BEACH NAILS set the mood for sunny escapes, salty swims, and easy outfits. This edit brings colour, shine, and playful details that feel fresh, wearable, and ready for holiday photos.
Think ocean blues, warm corals, and crisp whites, balanced with clean shapes. Each look works from poolside mornings to late dinners without feeling overdone.
You will spot simple accents and bolder designs that still feel effortless. Keep scrolling and pick a favourite that suits your plans, then save a few for later.
Table of Contents
- Soft Pastel Paradise: Peachy Pinks and Lavender Dreams
- Coral and Cream: Tropical Minimalism Done Right
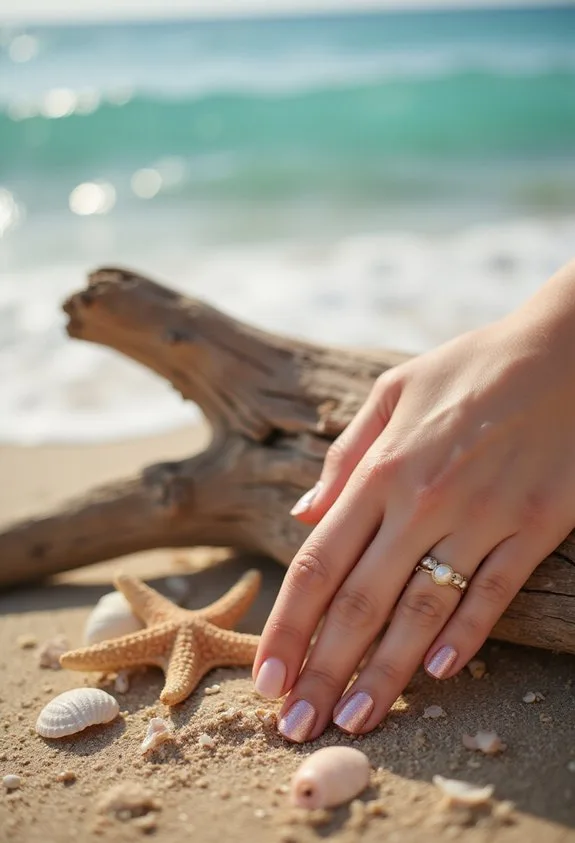
- Sandy Beige With Delicate Accents
- Minimalist Wave Line: Single Stroke Coastal Simplicity
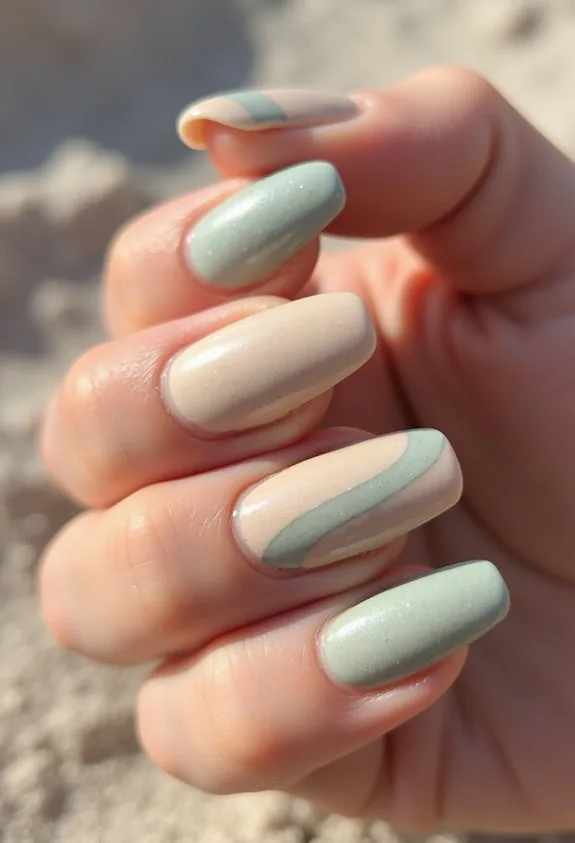
- Sea Glass Inspired: Frosted Pastel Ocean Colors
- Nude Base With Gold Foil Flakes: Understated Sparkle
- Rose Gold and Blush: Soft Romantic Beach Escape
- Ocean Blue Ombré: Gradient Waves on Your Fingertips
- Sunset Gradient Nails: Capturing Golden Hour Vibes
- Glitter Gradient: Sparkle That Fades Like Sunset
- Ombre Sand to Sea: Gradient From Beach to Ocean
- Sunset to Starlight: Day and Night Dual Design
- Metallic Gold Accents: Glamorous Shimmer for Any Design
- Aquamarine and Pearl: Luxe Coastal Elegance
- Holographic Beach Nails: Futuristic Vacation Shimmer
- Chrome Metallic Beach: Ultra-Shiny Futuristic Coastal Nails
- White French Tips With Beach Details: Modern Twist on Classic Style
- Mermaid Scale Design: Iridescent Scales That Shimmer
- Marble Beach Aesthetic: Swirled Coastal Elegance
- Ocean Wave Texture: 3D Dimensional Water Effects
- Dotted Ocean Waves: Playful Pattern Design
- Turquoise Tile Pattern: Mediterranean Inspired Design
- Geometric Tropical Print: Modern Abstract Beach Vibes
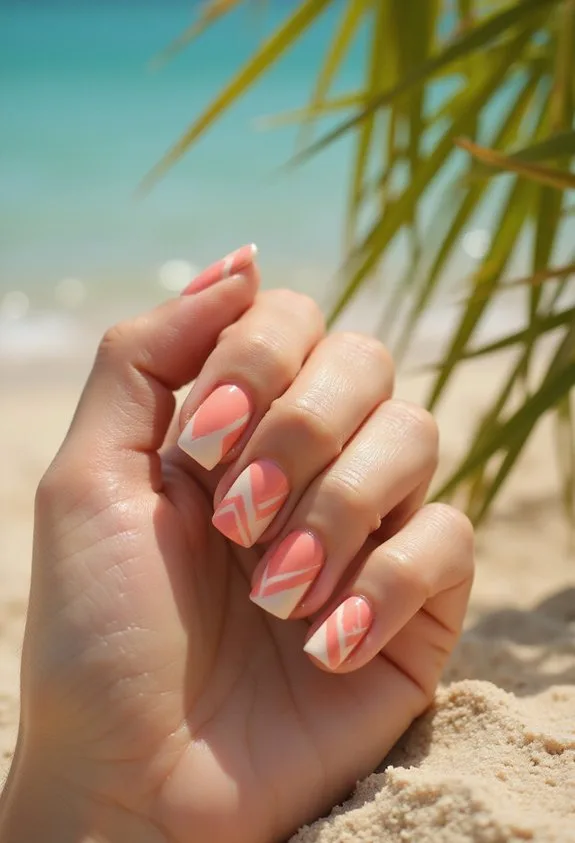
- Pastel Rainbow Chevron: Soft Directional Pattern
- Rainbow Beach Stripes: Colorful Vacation Energy
- Shell Accent Nails: Delicate Seashell Elegance
- Palm Tree Silhouettes: Simple Tropical Vibes
- Tropical Leaves and Vine: Lush Botanical Design
- Starfish and Starry Nights: Ocean-Inspired Celestial Designs
- Floral Hibiscus Design: Bold Tropical Blooms
- Tropical Fruit Medley: Watermelon, Pineapple, and Citrus Art
- Watercolor Beach Scene: Artistic Vacation Mood
- Sunset Clouds and Sky: Dreamy Ethereal Look
- Coconut Cream and Bronze: Warm Tropical Neutrals
- Tie-Dye Beach Nails: Groovy Vacation Vibes
- Neon Tropical: Vibrant Bold Beach Statement
- Frequently Asked Questions
- How Long Do Beach Nail Designs Typically Last Before Needing a Touch-Up?
- What Nail Polish Brands Work Best for Creating Smooth Ombre and Gradient Effects?
- Can I Apply These Designs at Home or Should I Visit a Professional?
- How Do I Protect My Beach Nails From Water Damage and Chlorine?
- What Base Coat and Top Coat Products Prevent Chipping During Vacation?
- Conclusion
Soft Pastel Paradise: Peachy Pinks and Lavender Dreams
When you’re craving that effortless beach-ready aesthetic, soft pastels deliver understated elegance without trying too hard. Peachy pinks and lavender create a sophisticated foundation for vacation nails that feel both modern and timeless.
Start with a creamy base coat like OPI’s “Bubble Bath” or Sally Hansen’s “Pale Dogwood” to establish your color story. These shades complement most skin tones beautifully. Layer on translucent finishes for dimensional depth without overwhelming your manicure.
Nail artist Maria Chen notes, “Soft pastels work best with rounded or almond shapes, enhancing their delicate appeal.” Add subtle dimension through ombre techniques or barely-there glitter accents along the tips.
You’ll want quick-dry topcoats for durability during beach activities. These understated hues maintain sophistication while screaming vacation mode—perfectly balanced for relaxation and style.
Coral and Cream: Tropical Minimalism Done Right
If soft pastels whisper sophistication, coral and cream shout joy with restraint. You’re embracing tropical minimalism—clean lines, strategic color blocking, negative space. A coral base paired with creamy French tips creates effortless coastal elegance. Think understated, not overdone.
Apply OPI’s “Living On the Bula-oulevard” as your foundation. Layer cream on the tips using precise, rounded edges for that coveted barely-there look. Nail artist Marcus Chen notes, “Minimalism requires flawless execution because nothing hides imperfection.”
Add dimensional interest through subtle texture. A matte topcoat on cream against glossy coral builds visual depth without clutter. You’re balancing warmth with coolness—the design’s secret strength.
Skip embellishments entirely. Let the color contrast speak. This combination works year-round, capturing vacation energy whenever you need it.
Sandy Beige With Delicate Accents

Understated elegance meets practicality in sandy beige—a neutral foundation that whispers rather than demands. You’ll love how this soft shade elongates your fingers while staying vacation-appropriate.
Layer a sheer beige base like OPI’s “Samoan Sand” for dimension. Add delicate white line work along the nail edge or minimalist wave designs using a thin brush. Consider subtle glitter accents near the cuticle area for understated shimmer.
“Sandy neutrals work beautifully because they complement every skin tone,” says celebrity nail artist James Boehmer. Mix matte and glossy finishes for textural interest. You can incorporate tiny seashell decals or negative space cutouts for sophistication.
This approach delivers polish without overwhelming your vacation aesthetic. The result? Nails that feel effortlessly chic, perfectly suited for beach walks and sunset dinners alike.
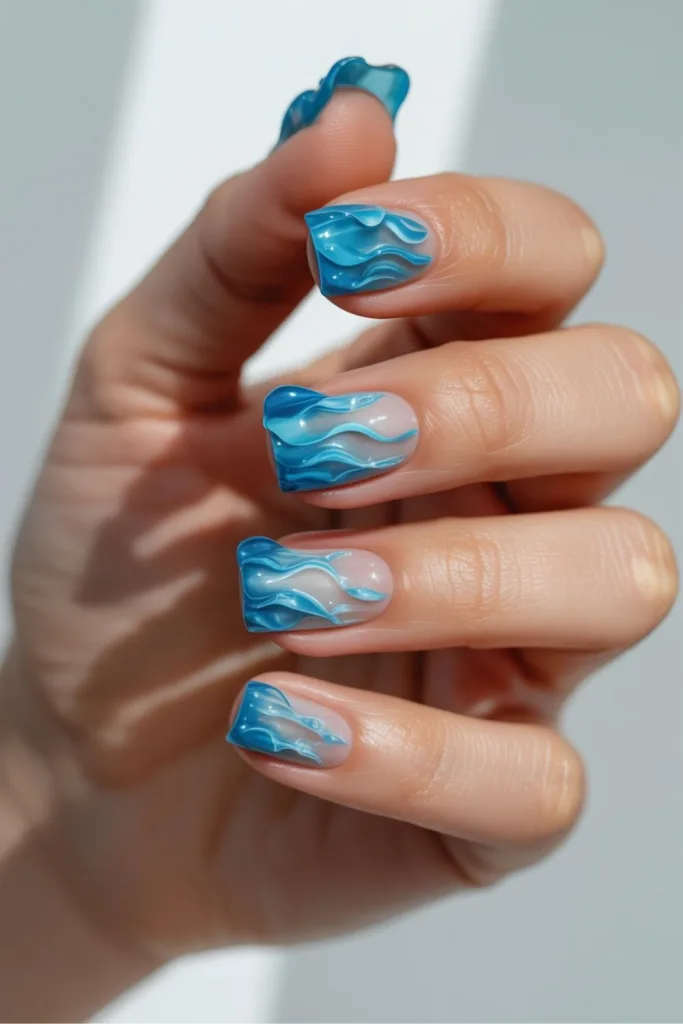
Minimalist Wave Line: Single Stroke Coastal Simplicity
A single brushstroke becomes your signature when you master the minimalist wave line. You’ll create coastal elegance with just one curved line across your nail. This technique requires steady hands and quality tools—grab a thin liner brush and a blue or gray gel polish for best results.
Start at the nail’s inner corner, moving upward in one fluid motion. The wave should feel natural, not perfectly geometric. According to nail artist Maria Chen, “One intentional stroke beats multiple hesitant ones every time.”
You’re layering sophistication onto a nude or cream base, letting negative space do the heavy lifting. This approach works beautifully on short nails. The minimalist wave reads polished without demanding attention. You’ve created something genuinely timeless—understated coastal charm that’ll have everyone asking your secret.
Sea Glass Inspired: Frosted Pastel Ocean Colors

Where minimalist strokes whisper elegance, sea glass nails speak in hushed, frosted tones that capture the ocean’s softer side. You’ll apply sheer pastels in seafoam, dusty blue, and pale sage across your nail beds. The frosted finish creates depth without overwhelming detail.
Layer a translucent base coat, then apply two thin coats of your chosen pastel shade. Add a milky topcoat to achieve that authentic sea glass texture. Consider brands like Essie or OPI for their quality frosted formulations.
You can enhance dimension by placing slightly deeper shades at the nail tips. This technique creates subtle gradient movement. According to nail artist Maria Chen, “Frosted finishes work best on longer nails where light naturally catches.” The muted palette pairs beautifully with your minimalist wave design, creating cohesive vacation-ready nails.
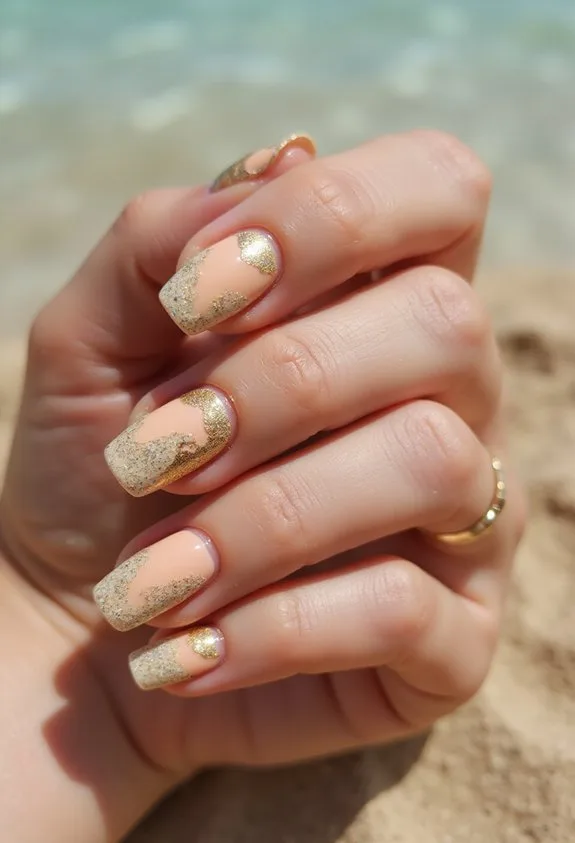
Nude Base With Gold Foil Flakes: Understated Sparkle
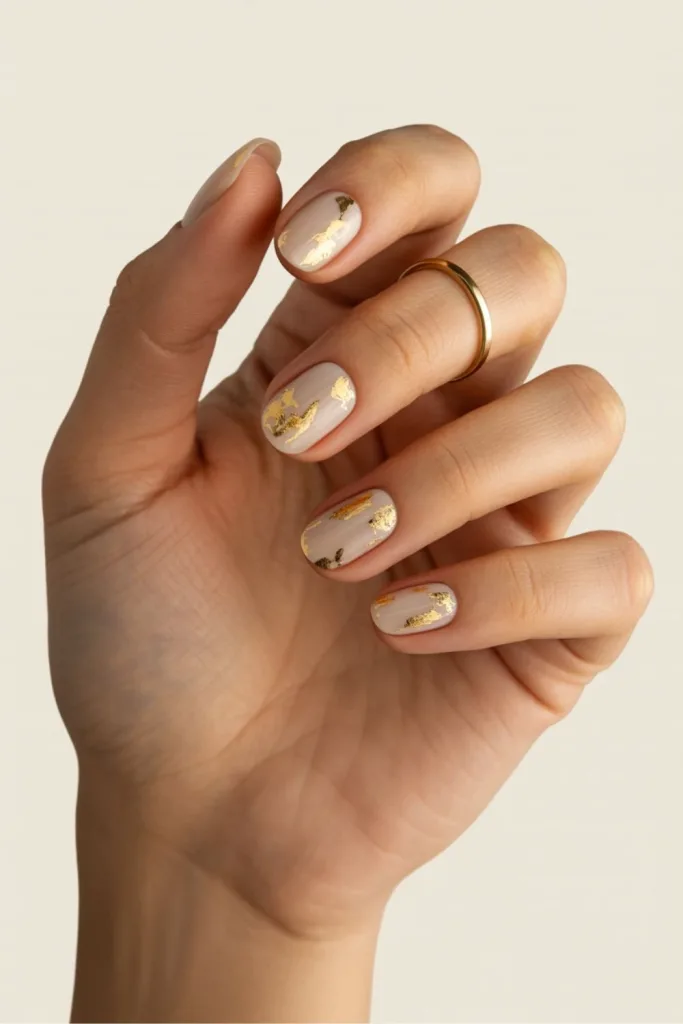
Sophistication doesn’t always demand boldness—sometimes it whispers through subtle shimmer and refined restraint. You’ll create an elegant foundation by applying two coats of nude polish that matches your skin tone perfectly. This neutral base becomes your canvas for understated luxury.
Next, strategically place gold foil flakes across your nails using a thin brush or dotting tool. Focus on the nail tips and accent fingers for dimensional interest without overwhelming your look. The Zoya Ornate collection offers excellent foil options for this technique.
“Gold foil reflects light beautifully while maintaining sophistication,” explains nail artist Marcus Chen. You’re not just adding sparkle—you’re creating depth and movement. Consider matte topcoat application over foils for contemporary contrast against glossy nude base. This approach delivers vacation-ready polish that photographs beautifully while remaining office-appropriate.
Rose Gold and Blush: Soft Romantic Beach Escape
When you’re chasing that dreamy beach getaway aesthetic, rose gold and blush create the perfect romantic nail combination. This soft palette elevates your vacation look without overwhelming your natural beauty.
Start with a creamy blush base coat. Layer rose gold shimmer across the nail tips for dimension and movement. The combination catches sunlight beautifully, creating that coveted vacation glow.
Key elements for this look:
- Soft blush cream base (try Essie Ballet Slippers)
- Rose gold chrome or foil accents
- Matte topcoat for sophisticated finish
- Nude-pink ombré blending technique
- Delicate gold line detailing
Pro tip: “Rose gold complements all skin tones because it bridges warm and cool undertones,” says celebrity nail artist Julie Kandalec. Apply shimmer strategically on tips and cuticle areas. This romantic combination works perfectly for sunset dinners and beach strolls.
Ocean Blue Ombré: Gradient Waves on Your Fingertips

Capture the mesmerizing movement of ocean waters with a blue ombré design that shifts from deep navy to soft aqua across your nails. You’ll start by applying a rich navy base coat, then gradually blend lighter blue shades toward your tips using a sponge technique. Layer translucent aqua polish over your nail bed, creating depth and dimension. The gradient effect mimics actual ocean waves rolling onto sand.
Use a fine detail brush to add subtle white streaks, suggesting seafoam and movement. According to nail artist Michelle Chen, “Ombré designs work best when you blend at least three color values gradually.” Apply a glossy top coat to enhance the water-like shimmer.
You’re creating an illusion of depth. This design works beautifully on both short and long nails. The result? Vacation-ready fingertips that capture summer’s essence perfectly.
Sunset Gradient Nails: Capturing Golden Hour Vibes
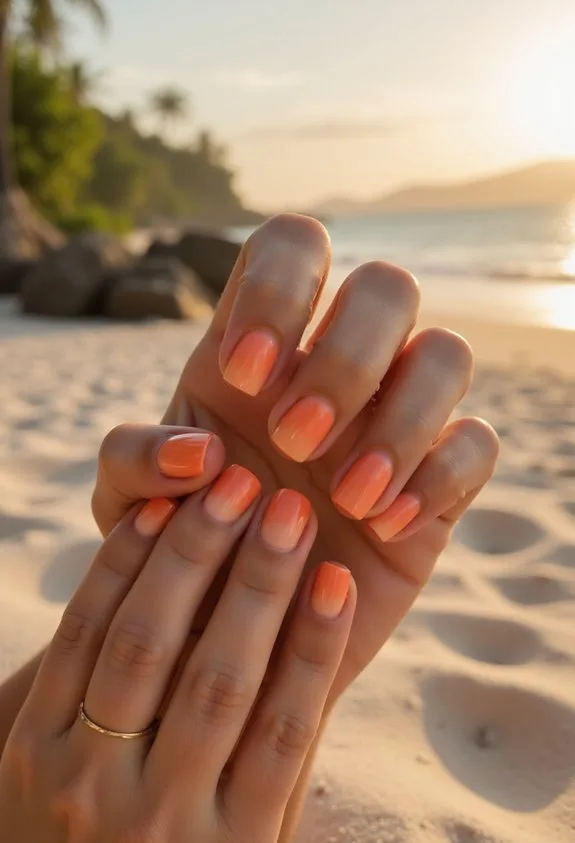
While ocean blues capture the cool refreshment of seaside escapes, sunset gradients bring warmth and romance to your fingertips. You’ll blend peachy corals, golden yellows, and deep oranges to recreate that magical golden hour on your nails. Start with a peachy base. Layer warm tones toward the tips using a sponge application technique for seamless blending.
Essential sunset gradient elements:
- Peachy-coral base shade for warmth and dimension
- Golden yellow mid-tone for authentic gradient progression
- Deep orange or burnt sienna accent color
- Fine detail brush for precision blending edges
- Matte topcoat to enhance the natural glow
As colorist Maya Chen notes, “Sunset gradients work best when you honor color temperature shifts.” You’re capturing nature’s most photogenic moment. Apply thin layers. Build gradually. Your nails become wearable art reflecting vacation dreams.
Glitter Gradient: Sparkle That Fades Like Sunset
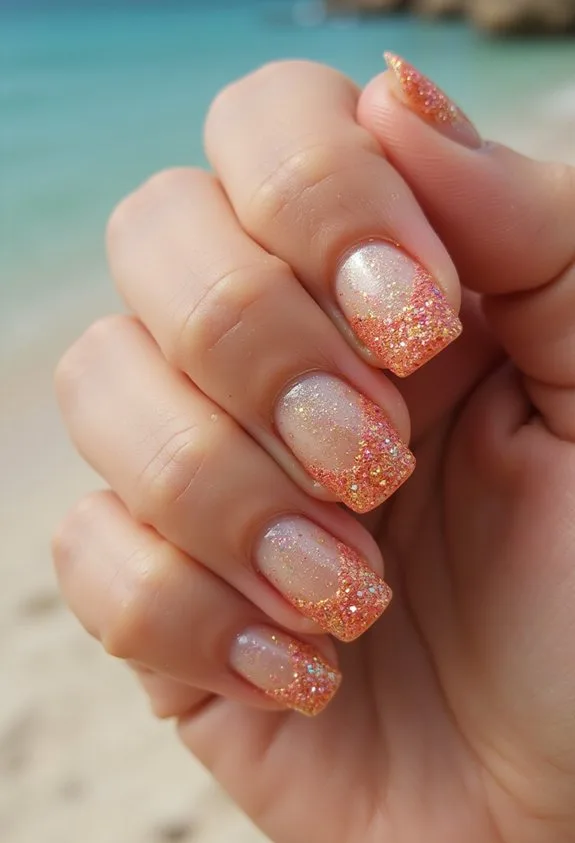
If you’ve mastered the sunset gradient, you’re ready to elevate it with strategic sparkle. Start by applying your golden-to-orange base, then layer fine glitter near the nail tips. Use a clear gel to secure pigmented sparkles that gradually fade toward the cuticle.
Celebrity nail artist Skylar Chen notes, “Glitter placement creates dimension without overwhelming the design.” Choose iridescent or rose-gold particles for subtle sophistication. Apply them densely at the free edge, spacing them wider as you move inward.
Products like Gelish Soak-Off Gel and OPI’s sparkle collections work beautifully for this technique. The gradient effect mimics sunset’s natural fading light. You’re creating movement on each nail. This design translates vacation energy into wearable art.
Ombre Sand to Sea: Gradient From Beach to Ocean

As you move beyond sunset hues, the beach-to-ocean gradient becomes your next creative frontier. This ombre technique shifts warm sandy tones into cool ocean blues, creating depth that mirrors actual shoreline colors.
Start with a peachy-beige base on your nail beds. Layer progressively darker shades toward your tips using a sponge application method for seamless blending. Sally Hansen’s Color Therapy collection offers excellent changing shades for this look.
Key application techniques:
- Apply base coat first for protection
- Sponge three gradient colors for smooth shifts
- Blend edges with a damp brush
- Seal with glossy top coat
- Add pearl accents for water shimmer
Professional colorist Maria Chen notes, “Gradient nails require patience during blending stages.” The sponging method eliminates harsh lines, delivering that coveted beachy sophistication everyone loves capturing in vacation photos.
Sunset to Starlight: Day and Night Dual Design

Once you’ve mastered the seamless gradient, you’re ready to flip the concept entirely. You’ll split your nail into two distinct halves: warm sunset hues on one side, cool starlight tones on the other.
Start with a base of peachy-coral polish. Apply golden and orange shades to create that sunset warmth. Move to deep purples and midnight blues for the night sky effect using a thin angled brush for precision.
Use OPI’s “Mali-Bbu to You” for sunset depth and Essie’s “Midnight Cami” for nighttime drama. A top coat seals both looks flawlessly.
As nail artist Sarah Chen states, “Dual designs showcase your personality’s multifaceted nature.” You’re fundamentally wearing vacation mood swings on your fingertips, celebrating both relaxation and adventure in one striking design.
Metallic Gold Accents: Glamorous Shimmer for Any Design
Whether you’re layering over your sunset-to-starlight design or starting fresh, metallic gold accents elevate any beach nail instantly. Gold shimmer works beautifully on shorter nails and complements warm skin tones exceptionally well.
Apply a sheer base coat first. This creates dimension and prevents direct contact with your nail surface. Consider these application methods:
- Thin brushstrokes along nail edges for subtle framing
- Full coverage as an accent nail on your ring finger
- Delicate dots scattered across a nude or coral base
- Gradient blending from gold to translucent tips
- Metallic swirls mimicking ocean waves
Brands like CND Shellac and OPI’s gold collections deliver professional-grade results. Allow proper curing time under UV light for maximum durability. Gold accents photograph beautifully in vacation pictures, catching natural sunlight perfectly. Your nails become conversation starters.
Aquamarine and Pearl: Luxe Coastal Elegance
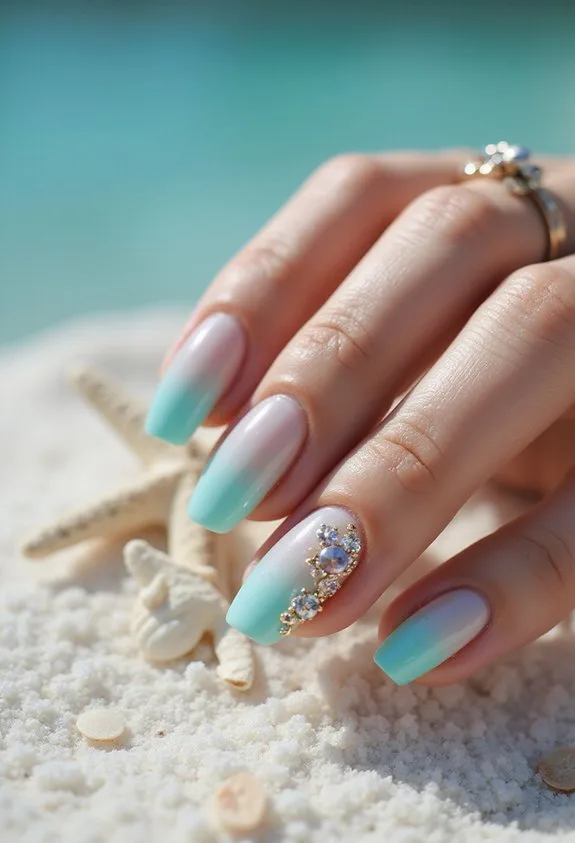
Aquamarine and pearl represent the ultimate luxe coastal palette. You’ll create sophisticated elegance by layering these complementary shades on your nails. Start with a creamy pearl base—try OPI’s “Pearl of Wisdom”—then accent with aquamarine tips or negative space designs. This combination captures ocean depth and sandy shorelines perfectly.
Add dimensional interest using matte and glossy finishes together. A nail artist at Vogue Beauty explains, “Mixing textures elevates simple color combinations into high-impact statements.” You can apply pearl with micro-glitter for subtle sparkle without overwhelming your look.
Consider chrome powder details along cuticle lines for extra refinement. Seal everything with a quality topcoat to maintain that luxe finish throughout your vacation. These shades work beautifully on short or long nails alike.
Holographic Beach Nails: Futuristic Vacation Shimmer
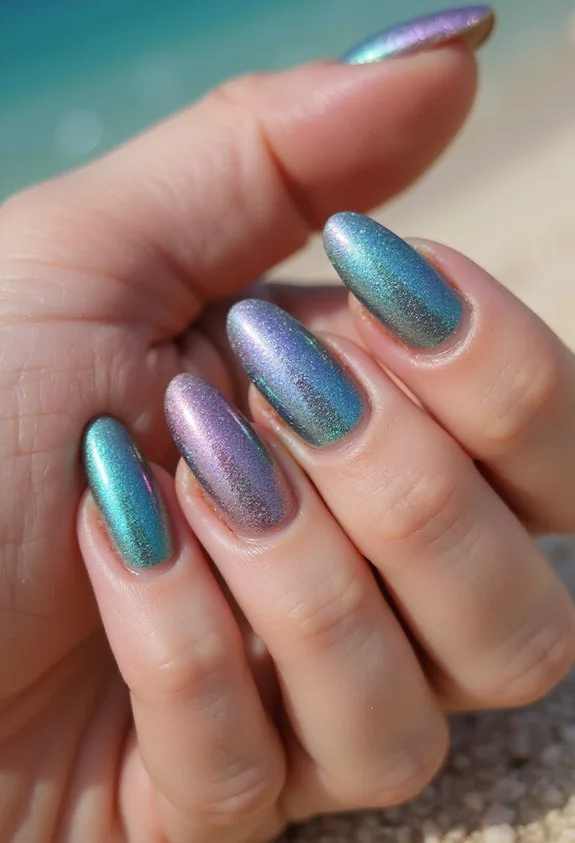
Three innovative finishes—chrome, holographic powder, and iridescent gel—transform your beach nails into mesmerizing light-catching designs. You’ll create vacation-ready manicures that shift colors as you move your hands.
Apply a glossy base coat first. Then layer holographic powder using a fluffy brush for seamless coverage. Here’s what makes this technique work:
- Holographic powders reflect rainbow hues under sunlight
- Chrome finishes create mirror-like metallic surfaces
- Iridescent gels blend multiple colors simultaneously
- Layering techniques enhance dimensional depth
- Sealed top coats protect the sheen
“Holographic nails capture light beautifully,” says nail artist Maya Chen. “The key is using quality powders and proper application methods.”
You’ll want to invest in brands like Lechat or Kiara Sky for best results. Build thin layers gradually for ideal color payoff. Your beach look demands this futuristic, shimmering aesthetic.
Chrome Metallic Beach: Ultra-Shiny Futuristic Coastal Nails

Chrome powder takes your beach manicure beyond holographic shimmer into pure metallic territory. You’ll achieve an ultra-reflective finish that mirrors light like polished metal. Apply a sticky base coat first, then press finely-milled chrome powder onto wet polish using a soft applicator pad. The result? Liquid-like shimmer that catches every angle.
Layer chrome over ocean-blue or seafoam bases for dimensional depth. You’re creating nails that look almost liquid. According to nail artist Maria Chen, “Chrome transforms ordinary colors into futuristic statements that photographs beautifully in natural light.”
Top with a glossy seal coat to lock everything down. Your manicure now features that coveted mirror-finish beach-glam aesthetic. Try brands like Lechat or Artistic for professional-grade chrome powders. These coastal nails demand attention without trying too hard.
White French Tips With Beach Details: Modern Twist on Classic Style
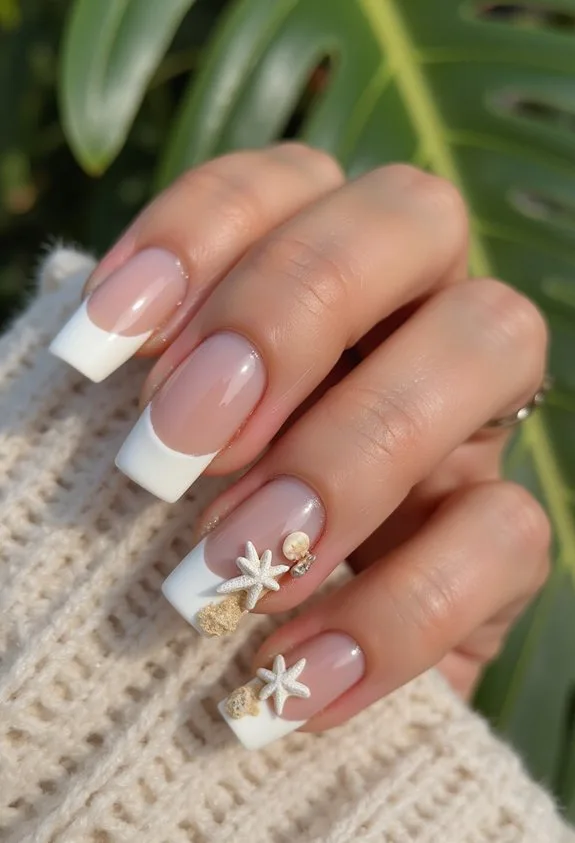
While chrome delivers pure metallic drama, white French tips offer timeless elegance with a modern coastal twist. You’re updating a classic manicure by incorporating subtle beach elements that feel fresh and sophisticated.
The beauty of this style lies in its versatility. White tips remain crisp and clean, while you customize the nail bed with delicate coastal details. Consider these enhancement options:
- Tiny seashell decals on accent nails
- Soft gradient washes mimicking ocean water
- Minimalist palm tree silhouettes
- Sand texture using fine glitter placement
- Thin gold striping suggesting sunset rays
Apply quality base coat before your white polish. Use gel formulations for longevity during vacation activities. Finish with glossy top coat for dimensional shine. Nail artist Jamie Chen notes, “French tips with subtle beach accents balance sophistication with seasonal appropriateness.”
Mermaid Scale Design: Iridescent Scales That Shimmer
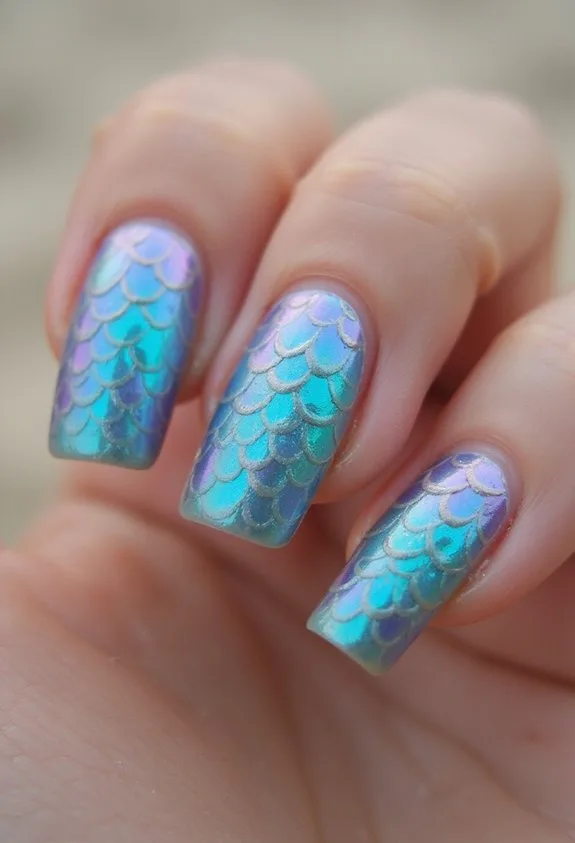
For those seeking something bolder than delicate coastal accents, mermaid scale designs deliver pure fantasy with serious shimmer appeal. You’ll layer iridescent flakes over jewel-tone base colors—deep teals, purples, and seafoam greens work beautifully. Apply a glossy top coat to maximize that light-catching quality.
The technique involves stamping or hand-painting overlapping scale patterns. Each nail becomes a miniature underwater landscape. Celebrity nail artist Trudi Kramer notes, “Iridescent pigments shift color depending on viewing angle, creating genuine depth.”
You can customize by mixing metallics—copper scales on blue bases, silver on emerald. Add tiny painted seashells or starfish details for dimensionality. This design requires patience during application but rewards you with a show-stopping vacation look. One coat of matte topcoat can tone down intensity if preferred.
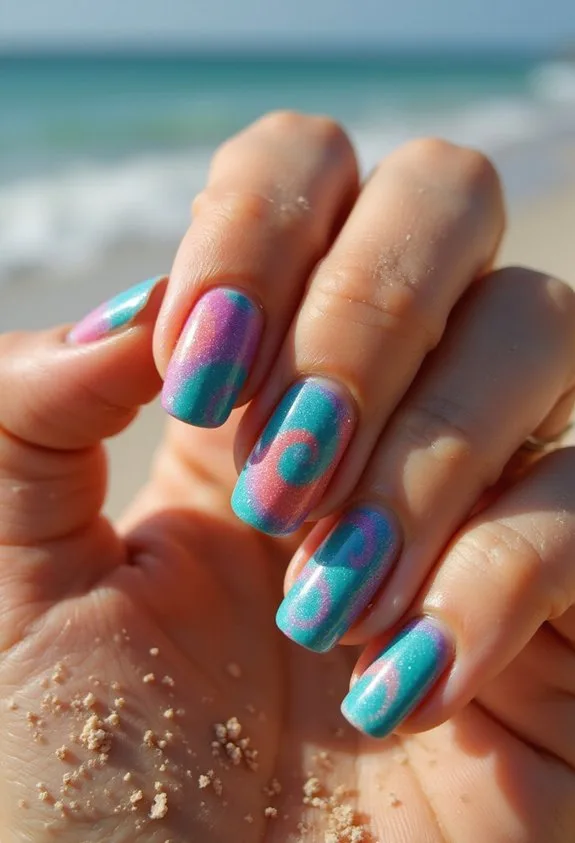
Marble Beach Aesthetic: Swirled Coastal Elegance
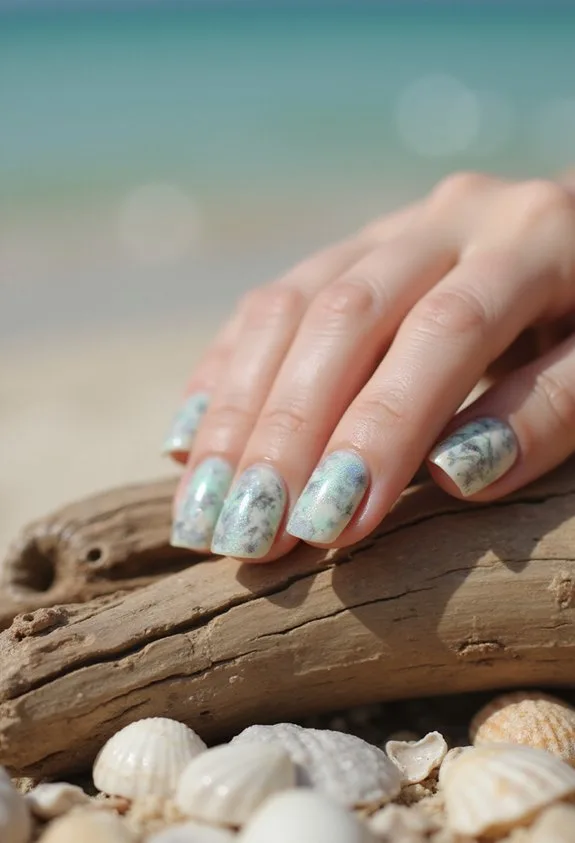
Swirled patterns that mimic natural stone bring understated sophistication to your beach nails. You’ll create this aesthetic by blending soft neutrals—creams, taupes, and pale grays—with veining techniques that suggest marble’s organic beauty.
Start with a creamy base coat. Use a thin brush or marbling tool to drag darker polish through wet base color, creating irregular lines. The key is unpredictability; nature doesn’t follow rules.
Essential techniques for marble beach nails:
- Apply semi-sheer topcoat for dimensional depth
- Layer complementary metallics sparingly for subtle shimmer
- Use quick, confident brush strokes
- Allow colors to blend naturally without overworking
- Seal with glossy finish for elegance
Pro colorist Sarah Chen notes, “Marble nails work because they’re sophisticated yet effortless-looking.” Your swirled design suits any beach outfit, from casual cover-ups to evening wear, delivering that coveted coastal-chic refinement.
Ocean Wave Texture: 3D Dimensional Water Effects
Building on marble’s elegance, you’ll now sculpt actual dimension into your nails with textured wave effects that catch light and movement. This technique transforms flat polish into tactile art. Use gel base coats paired with specialized texture powders or chunky glitter to create authentic water ripples across your nail surface. Layer translucent blues and teals strategically. Apply matte topcoat selectively—it’ll enhance the wave definition while glossy sections mimic water’s natural shine. According to nail artist Maria Chen, “Dimensional textures require patience during application; rushing causes uneven results.” Consider brands like LeChat or Gelish for their superior texture formulas. Build layers gradually, allowing each to cure completely. The result? Nails that literally look ocean-bound, perfectly capturing vacation’s essence without appearing cartoonish or overdone.
Dotted Ocean Waves: Playful Pattern Design
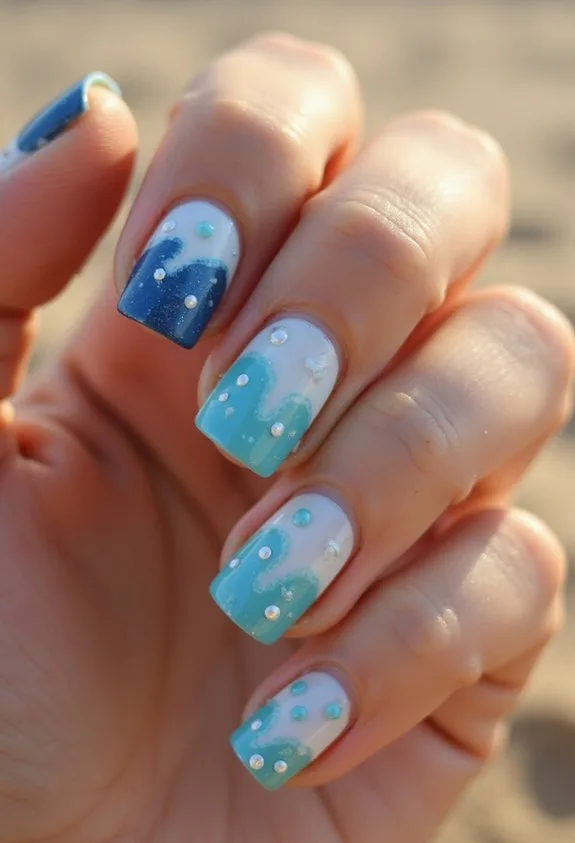
Why settle for solid colors when you can layer dots into dynamic wave patterns? This playful design technique transforms your nails into miniature ocean masterpieces using strategic dotting tools and precision application.
Create depth by layering dots in graduating sizes across your nail base. Use a fine dotting pen to establish wave crests, then fill in valleys with smaller dots for dimension. Consider these application techniques:
- Apply base coat for smooth dot adhesion
- Use contrasting colors for wave visibility
- Layer dots in curved formations mimicking water movement
- Build dimension through dot size variation
- Seal with glossy topcoat for luminous finish
According to nail artist Michelle Chen, “Dotted patterns allow clients to achieve professional results at home with patience and proper tools.” You’ll master this technique quickly with practice, creating vacation-ready nails that celebrate ocean energy and playful artistry throughout your beach getaway.
Turquoise Tile Pattern: Mediterranean Inspired Design
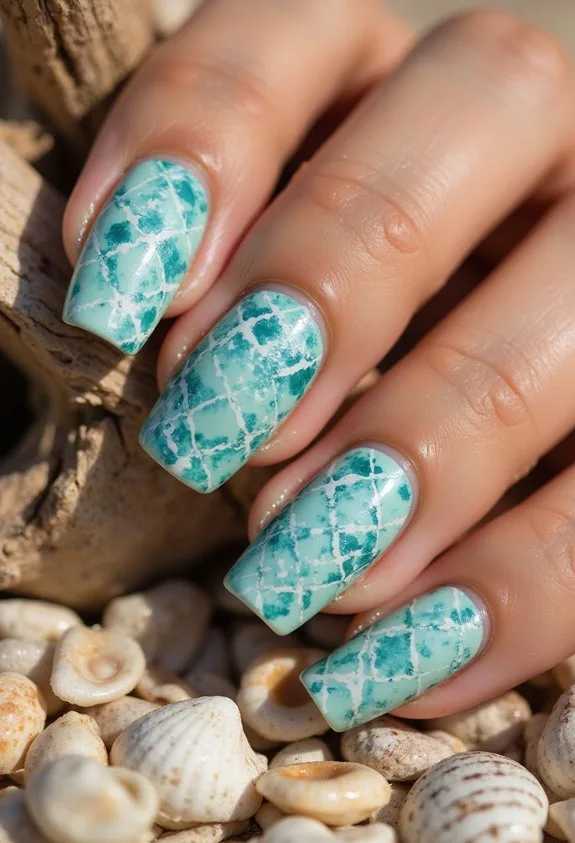
Transport your nails to sun-soaked coastal villages with geometric tile patterns that evoke Mediterranean charm. You’ll create depth by layering turquoise and white in repeating squares and diamonds across your nail surface. Start with a creamy turquoise base coat like OPI’s “Is That a Swim-Up Bar?” Then use a thin liner brush to hand-paint white geometric lines, creating authentic tile spacing. The pattern requires patience but rewards you with vacation-ready elegance. Add one accent nail featuring a solid turquoise with delicate white grout lines for visual interest. Seal everything with a glossy top coat to enhance the ceramic tile effect. This design transports you instantly, no plane ticket required. You’re fundamentally wearing wearable art that celebrates coastal living.
Geometric Tropical Print: Modern Abstract Beach Vibes
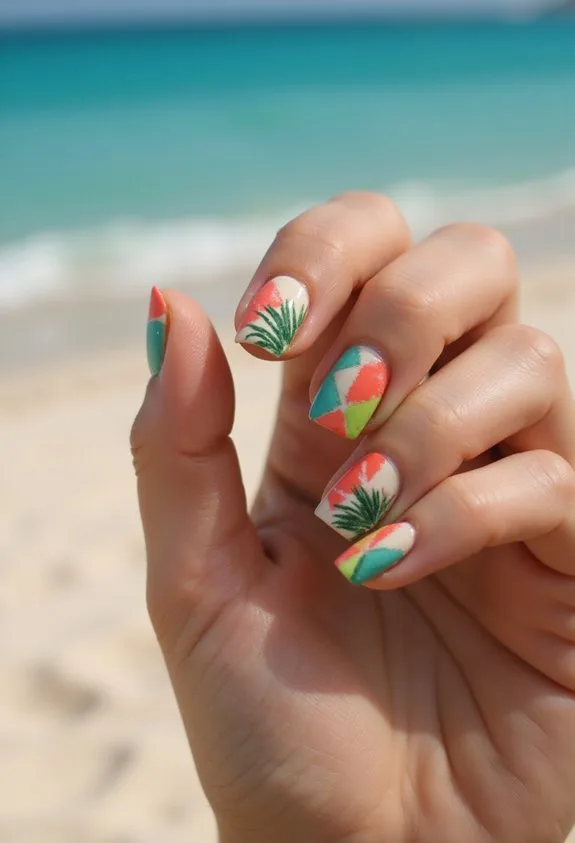
If you’re ready to level up from traditional tile patterns, geometric tropical prints deliver bold sophistication with an artistic edge. These designs combine angular shapes with vibrant island-inspired colors, creating visually striking nail art that captures modern beach energy.
Essential geometric tropical techniques:
- Layer overlapping triangles in coral, navy, and lime
- Use negative space strategically for balance
- Apply metallic accents on geometric lines
- Combine matte and glossy finishes for contrast
- Incorporate abstract palm leaf silhouettes
Start with a cream base coat. Apply geometric shapes using thin art brushes or stamping plates. Nail artist Sarah Chen notes, “Precision matters—clean lines elevate the entire look from casual to gallery-worthy.”
Finish with a glossy topcoat to enhance color depth. We can’t get enough of these modern designs that bring sophisticated vacation vibes straight to your fingertips.
Pastel Rainbow Chevron: Soft Directional Pattern
While geometric prints bring bold artistic energy, pastel rainbow chevrons offer a softer, more playful direction for your beach nail aesthetic. You’ll layer delicate hues—soft pink, lavender, mint, and peach—in V-shaped directional patterns that create visual movement without overwhelming the nail. This design celebrates understated elegance. Apply a cream base coat first. Use thin striping brushes or nail art pens to draw clean chevron lines at 45-degree angles. Pro tip: “Chevrons guide the eye and elongate the nail bed,” says nail artist Maya Chen. Try OPI’s “Do You Have This Color in Stock-holm” paired with Essie pastels. The overlapping angles add dimension while maintaining that vacation-ready softness. You’re creating sophistication through gentle color play and geometric precision. This style works perfectly on medium to long nails.
Rainbow Beach Stripes: Colorful Vacation Energy
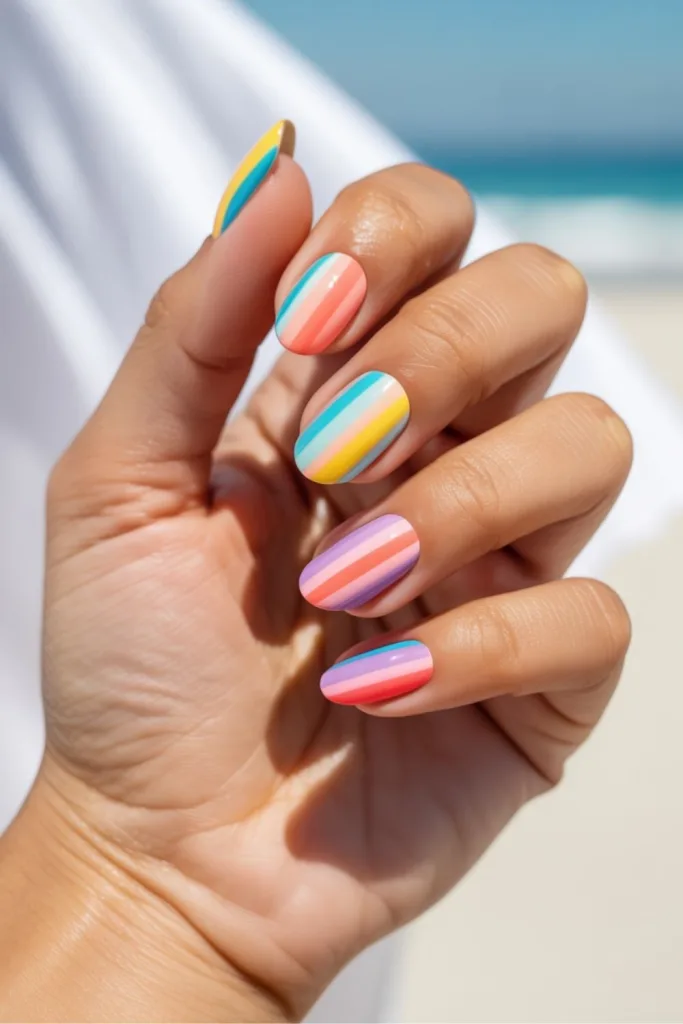
After the understated elegance of chevrons, rainbow beach stripes bring bold, playful energy that screams tropical getaway. You’ll create horizontal bands of vibrant hues across your nail bed, layering polish in precise, even lines. Start with a white base coat for maximum color saturation and vibrancy.
Build your rainbow strategically:
- Red, orange, yellow, green, blue stripes in sequence
- Use thin striping brushes for clean, defined edges
- Apply two coats per color for opacity
- Seal with glossy topcoat for dimension and protection
- Consider ombré fading between color shifts
Pro colorist Maria Chen notes, “Thin stripes elongate the nail visually while maintaining design cohesion.” You’ll want gel polish here—it holds crisp lines better than traditional lacquer. Finish with a matte topcoat if you prefer understated sophistication, or keep it glossy for beachy shine.
Shell Accent Nails: Delicate Seashell Elegance
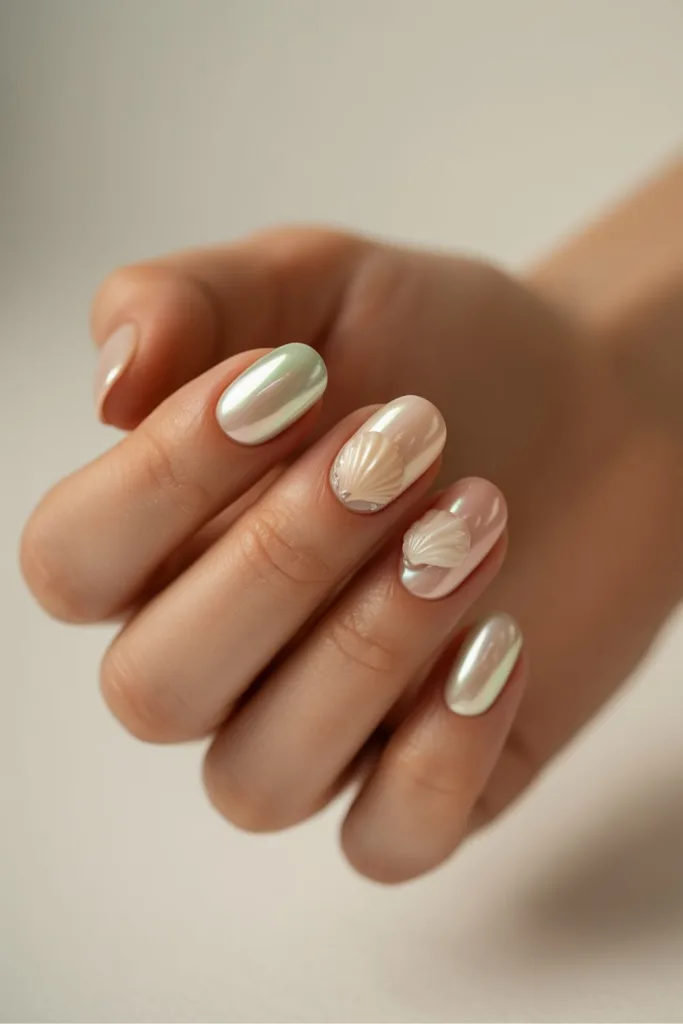
Seashell accents transform your nails into miniature ocean treasures. You’ll achieve this elegant look by layering tiny shell fragments or hand-painted designs onto a soft nude or cream base. The technique requires precision and patience. Apply a glossy top coat to seal everything beautifully.
You can use real crushed seashells mixed with gel polish for authentic texture. Alternatively, opt for detailed shell decals from brands like Zoya or Sally Hansen. These stick directly onto wet polish. Position them strategically on accent nails for maximum visual impact.
“Shell accents work best on shorter nails where they don’t overwhelm,” says celebrity nail artist Jenny Kim. Consider pairing them with soft pastels or metallics. This combination creates sophisticated beach elegance. Your vacation vibes radiate effortlessly through these delicate, ocean-inspired details.
Palm Tree Silhouettes: Simple Tropical Vibes
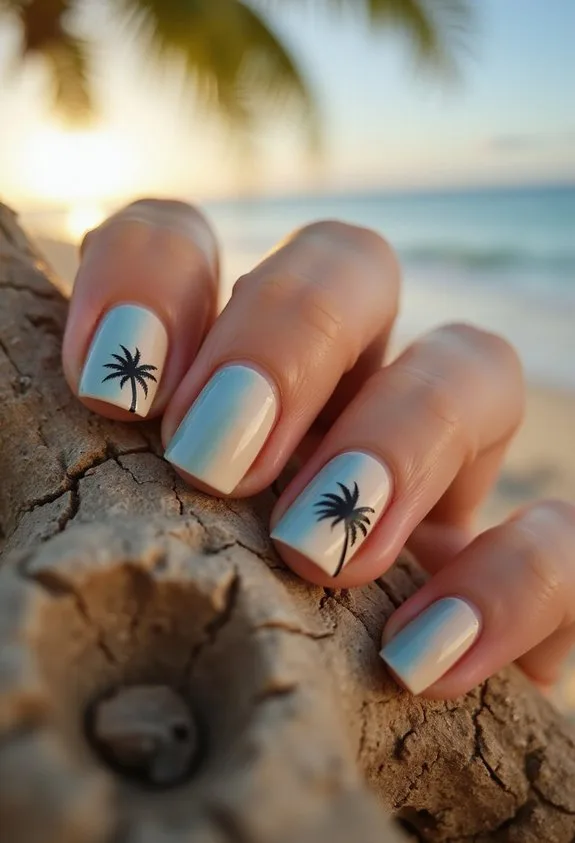
Because palm trees instantly evoke vacation destinations, they’re perfect for beach nail art. You’ll create striking silhouettes by painting thin, elegant fronds against neutral or vibrant backgrounds. This design works beautifully on short and long nails alike.
Key elements for palm tree silhouettes:
- Use gel polish for precision linework and longevity
- Layer matte and glossy topcoats for dimensional contrast
- Paint fronds in black, deep green, or bronze metallic shades
- Position multiple trees at varying heights for depth
- Combine with gradient sunset backgrounds for impact
Apply a base color first, then sketch your palm outline lightly. Use a thin brush or dotting tool to paint delicate fronds radiating outward. Seal everything with a glossy topcoat. Celebrity nail artist Jin Soon recommends this approach: “Silhouettes simplify tropical designs while maintaining sophistication.” Your vacation aesthetic awaits.
Tropical Leaves and Vine: Lush Botanical Design

While silhouettes capture tropical essence with minimalist elegance, you can elevate your beach nails further by layering botanical elements that feel garden-fresh and vibrant. Start with a soft cream or pale aqua base coat. Hand-paint delicate leaf outlines using thin brushes and forest green polish. Layer darker vines that curve organically across your nail surface, creating natural movement and depth.
You’ll want to add dimension through strategic shading. Apply lighter sage tones to leaf centers, then deepen edges with forest or olive hues. Consider adding tiny botanical details—small flowers nestled among foliage or subtle texture work using dotting tools.
Seal everything with glossy top coat. These intricate designs transform nails into miniature tropical gardens. The result? Sophisticated vacation vibes that feel effortlessly botanical and undeniably polished.
Starfish and Starry Nights: Ocean-Inspired Celestial Designs
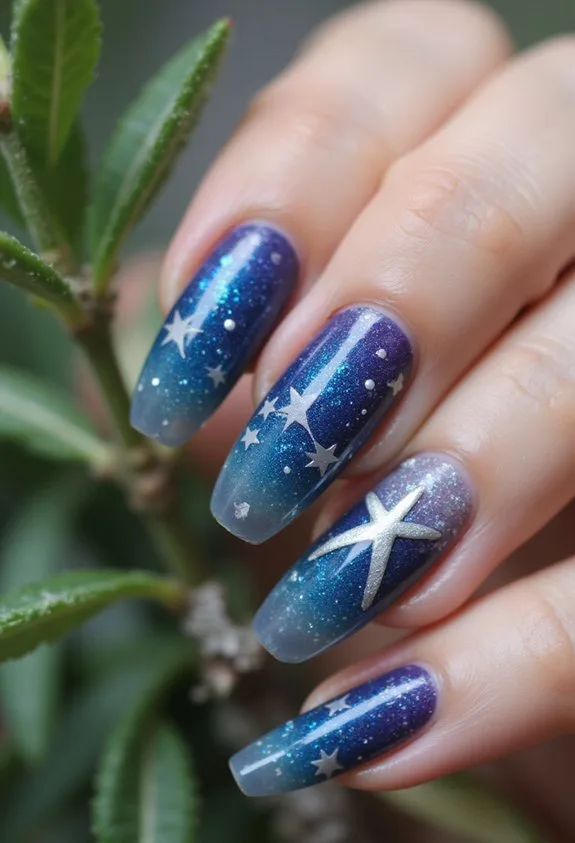
As day transforms to dusk on your beach vacation, the night sky above the ocean becomes your nail inspiration. You’ll create stunning celestial designs by layering deep navy and black bases with glittering accents.
Starfish designs demand precision. Hand-paint five-pointed stars using white gel polish, adding gradient shading for dimension. Layer translucent topcoat to capture that underwater glow.
Consider these celestial elements:
- Tiny starfish scattered across navy backgrounds
- Silver constellation patterns connecting dots
- Gradient skies shifting from purple to midnight blue
- Glitter halos surrounding each star detail
- Metallic constellations on nude base colors
Celebrity nail artist Jin Soon explains, “Ocean-inspired designs work best with contrast. Dark bases make celestial details pop dramatically.” Use gel formulas like Gelish or OPI for lasting vacation wear.
Floral Hibiscus Design: Bold Tropical Blooms
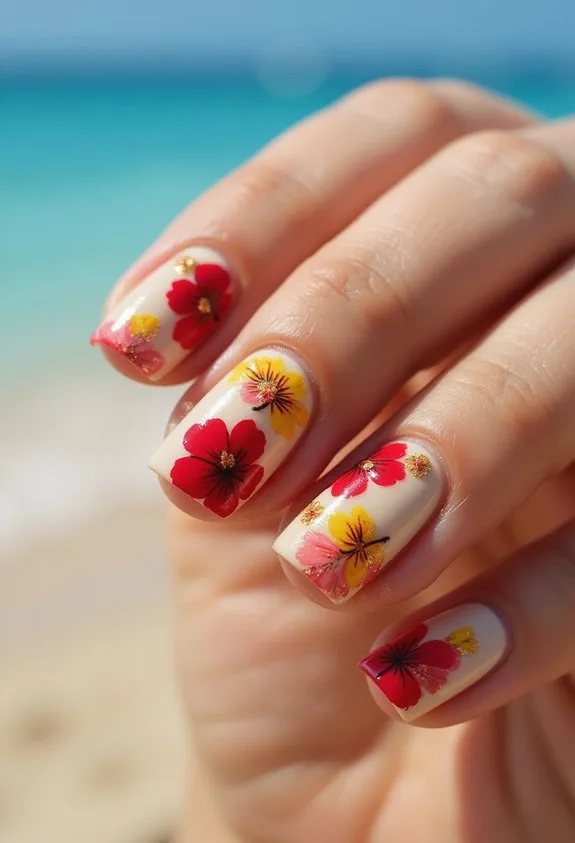
Nothing screams beach vacation quite like vibrant hibiscus flowers blooming across your fingertips. You’ll want to start with a nude or cream base coat that lets the florals pop. Layer bold pinks, corals, and deep magentas using thin nail art brushes for precision petals. Add dimension by applying darker shades to create depth within each bloom.
Consider using gel polish for extended wear during your trip. “Hibiscus designs work best on longer nails where you’ve got real estate for detail,” notes celebrity nail artist Maria Chen. You can hand-paint delicate flowers or use nail decals for faster application. Include complementary greenery using sage or forest green polish. Finish with a glossy topcoat that catches sunlight beautifully, making your tropical manicure absolutely luminous throughout your vacation days.
Tropical Fruit Medley: Watermelon, Pineapple, and Citrus Art
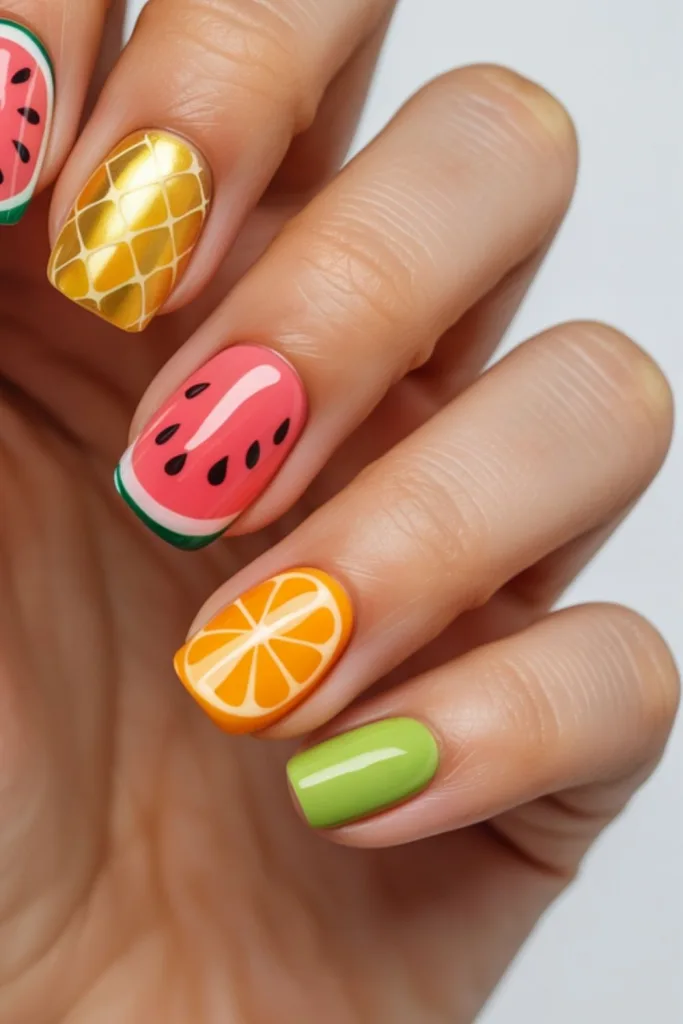
Tropical fruits bring playful energy to your beach nails with their vibrant colors and instantly recognizable shapes. You’ll create eye-catching designs that capture vacation vibes effortlessly.
Start with a crisp white or soft nude base. Layer your fruit art using gel polishes for durability and shine. Watermelon designs feature bright pink and green with black seeds for contrast. Pineapple patterns showcase golden yellow bodies with crosshatch detailing. Citrus fruits—oranges, lemons, limes—offer versatility in placement and sizing.
Essential techniques:
- Use thin nail art brushes for precise details
- Apply matte topcoat on fruit sections for dimension
- Combine glossy and matte finishes strategically
- Layer colors for realistic depth
- Seal designs with UV-resistant gel topcoat
Nail artist Jamie Chen notes, “Tropical fruits work beautifully on accent nails paired with solid summer colors.” You’ll achieve salon-quality results with practice and quality products like Gelish or Orly gels.
Watercolor Beach Scene: Artistic Vacation Mood
While fruit designs celebrate bold, recognizable imagery, watercolor beach scenes offer a softer, more artistic approach to vacation-inspired nails. You’ll blend soft blues, sandy beiges, and coral hues using a damp brush technique. Layer translucent gel polishes to create depth and movement across your nail canvas. Apply base coats in cream or pale yellow first. Then, use water-based watercolor pigments mixed with gel medium for fluid brushstrokes. The result feels painterly and organic. Consider adding fine details like palm trees or ocean waves using thin liner brushes. Seal everything with glossy top coat for protection. According to nail artist Maria Chen, “Watercolor techniques require patience but deliver sophisticated, gallery-worthy results.” You’re fundamentally wearing wearable art that captures vacation serenity beautifully.
Sunset Clouds and Sky: Dreamy Ethereal Look
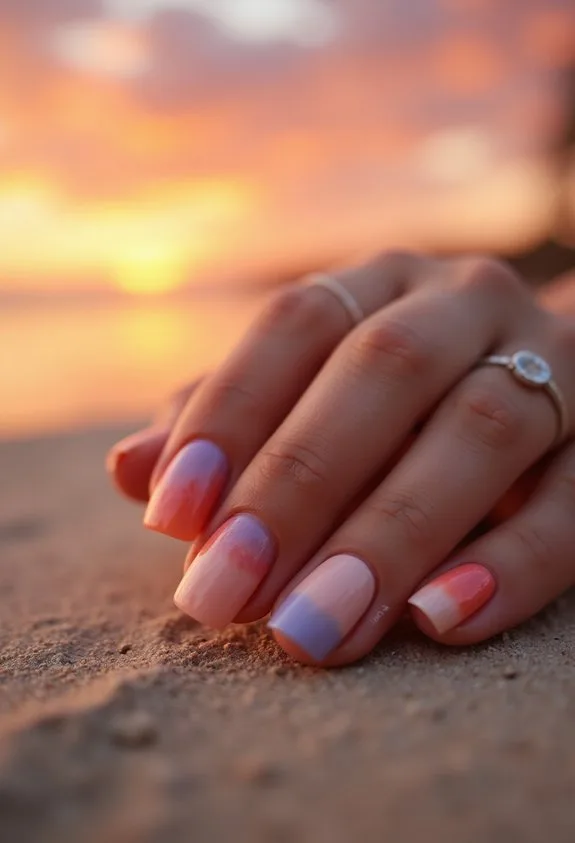
If you’re chasing that magical golden-hour feeling on your fingertips, sunset cloud designs deliver pure dreamy sophistication. You’ll blend soft peachy tones with lavender and coral gradients using sponging techniques for seamless color shifts. This aesthetic captures that ethereal vacation mood perfectly.
Key Elements for Sunset Cloud Nails:
- Sponge peachy, pink, and purple shades onto nude or cream base coats
- Layer translucent glitters for dimensional shimmer and depth
- Use fine detail brushes for wispy cloud formations
- Apply matte topcoat selectively for contrast with glossy sections
- Add gold leaf accents along cloud edges for luxury
According to nail artist Maria Chen, “Sunset designs work because they’re naturally forgiving—blending imperfections into the aesthetic.” You’ll want quality sponges and gel polish for longevity. These nails photograph beautifully and require minimal maintenance during your vacation.
Coconut Cream and Bronze: Warm Tropical Neutrals

Warm neutrals bring that effortless tropical elegance to your fingertips without demanding bold color. You’ll love how creamy coconut shades pair with bronze accents for sophisticated vacation vibes.
Essential Warm Neutral Elements:
- Creamy ivory and champagne base coats that elongate nails
- Metallic bronze and rose gold accents for dimension
- Warm terracotta and peach undertones for skin compatibility
- Matte finishes paired with glossy topcoats for contrast
- Nude-brown gradients mimicking sandy beach aesthetics
Layer a coconut cream polish with delicate bronze striping on your ring and pinky fingers. This creates visual interest without overwhelming your look. Apply a shimmering topcoat to bronze sections only for dimensional texture.
As nail artist Marcus Chen notes, “Warm neutrals work universally because they complement all skin tones while maintaining understated sophistication.” You’re fundamentally capturing sun-kissed beach days in a wearable format.
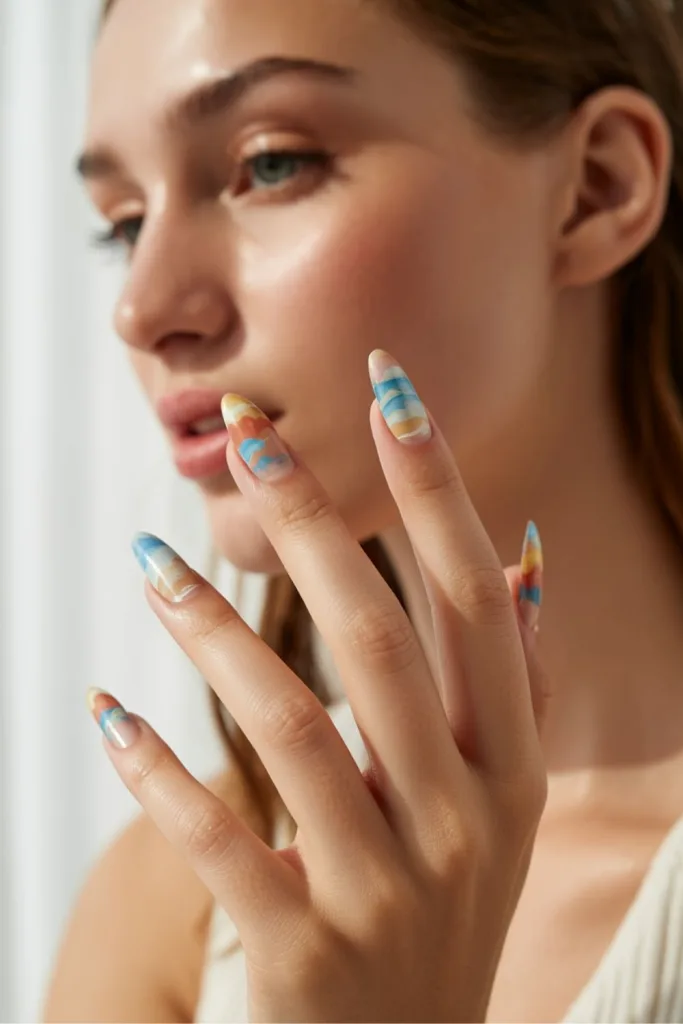
Tie-Dye Beach Nails: Groovy Vacation Vibes
While warm neutrals offer understated elegance, tie-dye beach nails bring playful energy to your vacation look. You’ll create this trendy design using water-marbling or freehand techniques. Start with a white or cream base coat as your foundation layer. Drop complementary colors—think ocean blues, sunset pinks, and tropical yellows—onto the nail surface. Swirl them together using a thin brush or toothpick for that signature psychedelic effect. Pro tip: “Tie-dye works best with high-contrast color combinations,” says nail artist Maria Chen. Seal everything with a glossy topcoat to enhance vibrancy. This style screams vacation confidence. You’re fundamentally wearing wearable art on your fingertips. CND’s Shellac or Gelish polish lines provide excellent pigmentation for these bohemian designs. Add metallic accents between swirls for dimensional appeal.
Neon Tropical: Vibrant Bold Beach Statement

Because summer demands a statement that can’t be ignored, neon tropical nails deliver that electric punch through fearless color combinations. You’ll layer brilliant lime greens, hot pinks, and electric oranges across your nail canvas. The key is strategic placement—try a neon gradient that moves from one vibrant shade to another across each nail. Apply OPI’s “Neon collection” as your base for maximum vibrancy and longevity. Add dimensional details through glitter accents or metallic striping. According to nail artist Marcus Chen, “Neon designs require ultra-glossy top coats to amplify their intensity.” You can also incorporate small tropical elements like palm fronds or hibiscus flowers using thin detail brushes. Seal everything with a high-shine gel topcoat. This approach transforms your nails into wearable vacation energy.
Frequently Asked Questions
How Long Do Beach Nail Designs Typically Last Before Needing a Touch-Up?
You’ll typically enjoy your beach nail designs for two to three weeks before you’ll need a touch-up. However, you can extend their lifespan by protecting them from excessive sun exposure and saltwater. You’ll notice faster fading if you’re constantly swimming.
What Nail Polish Brands Work Best for Creating Smooth Ombre and Gradient Effects?
You’ll achieve the smoothest ombre and gradient effects with brands like OPI, Essie, and Sally Hansen. They’re known for their pigment-rich formulas that blend beautifully. Gel polishes from Shellac and Gelish also work exceptionally well for creating flawless gradients.
Can I Apply These Designs at Home or Should I Visit a Professional?
You can definitely create ombre and gradient nails at home with practice. However, if you’re new to the technique, you’ll get better results visiting a professional first. They’ll show you proper application methods, then you can replicate them yourself.
How Do I Protect My Beach Nails From Water Damage and Chlorine?
You’ll protect your beach nails by applying a waterproof top coat before swimming. Wear gloves when possible, rinse your nails with fresh water after chlorine exposure, and moisturize cuticles daily. Reapply top coat every few days for maximum protection.
What Base Coat and Top Coat Products Prevent Chipping During Vacation?
You’ll prevent chipping by applying a strong base coat like gel or calcium-reinforced formula, then seal everything with a glossy top coat. You should reapply top coat every two days during vacation for maximum durability and shine.
Conclusion
You’ve got 38 stunning designs to choose from. Whether you’re drawn to soft pastels or bold neons, there’s a beach nail style waiting for you. Pick your favorite look, gather your polishes, and transform your nails into a vacation escape. These designs prove you don’t need an actual beach trip to feel those summer vibes. Your nails can be your getaway.