
Ironing a pleated skirt can seem tricky, but it doesn’t have to be. Pleated skirts are a timeless fashion staple, loved for their elegant and stylish look. To keep your pleated skirt looking sharp, it’s important to know how to iron it properly. This guide will help you maintain those crisp pleats with simple, easy-to-follow steps.
Table of Contents
Pre-Ironing Steps
Washing and Drying the Skirt: Before you start ironing, make sure your pleated skirt is clean. Follow the washing instructions on the care label to avoid damaging the fabric. Once washed, hang the skirt to dry to minimize wrinkles.
Dampen the Pleats: Using a spray bottle, lightly mist the pleats with water. This will make the fabric easier to iron and help set the pleats. Be careful not to soak the skirt; a light misting is enough.
Arrange the Pleats: Lay the skirt flat on the ironing board, making sure each pleat is aligned properly. Smooth out any wrinkles by hand. Take your time to ensure the pleats are perfectly arranged before you start ironing. This step is crucial for achieving a crisp, professional finish.
Ironing Techniques for Pleated Skirts
Ironing pleated skirts requires precision and care to maintain their crisp, structured look. Follow these step-by-step techniques to achieve perfect pleats every time.
Using a Pressing Cloth
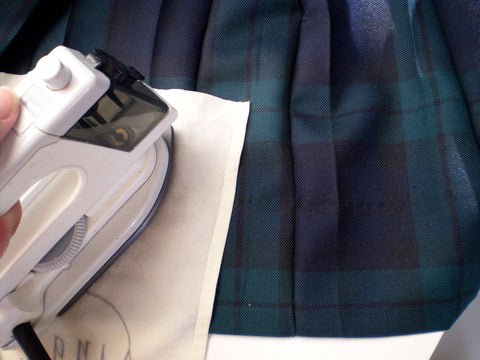
To protect delicate fabrics, place a pressing cloth (like a clean cotton or linen cloth) over the pleats. This acts as a barrier between the iron and the skirt, preventing any potential scorch marks or shine.
Step-by-Step Guide to Ironing Each Pleat
Start from the Top: Begin at the waistband of the skirt. Align the iron at the top of the pleat and press downward. Avoid moving the iron back and forth to maintain the pleat’s sharpness.
Move Downward: Slowly move the iron down the pleat, applying gentle pressure. This helps to set the pleat in place without flattening it.
Iron Both Sides: For an extra crisp look, iron both the front and back sides of each pleat. This ensures the pleat is evenly pressed and holds its shape.
Re-Align as Needed: As you work through the pleats, periodically check and re-align them to ensure they stay in place. Use your hands to smooth out any wrinkles or misaligned pleats.
Applying Light Pressure: When ironing pleats, use light pressure to avoid flattening them. The goal is to set the pleats without making them look stiff or overly pressed.
Using Starch Spray
If you want extra sharp pleats, consider using a starch spray. Lightly mist the pleats with the spray before ironing. This will help the pleats stay crisp for a longer period. Be sure to follow the instructions on the starch spray bottle for the best results.
By following these techniques, you’ll be able to maintain the elegant look of your pleated skirt and keep it looking fresh and stylish.
Also Read: Chessy Parent Trap Outfit
Tips and Tricks
Dealing with Stubborn Wrinkles and Creases
Sometimes, pleated skirts can develop stubborn wrinkles that are hard to remove. Here are a few tips to tackle them:
Use Steam: If your iron has a steam function, use it to help relax the fabric. Hold the iron a few inches above the pleats and let the steam penetrate the fabric before pressing.
Steam Iron: Consider using a handheld steam iron or a garment steamer to gently smooth out wrinkles. This is especially useful for delicate fabrics that may not respond well to direct ironing.
Re-dampen and Iron Again: If wrinkles persist, lightly mist the pleats with water again and re-iron them using a pressing cloth. This can help in loosening and removing tough creases.
Role of Starch Sprays
Starch sprays can be a game-changer when it comes to maintaining sharp pleats. Here’s how to use them effectively:
Light Application: Spray a light, even layer of starch onto the pleats before ironing. Too much starch can make the fabric stiff and uncomfortable.
Test First: Always test the starch spray on a small, inconspicuous area of the skirt first to ensure it doesn’t discolor or damage the fabric.
Iron Immediately: After applying the starch, iron the pleats while they are still damp. This will help set the starch and create crisp, long-lasting pleats.
Using a Pleat Board or Pleat Clips
For added precision and ease, consider using a pleat board or pleat clips:
Pleat Board: A pleat board is a handy tool that helps keep pleats in place while you iron. Simply align the pleats with the grooves on the board and iron over them. This can save time and ensure uniformity.
Pleat Clips: These are small clips designed to hold pleats in place. Clip the top and bottom of each pleat to keep them aligned while you iron. This is especially useful for skirts with many pleats or intricate designs.
Additional Tips
Iron Inside Out: For delicate fabrics, consider ironing the skirt inside out. This reduces the risk of damage and prevents shine marks on the fabric.
Avoid Overheating: Always start with a lower heat setting and gradually increase if needed. Overheating can scorch the fabric and ruin the pleats.
Frequent Touch-Ups: If you wear your pleated skirt often, give it regular touch-ups to keep the pleats sharp. A quick steam or light ironing can help maintain the look without much effort.
By incorporating these tips and tricks into your ironing routine, you’ll be able to keep your pleated skirt looking immaculate and stylish with minimal effort.
Conclusion
Ironing a pleated skirt may seem challenging, but with the right techniques and a bit of practice, you can master it easily. By following the steps to prepare your skirt, using the correct ironing techniques, and applying helpful tips and tricks, you’ll ensure your pleats remain crisp and sharp. Remember, the key is patience and attention to detail. Now, with your perfectly ironed pleated skirt, you’re ready to step out in style. Happy ironing!