
Minimalist nails offer that simple, understated elegance that never goes out of style or looks dated. This refined approach strips away the noise and focuses on clean, intentional design. It’s the nail trend for people who value sophistication over drama.
What makes minimalist nails so brilliant is their timeless appeal and incredible versatility across seasons. Neutral palettes, geometric shapes, and negative space create visual interest without clutter. They work perfectly whether you’re heading to the office or out for dinner.
These 42 minimalist nail ideas range from barely-there designs to bold geometric statements. Each look celebrates restraint and precision in the most beautiful way possible. Discover which design speaks to your personal aesthetic right now.
Table of Contents
- Classic White and Nude Minimalist Nails
- Soft Beige Base With Thin Black Lines
- Monochromatic Soft Gray Gradient
- Pale Pink With Minimal Gold Accent
- Soft White With Barely-There Blue
- Pale Yellow With Subtle Gold Detail
- Warm Beige With Minimal Pink Accent
- Pale Lavender With Thin Outline
- Pale Peach With Minimal Line Detail
- Understated Sage Green Matte Look
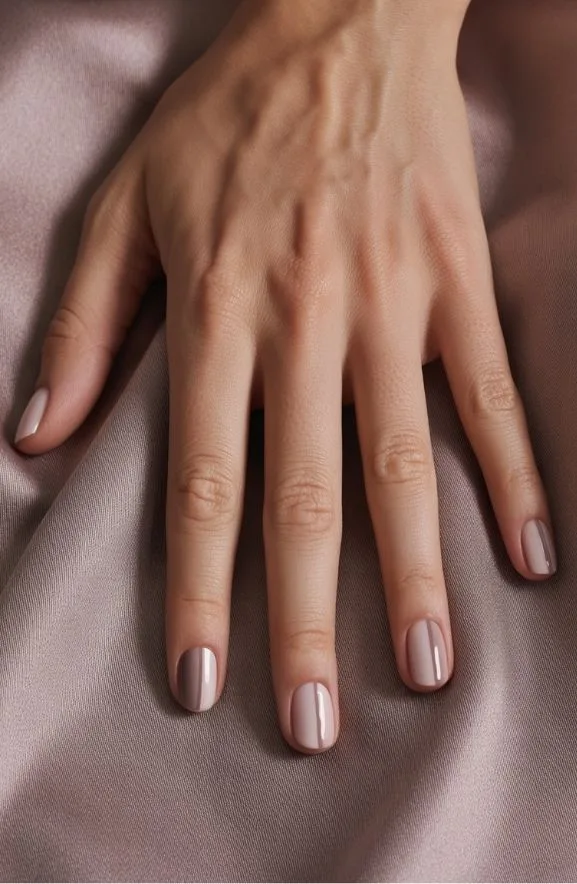
- Cream Base With Thin Tan Stripe
- Solid Pastel With Thin Border Line
- Clean French Tips Reimagined
- Clean Vertical Line Designs
- Soft Gray With Thin White Lines
- Soft Nude With Thin Black Border
- Subtle Horizontal Stripes in Soft Colors
- Clean Horizontal Color Blocking
- Clean Abstract Squiggle Pattern
- Simple Curved Line Design
- Minimalist Wave or Swoosh Design
- Clean Negative Space Triangle
- Single Accent Nail With Geometric Shape
- Geometric Shapes in Monochrome
- Minimalist Checkerboard in Neutrals
- Minimalist Cross or Plus Pattern
- Delicate Dash Pattern Nails
- Simple Geometric Triangle Accent
- Half-Moon Minimalist Nail Design
- Minimalist Stripe and Solid Combo
- Minimalist Marble With Thin Veining
- Delicate Dot Pattern on Neutral Base
- Simple Dot and Line Scattered Pattern
- Delicate Star Accent on One Nail
- Minimalist Floral Silhouette Nails
- Matte and Glossy Two-Tone Design
- Understated Glitter on Solid Base
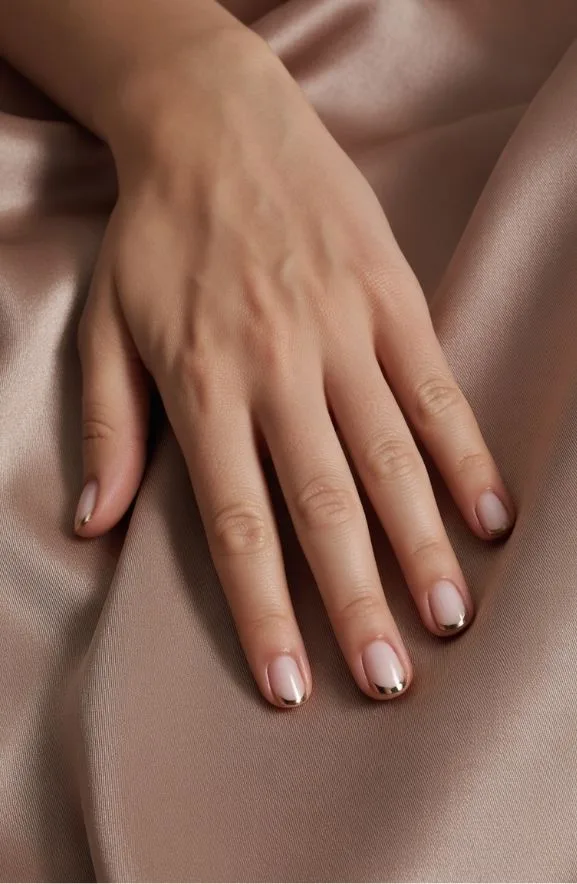
- Solid Color With Metallic Edge Detail
- Solid Color With Metallic Nail Tip
- Understated Ombre in Neutral Tones
- Negative Space Nail Art Ideas
- Extending the Life of Your Minimalist Manicure
- Frequently Asked Questions
- How Much Does a Minimalist Manicure Typically Cost at a Salon?
- Can Minimalist Nail Designs Work for Short Nails or Only Long Nails?
- What Tools and Products Do I Need to Create Minimalist Nails at Home?
- How Often Should I Touch up Minimalist Nail Designs to Maintain Appearance?
- Are Minimalist Nails Appropriate for Professional Workplace Environments?
- Conclusion
Classic White and Nude Minimalist Nails
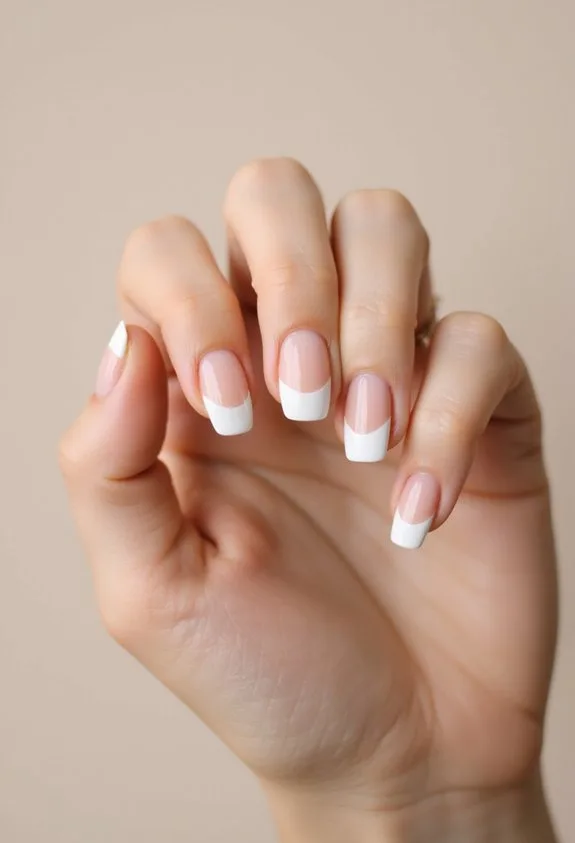
Because simplicity speaks volumes, classic white and nude minimalist nails remain the gold standard for understated elegance. You’ll appreciate how these shades work with any outfit or occasion. Start with a quality base coat like Essie’s Base Coat to prevent staining and guarantee longevity.
Apply two thin layers of your chosen shade—bright white or soft nude—for even coverage. You’re creating a clean canvas that highlights your nail shape rather than competing with bold colors. Consider a glossy finish for modern sophistication or matte for contemporary edge.
Add dimension through strategic placement. Try white tips with nude bases or reverse the formula for subtle contrast. As nail artist Christina Chong notes, “Minimalism thrives on precision and quality.” Seal everything with a top coat for protection and shine that lasts.
Also read: Fall Nail Inspo Almond | Autumn Design
Soft Beige Base With Thin Black Lines
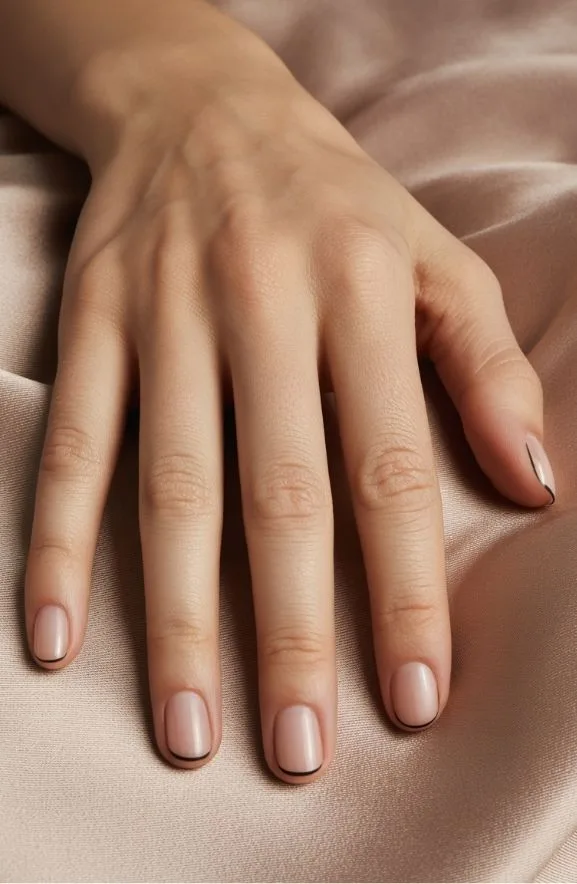
Step into modern minimalism by layering soft beige with precise black lines for understated sophistication. You’ll create a refined look that whispers elegance rather than shouts it.
Start with a creamy beige base coat like Essie’s “Linen” or OPI’s “Samoan Sand.” These neutral foundations provide the perfect canvas for your geometric details. Let it dry completely before adding thin black lines using a fine-tipped nail art brush or specialized liner pen.
Key styling techniques:
- Draw single vertical lines down the nail center for lengthening effect
- Create minimalist geometric shapes like triangles or negative space designs
- Layer thin horizontal strokes across the nail tip for modern interest
According to nail artist Jin Soon Choi, “Restraint is the ultimate luxury in nail design.” Your precision matters here. Clean lines elevate the entire manicure, transforming simple elements into sophisticated art.
Monochromatic Soft Gray Gradient
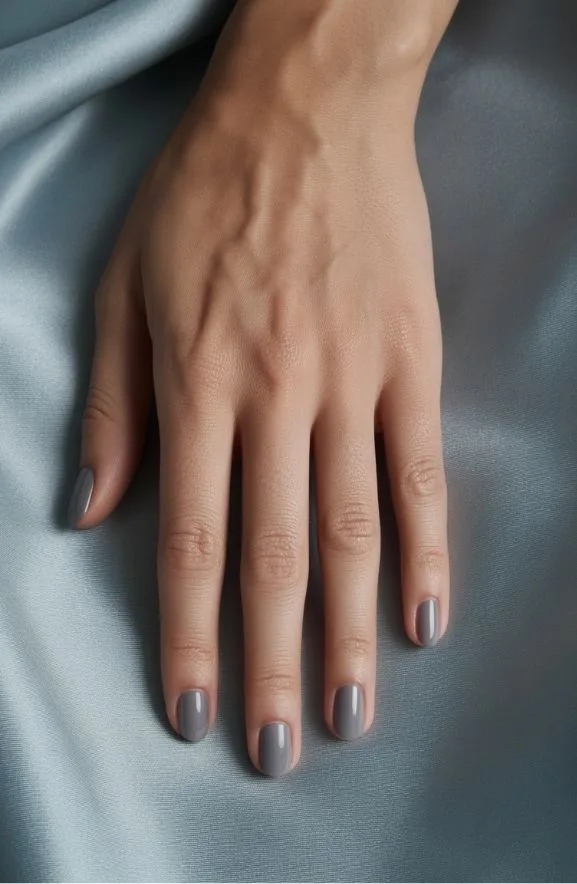
Sophistication lives in subtle shifts of tone. You’re creating a gradient that moves from light gray to deeper charcoal across your nails, building dimension without bold color. Start with a pale gray base coat, then blend slightly darker shades toward the nail tip using a damp sponge.
This technique demands precision. Apply thin layers, allowing each to dry completely before adding the next shade. A soft matte topcoat enhances the understated elegance while protecting your work.
Celebrity nail artist Jin Soon states, “Gray gradients elevate minimalism by suggesting depth through restraint.” You’ll achieve this effect using Essie’s “Chinchilly” and “Chinoise Green” blended seamlessly. The result? Nails that whisper sophistication rather than shout it.
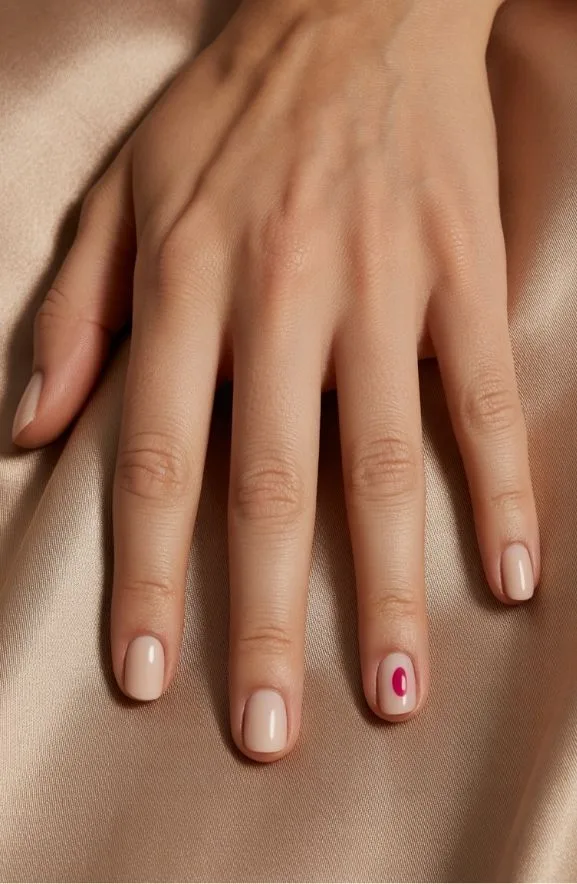
Pale Pink With Minimal Gold Accent

Nearly every minimalist nail enthusiast gravitates toward pale pink as their go-to base. You’ll find this soft, understated shade creates the perfect canvas for strategic gold accents. The combination whispers sophistication without demanding attention.
Apply two coats of a creamy pale pink polish like OPI’s “Baby, Take a Bow.” Once dry, use a thin gold liner brush to create one delicate stripe down the center of each nail, or frame the cuticle area. This restraint defines minimalist design.
Consider these accent placement options:
- Single vertical gold line on the ring finger only
- Thin gold border along the top edge
- Minimalist geometric shape on the accent nail
Professional nail artist Sarah Chen notes, “Gold’s warmth against cool pink creates unexpected depth.” You’re balancing femininity with modern elegance effortlessly.
Soft White With Barely-There Blue

While pale pink dominates minimalist nail aesthetics, soft white offers an equally refined alternative that feels crisp and modern. You’ll create an understated canvas that highlights subtle details beautifully. A barely-there blue accent—think just a whisper of color—elevates the design without overwhelming it.
Start with a creamy white base like OPI’s “Alpine Snow” for flawless coverage. Apply thin, even coats to avoid thickness. Next, you’ll add that elusive blue touch. Use a fine liner brush or thin stripe along the nail edge. The blue should feel almost invisible at first glance.
Nail artist Chen recommends: “Soft white with minimal blue creates sophisticated depth while maintaining minimalist principles.” Finish with matte topcoat for modern texture. This combination whispers elegance rather than shouts it.
Pale Yellow With Subtle Gold Detail

How can you elevate a delicate pale yellow into something truly luxe? The answer lies in strategic gold accents that catch light without overwhelming your minimalist aesthetic.
Start with a creamy pale yellow base coat like Essie’s “Pale Citrine.” This creates your canvas for understated elegance. Now comes the artistry: apply thin gold lines along one accent nail using a fine brush or gold striping tape. Consider these sophisticated applications:
- Vertical gold stripe down the center nail
- Delicate gold outline on your ring finger only
- Minimal geometric gold corner detail
“Gold detailing transforms simplicity into sophistication,” explains celebrity manicurist Jin Soon. Layer a glossy top coat to enhance dimension. The result? Nails that whisper luxury rather than shout it. You’ve mastered modern elegance through restraint and precision.
Warm Beige With Minimal Pink Accent
A warm beige base creates the perfect foundation for understated sophistication. You’ll apply two coats of a creamy beige polish like OPI’s “Berlin There Done That” for seamless coverage. This neutral backdrop allows your minimal pink accent to shine without overwhelming the design.
On your accent nail—typically your ring finger—you’ll paint a thin vertical line using soft pink. Keep the stroke delicate and centered. This restraint defines minimalist nail art.
“The key to minimalist design is knowing what to leave out,” explains celebrity nail artist Zoya Reyzis. You’re creating visual interest through negative space, not clutter.
Seal everything with a glossy topcoat. The combination feels polished yet effortless. You’ve achieved elegant simplicity that works for professional settings and casual occasions alike.
Pale Lavender With Thin Outline

Soft lavender polish creates a dreamy yet sophisticated base that’ll elevate your minimalist aesthetic. This delicate shade works beautifully on all skin tones and requires precision application for flawless results.
The thin outline technique defines your nail edges without overwhelming the design. You’ll use a fine-tipped brush or striping tool to create crisp, dark lines—typically charcoal or deep plum—around your nail perimeter.
Here’s how to achieve this look:
- Apply two coats of pale lavender base polish for even coverage
- Use a thin detail brush with contrasting dark polish for precise outline work
- Seal everything with a glossy top coat for protection
Nail artist Sarah Chen notes: “Outlines add dimension without cluttering the design.” This approach maintains minimalism while introducing visual interest. Your nails’ll look polished and intentional, requiring just fifteen minutes total application time.
Pale Peach With Minimal Line Detail

Pale peach delivers warmth and understated elegance that feels fresh without demanding attention. You’ll start with a creamy base coat like Essie’s “Bikini So Teeny” across all nails. Once dry, use a thin black or charcoal liner to sketch minimal geometric lines. Try a single diagonal streak or subtle corner detail on two accent nails. Keep strokes deliberate and clean—precision matters here. The contrast between soft peach and stark lines creates sophisticated visual interest. You can add a single matte topcoat for refined texture, or keep it glossy for polish. This design works beautifully for professional settings and casual moments alike. The restraint makes it timeless and endlessly wearable.
Understated Sage Green Matte Look

Sage green whispers sophistication in a way that brighter hues simply can’t match. You’ll find this earthy tone creates an understated elegance that feels both modern and timeless simultaneously. A matte finish amplifies the effect, softening any shine for a velvety appearance.
The best approach? Start with a quality base coat. Apply two thin layers of sage green polish, letting each dry completely. Finish with a matte top coat to seal your look.
Here’s what makes this style work:
- Neutral cuticles keep focus on your nails without competing details
- Short to medium length showcases the color’s depth more effectively
- Bare nail beds occasionally create sophisticated contrast
As beauty educator Margaret Chen notes, “Matte finishes demand flawless application—any bubbles become visible.” You’re investing in precision here, not complexity.
Cream Base With Thin Tan Stripe
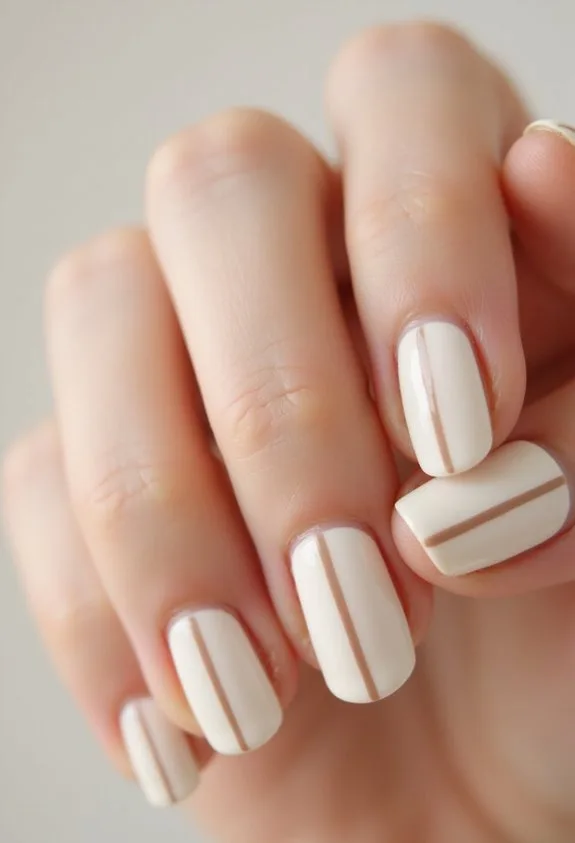
While matte finishes celebrate restraint, a cream base with thin tan stripe brings dimension through subtle line work. You’ll apply a creamy ivory foundation using two thin coats for opacity. Once dry, grab a fine-tipped liner brush and steady your hand carefully. The tan accent line runs vertically down your nail’s center or horizontally across the nail bed. This minimalist approach demands precision. According to nail artist Jamie Chen, “Thin stripes create visual interest without compromising elegance.” You can achieve this using gel polish or traditional lacquer. Try OPI’s “Bubble Bath” as your cream base paired with “Samoan Sand” for your stripe. The contrast shouldn’t feel jarring—instead, it whispers sophistication. Remove any polish imperfections with a detail brush dipped in rubbing alcohol. This design works beautifully on natural or slightly extended nails.
Solid Pastel With Thin Border Line

If you’re ready to elevate minimalism with color, a solid pastel paired with a thin border line delivers understated elegance. You’ll create dimension without overwhelming your nails.
Choose soft hues like dusty rose, sage green, or pale lavender. Apply two coats of your chosen pastel for even coverage. Once dry, use a thin liner brush to trace a delicate border around your nail edge.
Key techniques for success:
- Apply base coat first to prevent staining
- Use gel formulas for longevity and precision
- Seal with glossy topcoat for polished finish
The contrast between solid color and crisp line creates visual interest instantly. This design works for any occasion—professional settings or casual outings. Professional nail artist Maria Chen notes, “Minimalist designs with subtle borders prove that less truly is more.” Your nails become refined statements without fuss.
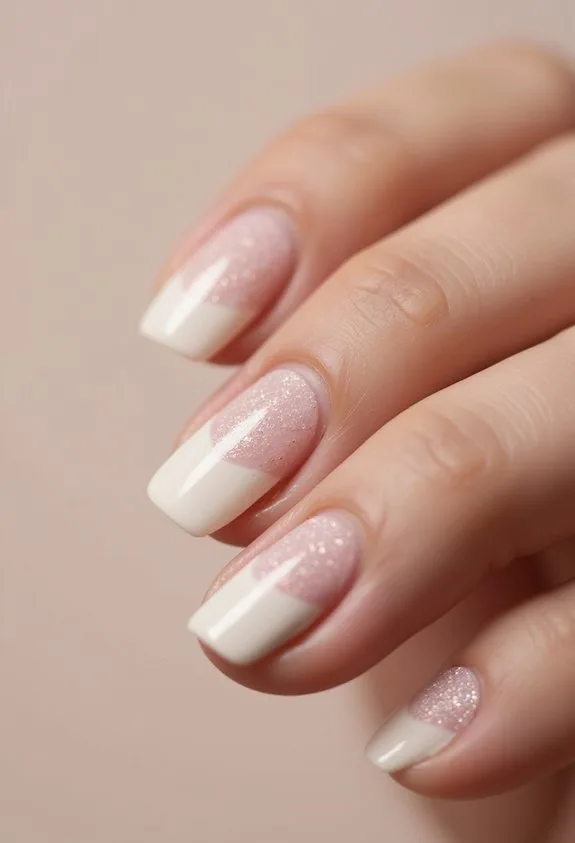
Clean French Tips Reimagined

Building on minimalist foundations, the classic French tip evolves beyond its traditional white-and-pink formula. You can experiment with sheer nude bases paired with soft gray or beige tips for understated sophistication. Try using gel polishes like Essie’s “Ballet Slippers” to achieve seamless color shifts without harsh lines.
The key lies in precision application. You’ll want to use thin brushes or nail art pens for clean, deliberate strokes. According to nail artist Jin Soon Choi, “Modern French tips celebrate negative space and subtle contrast rather than bold definition.”
Consider asymmetrical tip placements on select nails, or soften edges with barely-there gradient effects. You might also layer translucent topcoats for dimension. These reimagined versions maintain elegance while feeling fresh and contemporary.
Clean Vertical Line Designs
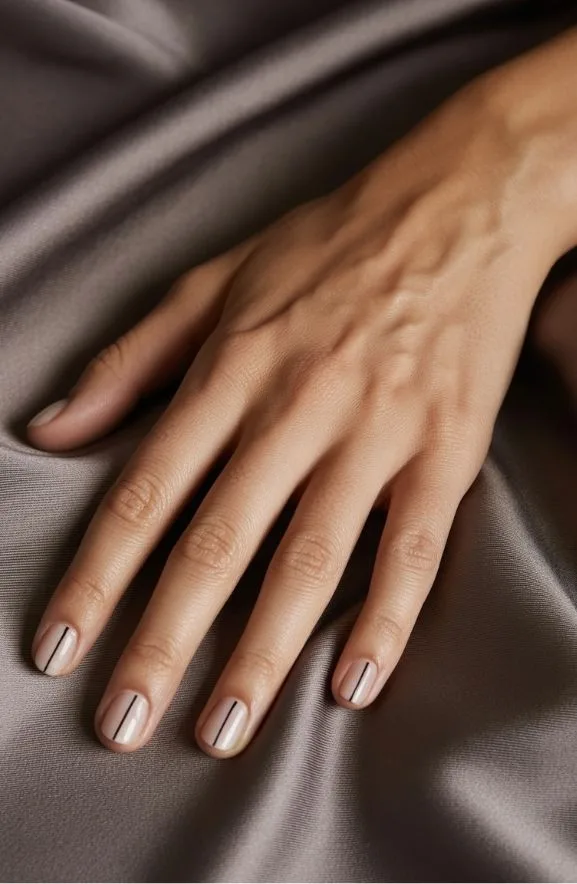
Vertical lines offer a striking alternative to curved nail designs, creating an illusion of length while maintaining minimalist appeal. You’ll achieve sophisticated elegance through this understated approach. These clean strokes elongate your fingers beautifully.
Consider these styling options:
- Monochromatic stripes using white lines on nude or soft gray bases for subtle dimension
- Single accent nail featuring a bold vertical line while keeping others neutral for balanced drama
- Negative space designs where you paint around thin lines, letting your natural nail show through
Apply thin vertical stripes using a fine liner brush or specialized striping tool. Layer products like OPI’s “Alpine Snow” for crisp definition. The key involves steady hand control and consistent spacing between lines. As nail artist James Davidson notes, “Precision transforms minimalism into statement-making art.” You’re creating visual interest without overwhelming color or pattern.
Soft Gray With Thin White Lines
Since soft gray serves as the perfect neutral canvas, you’ll create understated sophistication by layering thin white lines across its muted surface. Start with two coats of a quality gray base like OPI’s “Appropriately Gray” for even coverage. Use a fine liner brush or thin striping tool to apply crisp white lines—vertically, horizontally, or in geometric patterns. Precision matters here. The contrast between soft and bright tones elevates your minimalist aesthetic without overwhelming the nail. “Thin lines demand steady hands and quality tools,” says celebrity nail artist Jin Soon Choi. Seal everything with a glossy topcoat for dimension. You’ve got a design that whispers elegance rather than shouts it—exactly what minimalism demands.
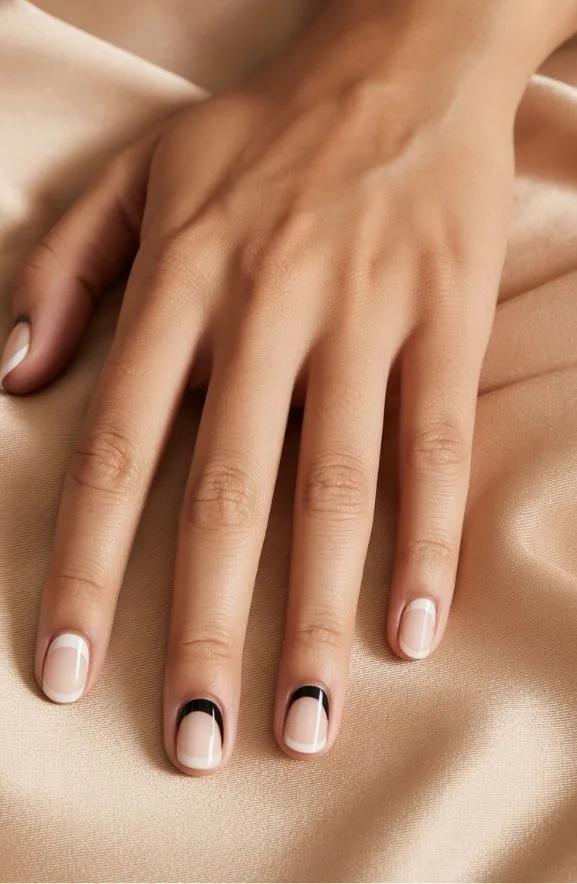
Soft Nude With Thin Black Border
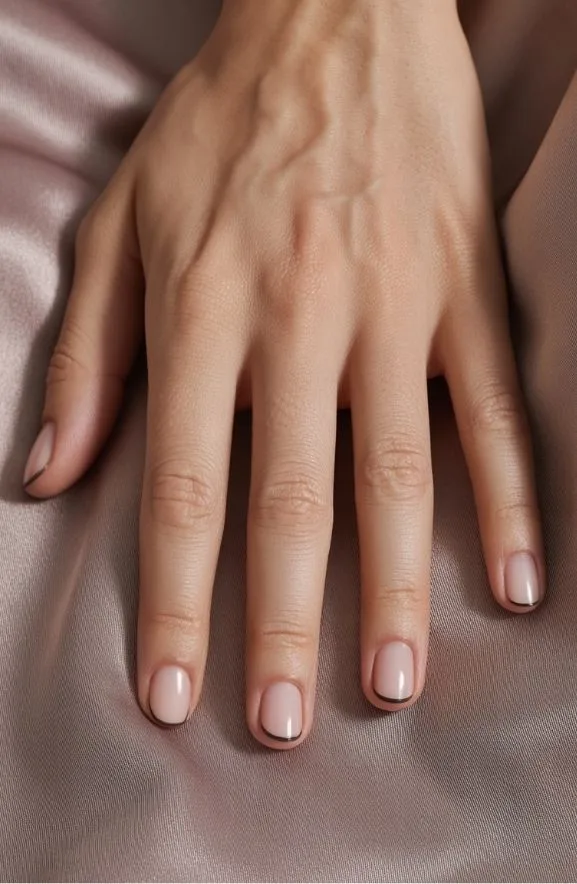
When you’re after an effortless elegance, a soft nude base paired with a precise black border delivers exactly that—understated sophistication without the fuss. This combination works because it creates definition while maintaining minimalist appeal.
Start with a creamy nude polish as your foundation. Apply two coats for full coverage. Once dry, use a thin nail art brush or striping tool to outline your nail edge in black.
- Product pick: Try essie “Ballet Slippers” with a matte black gel for sharp lines that won’t smudge
- Application tip: Steady your hand by resting your pinky on your work surface while creating borders
- Styling option: Leave one accent nail nude-only for subtle variation
The result? Clean, intentional nails that feel both current and timeless. This design flatters any skin tone beautifully.
Subtle Horizontal Stripes in Soft Colors
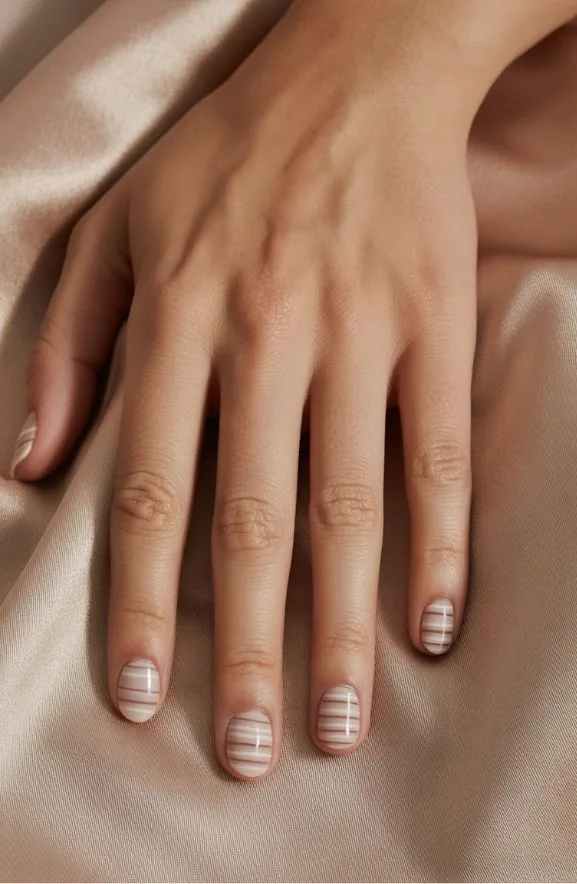
Layering delicate horizontal lines across your nails creates visual interest while keeping the overall aesthetic calm and refined. You’ll start with a soft base—pale pink, cream, or barely-there beige works beautifully. Once dried, use a thin liner brush or striping tool to paint your horizontal lines in complementary pastels. Try pairing a nude base with dusty rose stripes, or ivory with warm taupe accents.
The spacing matters. Keep lines evenly distributed, roughly one to two millimeters apart. This precision prevents your design from feeling cluttered. You can apply 3-5 stripes per nail depending on your preference.
A matte topcoat enhances the minimalist vibe, while glossy finishes add subtle dimension. CND’s Ridge-Filling Base Coat guarantees your foundation stays smooth and even. This design works on short or long nails without compromising elegance.
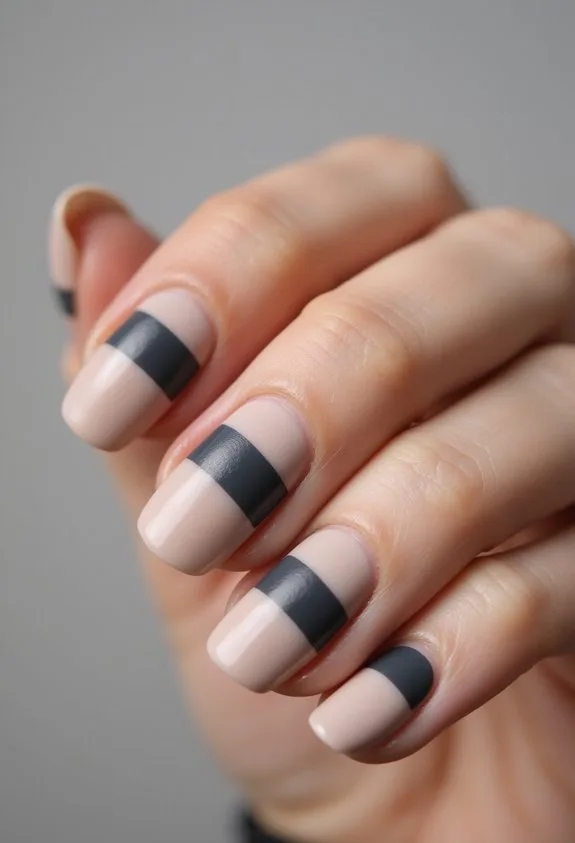
Clean Horizontal Color Blocking

Two or three bold, distinct colors create striking horizontal sections that feel both modern and intentional. You’ll divide your nail into clean bands of contrasting hues, establishing a structured yet sophisticated look that captures minimalism’s essence.
Start by applying a base coat for protection and longevity. Then carefully paint each horizontal section using quality polish like OPI or Essie, allowing proper drying between layers. Sharp lines distinguish each color block beautifully.
Key techniques for success:
- Use thin striping brushes or nail tape to achieve crisp, defined edges between color sections
- Choose complementary colors like navy and cream, or black and soft gray for maximum impact
- Seal everything with a glossy top coat for dimensional shine and protection
This approach transforms simple color theory into wearable art that you’ll love displaying.
Clean Abstract Squiggle Pattern
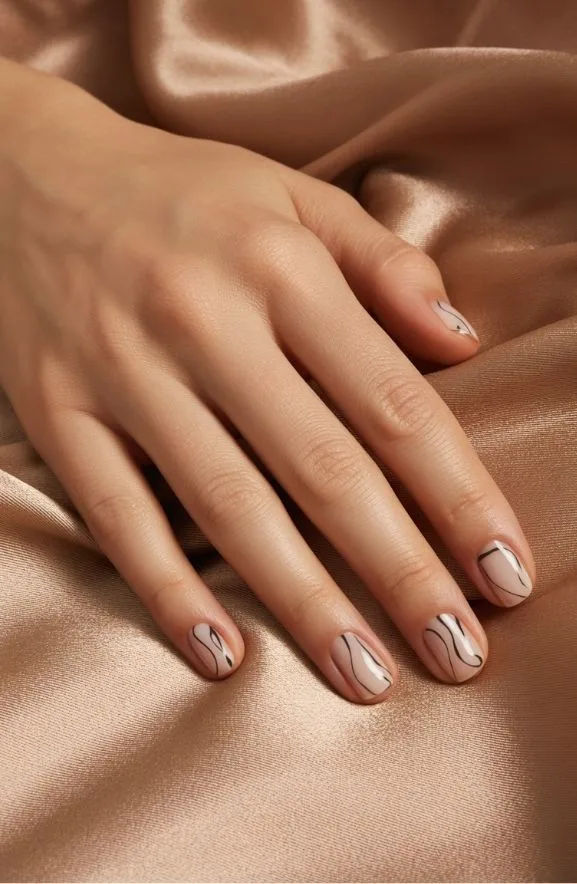
If you’re craving a design that feels artistic yet refined, clean abstract squiggles deliver exactly that balance. You’ll want to start with a neutral base—soft beige or warm white creates the perfect canvas. Using a thin liner brush, you can sketch flowing, organic lines across your nails with steady, confident strokes. The key is intentionality; each squiggle should feel purposeful rather than random. Try layering two complementary colors like charcoal and taupe for sophisticated depth. Apply your design with precision, letting some lines intersect while keeping others isolated. Seal everything with a glossy topcoat to enhance the polish and protect your artwork. This minimalist approach gives you that gallery-worthy aesthetic without overwhelming your fingers. We can’t get enough of how effortlessly elegant this style looks.
Simple Curved Line Design

Curved lines offer a sophisticated alternative to geometric precision. You’ll appreciate how gentle arcs create visual flow across your nail canvas. These designs work beautifully on short or long nails alike.
- Apply a nude or soft cream base coat for ideal contrast
- Use a thin liner brush with gel polish for clean, controlled curves
- Layer multiple curved strokes to build depth and dimension
Start with one sweeping line from cuticle to tip. Build confidence gradually. Adding a second contrasting curve creates dynamic movement without overwhelming your design.
Celebrity nail artist Zoya Chen notes, “Curved lines feel modern yet timeless, offering clients endless customization options.” You can experiment with metallic accents along your curves for subtle sophistication. Keep negative space intentional—it’s what makes minimalist designs truly stand out and prevents visual clutter on your nails.
Minimalist Wave or Swoosh Design
Swooshes and waves bring motion to your minimalist nail art in ways that feel both effortless and intentional. You’ll create these designs using thin brushes or liner tools with gel or acrylic polish.
Start at the nail’s edge and drag the color diagonally across your base. The movement should feel natural, not forced. One swoosh per nail delivers maximum impact without visual clutter.
Layer translucent colors for depth. A nude base topped with a sheer gray swoosh creates sophisticated dimension. According to nail artist Jamie Genevieve, “Wave designs mirror contemporary art movements while maintaining nail minimalism’s core aesthetic.”
You can also use chrome powder along the swoosh’s edge for subtle shimmer. Apply it carefully to accent rather than dominate. Matte topcoats enhance the design’s refined appearance and prevent shine from overwhelming your composition.
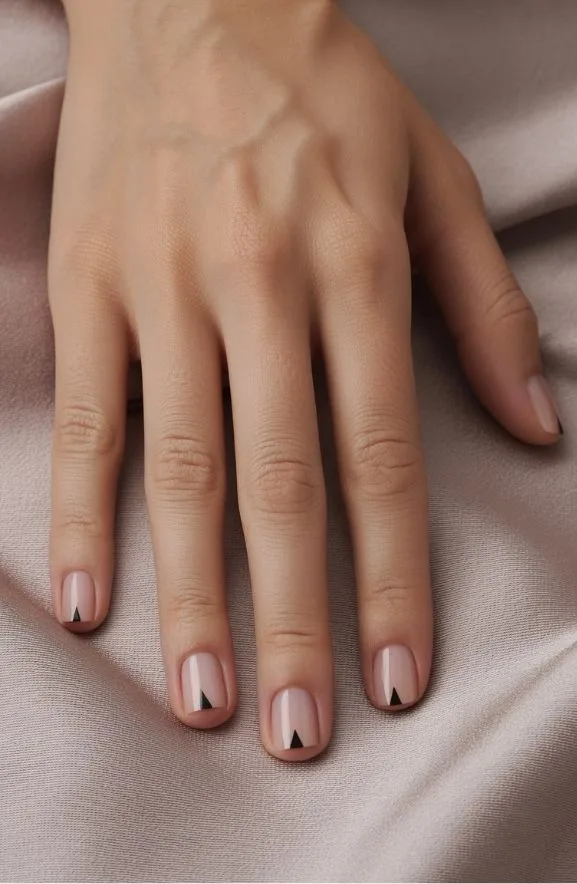
Clean Negative Space Triangle
While swooshes emphasize movement, triangles embrace stillness through strategic emptiness. You’ll create sophisticated geometry by leaving the nail bed exposed in precise triangular shapes, letting your skin tone become the design itself.
This technique demands clean lines and careful planning. Start with a sharp nail shape—stiletto or almond works best. Map your triangle lightly with a nail pencil before applying polish.
Essential steps for triangle perfection:
- Use painter’s tape along triangle edges for razor-sharp borders
- Apply two thin coats rather than one thick coat for evenness
- Seal with matte topcoat to enhance the negative space drama
The beauty lies in restraint. You’re not filling space; you’re defining it through absence. Essie’s “Ballet Slippers” or OPI “Bubble Bath” complement this minimalist approach perfectly, creating understated elegance that speaks volumes.
Single Accent Nail With Geometric Shape
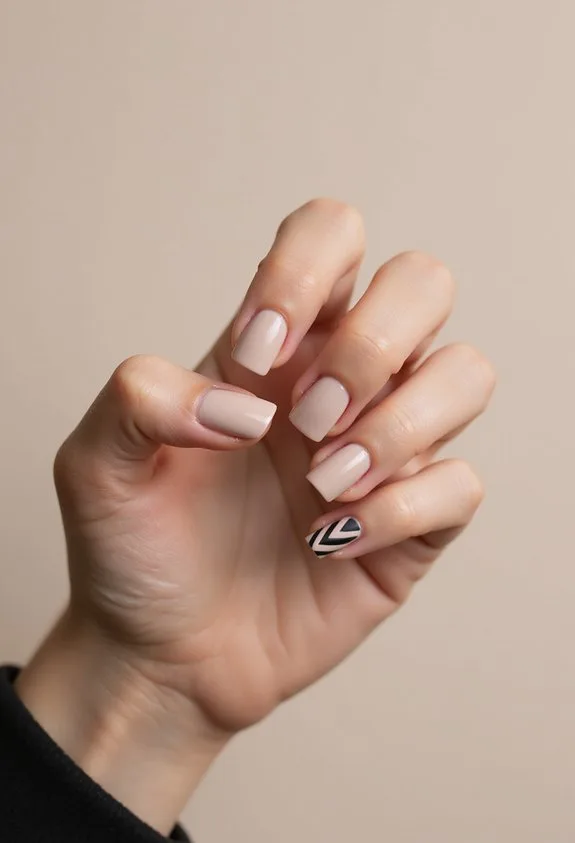
By concentrating your geometric design on just one nail, you’ll amplify its impact through bold simplicity. Choose your accent nail—typically the ring finger—and apply a neutral base across all ten nails first. Then, you’re ready to create.
Use thin-tipped brushes or striping tools to draw clean lines. A single triangle, linear pattern, or minimalist square works beautifully. We can’t get enough of matte finishes paired with glossy geometric shapes for textural contrast.
Consider OPI’s “Black Onyx” or essie’s “Ballet Slippers” as your base. Layer your geometric accent in contrasting color—charcoal, navy, or soft gold creates sophisticated depth.
As nail artist Lisa Chen notes, “One striking element draws the eye without overwhelming the overall aesthetic.” This approach celebrates restraint while showcasing intentional design, making your nails feel curated and purposeful.
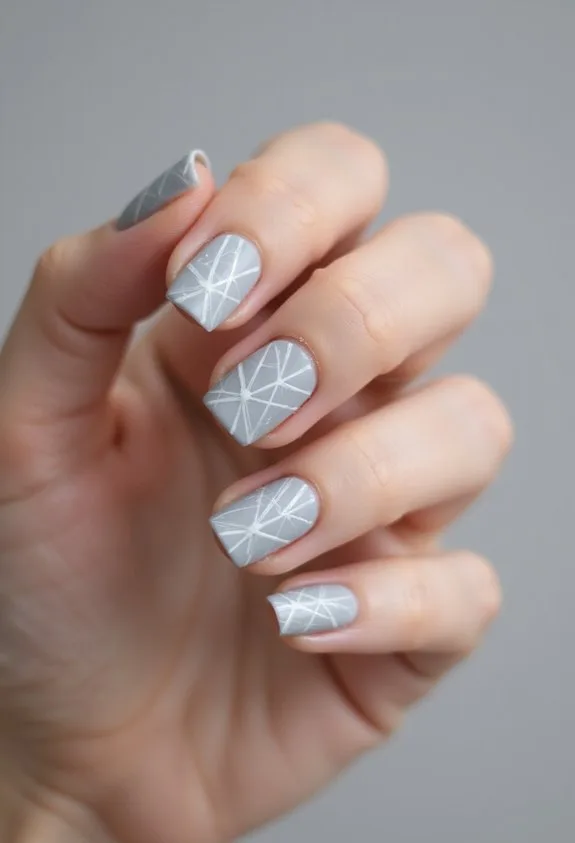
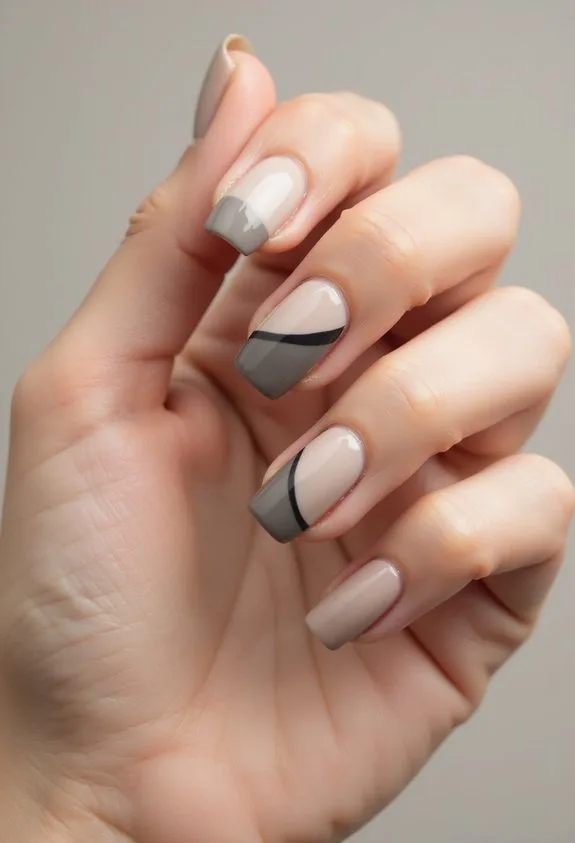
Geometric Shapes in Monochrome
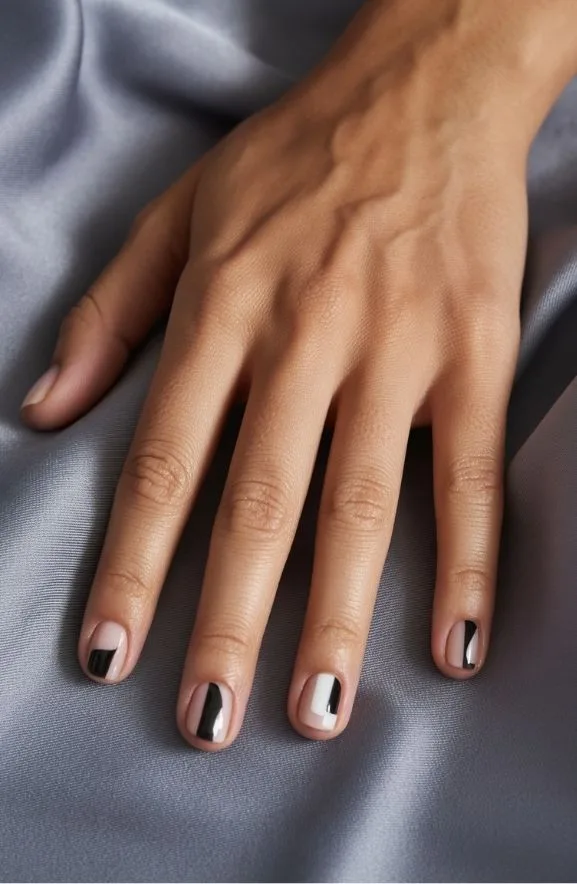
When you’re drawn to clean, sophisticated design, monochrome geometric nails offer the perfect solution. You’ll create striking visuals using only black, white, and gray tones. This approach demands precision and intentional placement.
- Linear patterns: Straight lines and angles create modern sophistication without overwhelming the nail bed
- Negative space: Let bare nail show through shapes, amplifying the minimalist aesthetic extensively
- Layered shapes: Stack triangles or squares for dimensional depth that catches light beautifully
You can achieve these looks with gel polish and thin brushes. Apply a white base coat first, then outline geometric forms in matte black. Consider using stamping plates for consistent shapes. The contrast between glossy and matte finishes elevates your design further. This style works beautifully for both professional and creative settings, proving minimalism doesn’t mean boring.
Minimalist Checkerboard in Neutrals
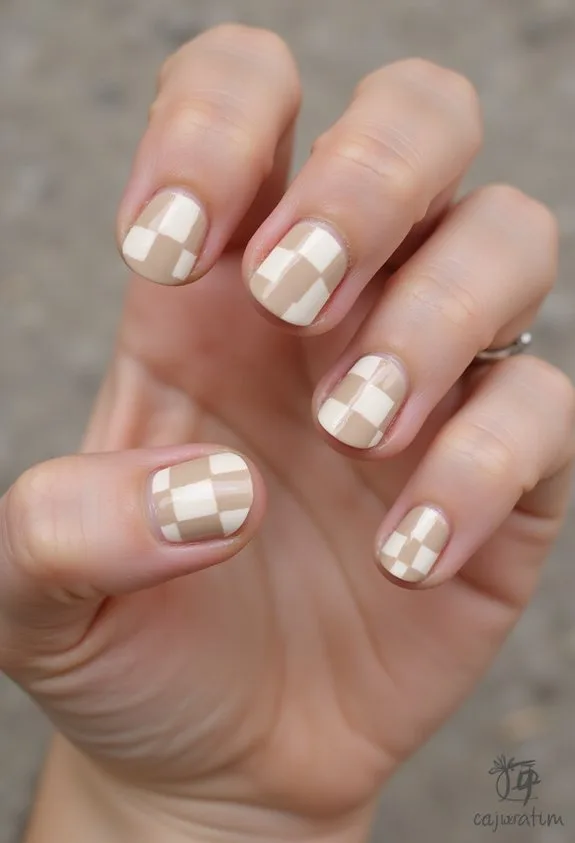
A checkerboard pattern doesn’t have to be loud or playful—you can transform it into understated elegance using soft, neutral tones. Start with a creamy base like OPI’s “Bubble Bath” or Essie’s “Ballet Slippers.” You’ll create tiny squares using a thin liner brush or nail art pen in taupe, greige, or warm gray. The key is keeping proportions small and deliberate. Alternate colors in a staggered grid across your nail surface. Paint two coats of clear topcoat for dimension and durability. As nail artist Jessica Kim notes, “Neutral checkerboards work because they whisper rather than shout.” Layer matte and glossy finishes for subtle visual interest. This design works beautifully on shorter nails, proving minimalism doesn’t require length. The result? Sophisticated, modern polish that commands attention through restraint.
Minimalist Cross or Plus Pattern
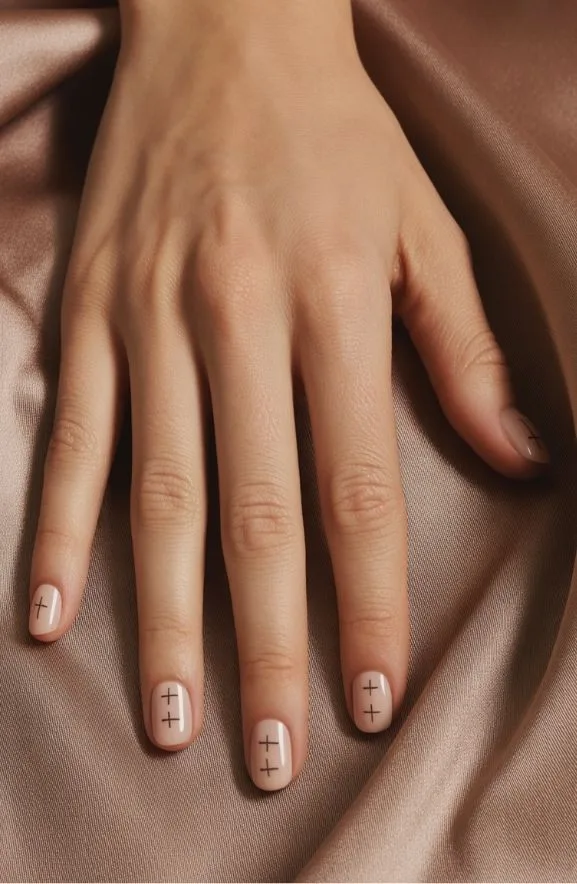
If you’re drawn to geometric simplicity, the cross or plus pattern offers understated sophistication without overwhelming your nails. This design creates clean lines that feel modern yet timeless. You’ll achieve the look by painting thin vertical and horizontal strokes across your nail bed using a fine liner brush or thin striping tool.
Start with a neutral base—think cream, beige, or soft gray. Then layer contrasting lines in black, navy, or warm brown for dimensional appeal. The key is precision and balance.
Design variations to try:
- Single centered cross on each nail
- Grid-style multiple crosses in staggered placement
- Asymmetrical plus signs for artistic edge
This minimalist approach works beautifully on natural nails and complements professional settings. The pattern draws attention without demanding maintenance, making it perfect for everyday elegance.
Delicate Dash Pattern Nails

For a design that’s effortless yet refined, delicate dash patterns offer understated elegance that won’t demand constant upkeep. You’ll apply thin horizontal or vertical lines using a fine liner brush or striping tool across your nail base. This minimalist approach works beautifully on nude, cream, or soft pastels. Layer dashes in varying lengths for visual interest without overwhelming the design. Apply a glossy top coat to enhance the clean lines and create dimension. According to nail artist Maria Chen, “Dash patterns prove that simplicity creates sophistication.” You can customize spacing between marks to match your personal aesthetic. The result? Nails that feel intentional and polished. Use brands like Essie or Sally Hansen for precision application. This design suits professional settings while maintaining contemporary appeal.
Simple Geometric Triangle Accent
While dash patterns prove that minimalism works through repetition, geometric triangles take that philosophy further by using bold shapes to create maximum impact with minimal effort. You’ll appreciate how a single triangle accent nail commands attention without overwhelming your manicure. The key is strategic placement on your ring finger or pinky, creating visual interest through negative space.
- Use a thin liner brush or striping tool for crisp, clean triangle edges
- Layer sheer nude bases with contrasting dark triangles for sophisticated depth
- Combine matte and glossy finishes to enhance geometric definition
Professional colorist Maya Chen notes, “Triangle accents work because they’re mathematically pleasing to the eye.” You can achieve this look using OPI’s Alpine Snow base with Essie’s Licorice black for precise lines. Start with light hand pressure, building opacity gradually for flawless results.
Half-Moon Minimalist Nail Design
The half-moon design flips traditional nail art by painting the base of your nail instead of the tip. You’ll create a curved accent using a rounded cosmetic sponge or specialized half-moon stencil. Start with a neutral base coat on your entire nail. Then apply your chosen color—soft pastels or bold jewel tones work beautifully—to just the lower portion. The Essie Gel Couture line offers excellent opacity for this technique. Seal everything with a glossy topcoat for dimension and durability. As nail artist Sarah Chen notes, “Half-moons elongate fingers while maintaining understated elegance.” The design works across all nail lengths and shapes. You’re essentially fundamentally creating negative space that feels modern and refined. This minimalist approach requires steady hands but minimal experience.
Minimalist Stripe and Solid Combo
Pairing clean stripes with solid colors creates a balanced look that’s both simple and striking. You’ll achieve sophistication by combining vertical or horizontal lines with neutral bases like white, beige, or soft gray. This design works beautifully on shorter nails and requires minimal skill to execute.
Start with a solid foundation polish, then add thin stripes using a detail brush or striping tool:
- Use high-quality gel polish for longevity and crisp line definition
- Apply stripes at varying angles for visual interest and dimension
- Layer matte and glossy finishes to enhance contrast between elements
The beauty here is restraint. You’re not overwhelming your nails with busy patterns. Instead, you’re creating elegant geometry that draws attention without demanding it. This combo suits professional settings perfectly while maintaining undeniable style.
Minimalist Marble With Thin Veining
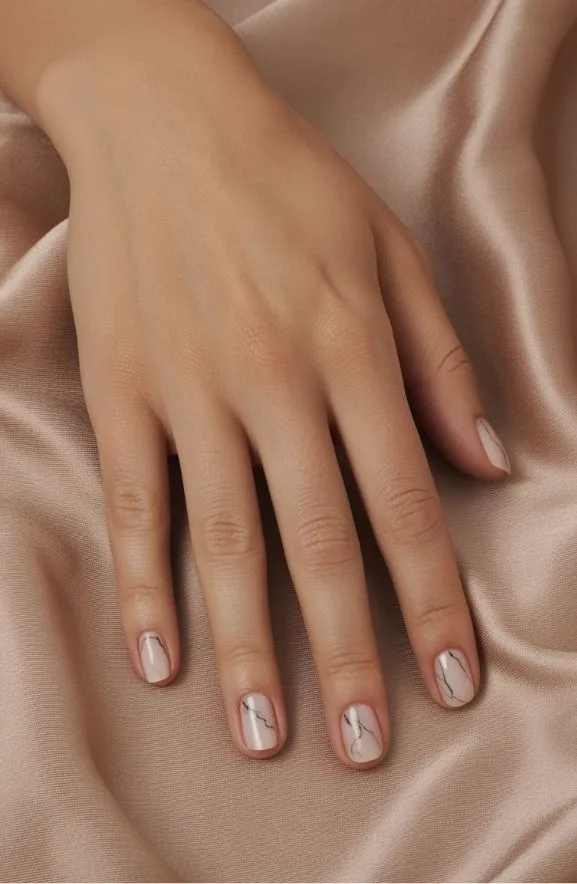
If you’re looking for elegance that feels effortless, minimalist marble nails deliver sophisticated natural beauty without the visual chaos of traditional marble designs. You’ll achieve this aesthetic using a neutral base—soft beige, cream, or pale gray—then add ultra-thin veining in charcoal or taupe using a fine liner brush or nail art pen.
The key lies in restraint. Apply delicate, irregular lines across one or two nails per hand, mimicking natural stone without overwhelming the design. Consider using brands like Essie or Sally Hansen for your base, then layer thin veining carefully.
Pro tip: seal everything with a glossy topcoat to enhance the marble’s dimensional quality. This approach creates understated sophistication that works for professional settings and casual wear alike.
Delicate Dot Pattern on Neutral Base
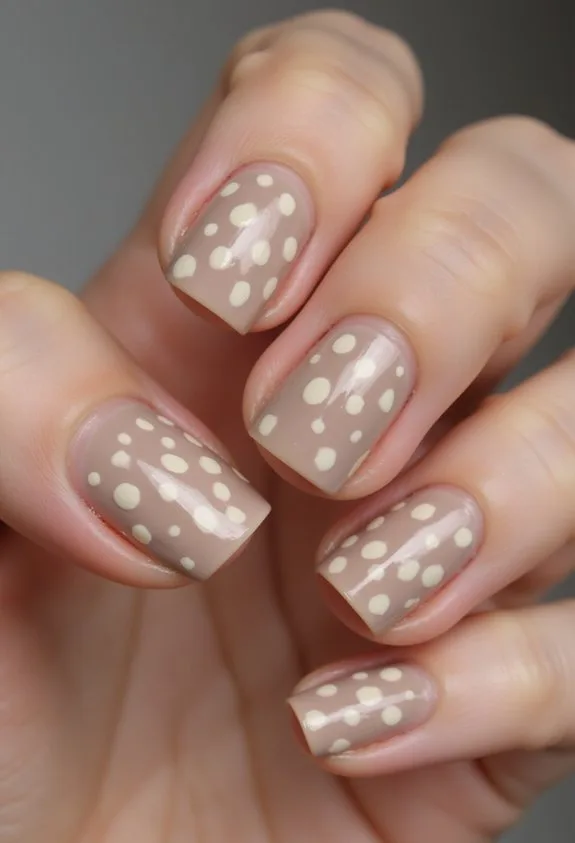
For a design that feels both modern and timeless, consider layering tiny dots across your neutral base—a technique that transforms simplicity into visual interest. You’ll create depth using a dotting tool or fine brush, spacing each dot intentionally for balanced composition. Soft beiges, warm grays, and creamy whites provide the perfect canvas for this understated approach.
Build your design strategically:
- Use a thin liner brush or dotting pen for precise placement and consistent sizing
- Layer dots in varying sizes—mixing large focal points with smaller accent dots creates dimension
- Apply a glossy topcoat to enhance the dots’ subtle shimmer and protect your work
The result? Nails that whisper sophistication rather than shout it.
Simple Dot and Line Scattered Pattern

What happens when you combine two of minimalism’s most versatile elements—dots and delicate lines—into one cohesive design? You’ve created a pattern that’s both understated and visually intriguing. Start with a soft nude or ivory base. Then scatter tiny dots across your nails using a thin brush or dotting tool. The key is intentional randomness—placement matters more than perfection. Layer fine lines between the dots for added dimension. A nude base coat like Essie’s “Ballet Slippers” provides the perfect canvas. Consider using gel polish for longevity and precision application. Expert nail artist Maria Chen notes: “Scattered patterns reward patience over speed.” The result? Nails that whisper sophistication rather than shout. This design works year-round and complements any style effortlessly. You’re investing in timeless elegance.
Delicate Star Accent on One Nail

While scattered dots and lines create understated sophistication across your entire manicure, a single delicate star accent offers a different kind of minimalist power—focus through restraint. You’re directing attention strategically. One perfectly placed star becomes your statement.
Choose your accent nail carefully. The ring finger works beautifully. Use a fine liner or thin brush for precision work.
- Apply a sheer nude or cream base to all nails for contrast
- Create your star using gel or traditional polish in metallic gold or silver
- Seal with a glossy topcoat for dimensional shine
A beauty expert notes, “Minimalist design thrives on intentional placement.” Your star shouldn’t feel rushed. Take time perfecting those five points. This approach celebrates negative space while maintaining visual interest. You’ve achieved elegant restraint.
Minimalist Floral Silhouette Nails

A single stem or bloom rendered in pure outline form captures botanical elegance without decoration. You’ll use a thin brush or liner to sketch delicate flower contours on a neutral base. Think minimal stems, simple petals, and understated leaves.
Start with a cream or soft beige polish as your canvas. Then, using black or dark brown gel, you’ll create your floral design with steady, intentional strokes. The beauty lies in restraint—one flower per nail works perfectly.
According to nail artist Jennifer Chen, “Negative space is your greatest tool here. Let the bare nail breathe alongside your design.” Apply a glossy topcoat to enhance the silhouette’s definition.
This approach works beautifully on natural nails and extensions alike. You’re creating sophistication through simplicity, proving that less truly means more.
Matte and Glossy Two-Tone Design
Taking your minimalist aesthetic further, you’ll now layer contrasting finishes to add dimension without abandoning simplicity. This technique transforms basic designs into sophisticated statements through strategic matte and glossy placement.
The contrast creates visual interest instantly. You’re fundamentally building depth on a small canvas using finish, not color complexity.
Essential Application Methods:
- Apply matte base coat to entire nail, then add glossy topcoat to specific zones like the nail tip or geometric shapes
- Use matte on accent nails while keeping others glossy for balanced visual rhythm
- Try glossy French tips over matte nail beds for timeless elegance
Celebrity nail artist Deborah Lippmann notes, “Finish contrast is the minimalist’s secret weapon—it’s sophisticated without being busy.”
Apply Sally Hansen Miracle Gel in matte for base work. Layer Seche Vite glossy topcoat strategically. The combination creates professional, gallery-worthy results that require minimal effort but deliver maximum impact.
Understated Glitter on Solid Base
When you’re ready to add sparkle without sacrificing minimalist principles, understated glitter offers the perfect solution. You’ll apply a single, solid base color—think soft nude, pale pink, or cool gray—then layer fine glitter strategically. Rather than covering your entire nail, focus glitter on the nail bed’s lower half or create a subtle gradient effect. This approach maintains sophistication while introducing dimension. Try OPI’s “Black Onyx” base with delicate gold micro-glitter for contrast. According to celebrity nail artist Jin Soon, “Restraint defines modern luxury in nail design.” You can also accent only your accent nail with glitter, keeping others matte. The key’s choosing fine glitter particles over chunky ones. This technique works beautifully for both professional settings and evening occasions, delivering elegance through intentional restraint rather than maximum coverage.
Solid Color With Metallic Edge Detail
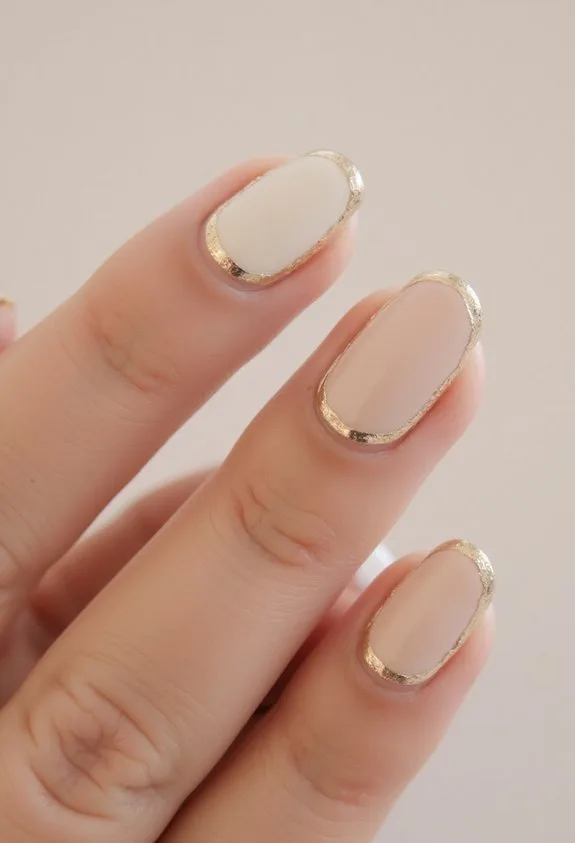
For a refined step beyond glitter placement, metallic edge detailing elevates your minimalist manicure through strategic line work rather than surface embellishment. You’re creating visual interest where it matters most—the nail’s perimeter. This technique demands precision and steady hands.
How to achieve metallic edges:
- Apply your solid base color in two coats, allowing proper drying time between applications
- Use a thin detail brush with metallic polish (gold, silver, or rose gold) to trace along the free edge
- Consider gradient effects by layering metallics for dimensional depth
The beauty lies in restraint. A single metallic line transforms understated elegance into sophisticated design. Brands like Essie and Sally Hansen offer quality metallics with excellent opacity. Professional nail technicians often recommend this approach for clients seeking refinement without visual chaos.
Solid Color With Metallic Nail Tip
Most nail enthusiasts find that combining a creamy solid base with metallic tips creates impact without complexity. You’ll apply your chosen shade—think soft nude, blush, or classic white—across the entire nail bed first. Then you’ll carefully paint metallic polish onto just the tip area, creating a clean separation between colors.
The beauty lies in its versatility. Gold tips pair elegantly with warm undertones, while silver complements cool palettes. Chrome and rose gold offer modern alternatives that feel fresh and sophisticated.
According to nail artist Maria Chen, “This design bridges minimalism and glamour perfectly.” You can achieve precision using thin brushes or metallic nail pens. The result? Nails that look professionally done while maintaining that effortless aesthetic minimalism promises.
Understated Ombre in Neutral Tones

If solid bases and metallic accents feel too structured for your taste, try a softer approach with ombre blending. Understated ombre in neutral tones creates dimension without drama, perfect for minimalist aesthetics.
You’ll blend creams, taupes, and soft browns seamlessly across your nail surface. This technique requires patience but rewards you with sophisticated results that feel effortlessly refined.
Creating Your Neutral Ombre:
- Start with a light base shade and gradually deepen toward the tip using a makeup sponge
- Use complementary neutrals like beige-to-gray or champagne-to-brown for cohesive conversion
- Seal everything with clear topcoat for smooth, glossy finish
Nail artist Sarah Chen notes, “Ombre works beautifully when you’re subtle with your color shifts.” Choose quality polishes like OPI Bubble Bath or Essie Ballet Slippers for superior blendability. The result? Nails that whisper elegance.
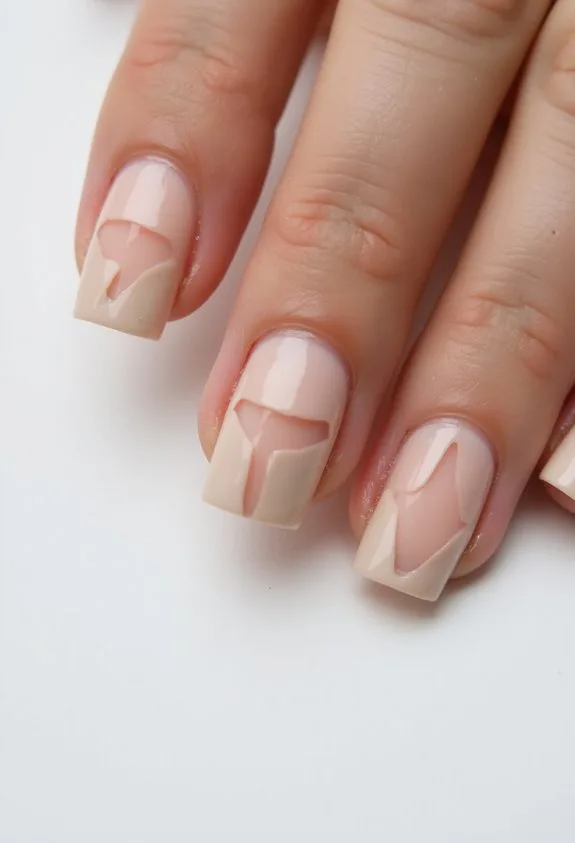
Negative Space Nail Art Ideas

Leaving bare nail exposed creates striking visual contrast that’s surprisingly modern and minimal. You’re fundamentally using empty space as a design element, which sounds counterintuitive but works beautifully.
Try painting geometric shapes along your nail edges while keeping the center bare. This technique requires steady hands and thin brushes—invest in quality tools like Zoya or Essie for precision application.
Negative space designs work exceptionally well on shorter nails. You might create thin lines framing your nail perimeter, leaving the middle completely natural. According to nail artist Maria Chen, “Negative space forces us to appreciate the nail’s natural beauty rather than covering it completely.”
Combine this approach with nude bases or sheer polishes for enhanced subtlety. The contrast between painted and unpainted areas delivers sophisticated impact without appearing overdone or cluttered.
Extending the Life of Your Minimalist Manicure

Your minimalist manicure‘s clean lines and negative space deserve protection that matches their sophistication. You’ll want to invest in quality products and smart habits to keep your design looking fresh.
- Apply a high-quality top coat every three days to seal your design and prevent chipping
- Use cuticle oil daily to maintain nail health and prevent peeling at the edges
- Wear gloves during cleaning to protect your polish from harsh chemicals and water damage
Keep your nails hydrated. Dermatologist Dr. Sarah Chen notes, “Moisturized nails hold polish longer and resist breakage.” Avoid prolonged water exposure. Your minimalist design relies on crisp edges, so be intentional with your daily activities. Consider scheduling touch-ups every two weeks. This maintenance routine guarantees your elegant aesthetic stays impeccable and extends your manicure’s longevity considerably.
Frequently Asked Questions
How Much Does a Minimalist Manicure Typically Cost at a Salon?
You’ll typically spend between $25 and $50 for a minimalist manicure at most salons. The exact price depends on your location, the salon’s reputation, and whether you’re adding extras like gel polish or nail art embellishments to your simple design.
Can Minimalist Nail Designs Work for Short Nails or Only Long Nails?
You can absolutely rock minimalist nail designs on short nails! In fact, they’re ideal for shorter lengths since simple lines, dots, and geometric shapes don’t require much space. You’ll find that minimalist designs actually look cleaner and more sophisticated on short nails.
What Tools and Products Do I Need to Create Minimalist Nails at Home?
You’ll need basic nail polish, a thin brush or dotting tool, nail file, buffer, and base coat. You can create stunning minimalist designs with just these essentials. Consider adding a top coat for longevity and clean-up brush for precision work.
How Often Should I Touch up Minimalist Nail Designs to Maintain Appearance?
You’ll want to touch up your minimalist nails every two to three weeks as your natural nails grow out. Since minimalist designs rely on clean lines and simplicity, you’ll notice growth more noticeably. Regular maintenance keeps your look sharp and polished.
Are Minimalist Nails Appropriate for Professional Workplace Environments?
Yes, you’ll find minimalist nails perfect for professional environments. They’re understated, polished, and sophisticated—qualities that won’t distract from your work. You can wear clean lines, neutral tones, or subtle designs that enhance your professional image without appearing too bold or casual.
Conclusion
You’ve discovered how minimalist nails work for every occasion. By choosing quality topcoats like Seche Vite and maintaining consistent cuticle care, you’ll keep your designs looking sharp longer. Negative space and subtle color blocking offer sophisticated impact without overwhelming your hands. These understated styles prove that less truly is more—refined elegance doesn’t require complexity, just intention and precision.