
Summer nails bring that beachy, fun energy that makes you feel genuinely excited about the season. Bright colours, tropical vibes, and playful designs capture vacation mode perfectly without leaving home. You’ll absolutely love how carefree and fabulous they make you feel every single day.
What makes summer nails so brilliant is their ability to feel joyful and effortlessly stylish at once. From ocean blues to sunset oranges, colour choices bring happiness and personality naturally. They work beautifully whether you’re heading to the beach, hanging with mates, or embracing summer adventures confidently.
Here are 42 gorgeous summer nail designs that celebrate beachy fun with genuine colour and vibrant style. From tropical prints to metallic accents, each design brings something special and summery to the table. Pick your favourite and get ready to feel absolutely fabulous and beach-ready always.
Table of Contents
- Soft Pastel Summer Gradient
- Tropical Hibiscus Flower
- Ocean Blue and White Marble
- Coral Pink With Gold Foil
- Seafoam Minimalist Stripes
- Sunset Ombre in Orange and Purple
- Blush Pink and White Stripes
- Turquoise With Sand Dollar Details
- Aquamarine With Shimmer Finish
- White Base With Watercolor Seashell
- Mermaid Scales in Blue and Silver
- Ocean Wave Design
- Teal Glitter Ombre
- Sandy Beige With Ocean Blue Tips
- Bright Turquoise Gloss Finish
- Ocean Waves With White Foam
- Palm Tree Silhouettes
- Pineapple Print Nails
- Tropical Flamingo and Leaves
- Tropical Monstera Leaves
- Lime Green With White Daisy
- Sage Green With Botanical Accents
- Bright Fuchsia With Palm Print
- Tropical Sunset With Palm Silhouette
- Watermelon Slice Nails
- Lemon Yellow With Black Stripes
- Peach Glitter and Nude Blend
- Creamsicle Orange and Peach Swirl
- Mint Green With Citrus Accent
- Shell and Starfish Accents
- Navy Blue and White Nautical Stripes
- Coral Reef Color Blocking
- Coral and White Geometric Design
- Sunshine Yellow Metallic Tips
- Peachy With Rose Gold Shimmer
- Golden Hour Warm Metallics
- Lavender Pastel With Floral Accents
- Pastel Rainbow Gradient Summer
- Powder Blue With White Cloud Details
- Crystal Clear Gloss With Micro-Glitter
- High-Shine Gel With Iridescent Finish
- Beach-Inspired Nude With Sparkle
- Frequently Asked Questions
- How Long Do Summer Nail Designs Typically Last Before Chipping?
- What Nail Polish Brands Work Best for Creating Beachy Nail Art?
- Can I Apply These Designs Myself or Do I Need a Professional?
- How Do I Remove Glitter and Foil Nail Designs Without Damaging Nails?
- What Base Coat and Top Coat Should I Use for Summer Designs?
- Conclusion
Soft Pastel Summer Gradient

When you’re ready to elevate your nail game this season, soft pastel gradients deliver effortless sophistication. This technique blends two complementary shades seamlessly across your nail surface, creating dimensional depth that catches light beautifully. You’ll want to start with a base coat, then apply your lighter shade first. Using a makeup sponge, dab your darker pastel onto the tip and gently stipple where the colors meet. Brands like Essie and OPI offer excellent gradient-friendly formulas. The result? A professional ombre effect without complicated brushwork. As nail artist Michelle Humphrey notes, “Gradients work best with analogous colors—think lavender to lilac or peach to coral.” You’re creating movement and visual interest while maintaining that breezy summer aesthetic everyone craves right now.
Also read: Pink Valentines Day Nails | Sweet Design
Tropical Hibiscus Flower
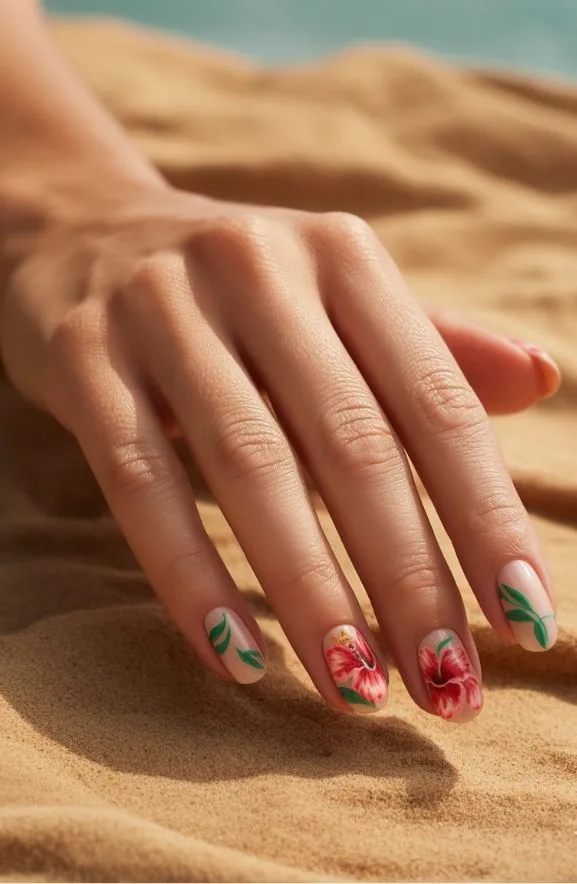
If soft gradients feel too understated for your taste, hand-painted hibiscus flowers bring bold botanical beauty to your nails. You’ll start with a vibrant base—think coral, hot pink, or sunset orange—that mimics tropical petals. Using a thin detail brush and gel polish, you’ll sketch delicate five-petal formations with precise curved strokes. Add darker shades for dimension and depth. Layer translucent pinks over your base to create realistic petal texture and movement.
According to nail artist Maria Chen, “Hibiscus designs thrive when you vary petal sizes and overlap them naturally.” Consider adding tiny black stamens at each flower’s center using a dotting tool.
Seal everything with glossy top coat for that beachy, sun-kissed finish. The result? Statement nails that scream summer confidence without looking overdone.
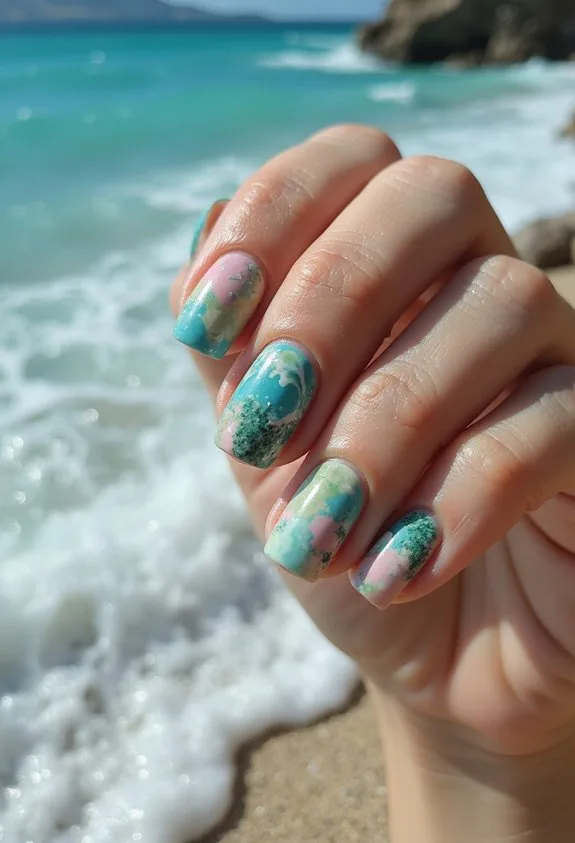
Ocean Blue and White Marble

Creating ocean-inspired marble nails requires layering translucent blues with stark white swirls to capture water’s natural movement. You’ll start with a creamy white base coat as your foundation. Apply two coats of translucent blue polish—brands like Essie’s “Bikini So Teeny” work beautifully for this effect. While the second coat remains tacky, use a thin brush to drag white polish across the surface in organic patterns. Don’t aim for perfection; nature’s marble isn’t symmetrical. A topcoat seals everything and adds glossy dimension. You can enhance the design by adding tiny pearl accents near the cuticle area. This technique mimics actual ocean water, giving your nails sophisticated depth. The marble effect transforms simple summer polish into wearable art that captures coastal vibes perfectly.
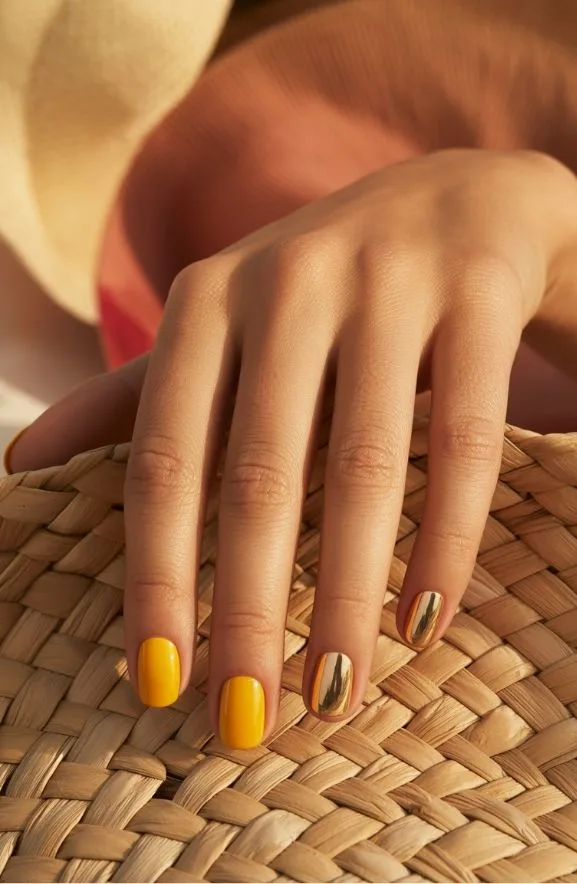
Coral Pink With Gold Foil

For a summery glow that catches the light, coral pink with gold foil delivers warmth and sophistication in one stunning manicure. You’ll start with two base coats of a creamy coral polish like Essie’s “Peach Daiquiri” for depth and durability. Apply gold foil sheets to your accent nails using a tacky gel base. The foil adheres instantly when pressed firmly for five seconds. According to nail artist Michelle Chen, “Gold foil creates dimension without overwhelming delicate coral tones.” Layer a glossy top coat over everything for seamless integration. You can also hand-paint thin gold lines across your nail beds for personalized detailing. This combination works beautifully on medium oval or coffin shapes. Pair it with lightweight summer dresses and metallic sandals for maximum impact throughout warm months.
Seafoam Minimalist Stripes
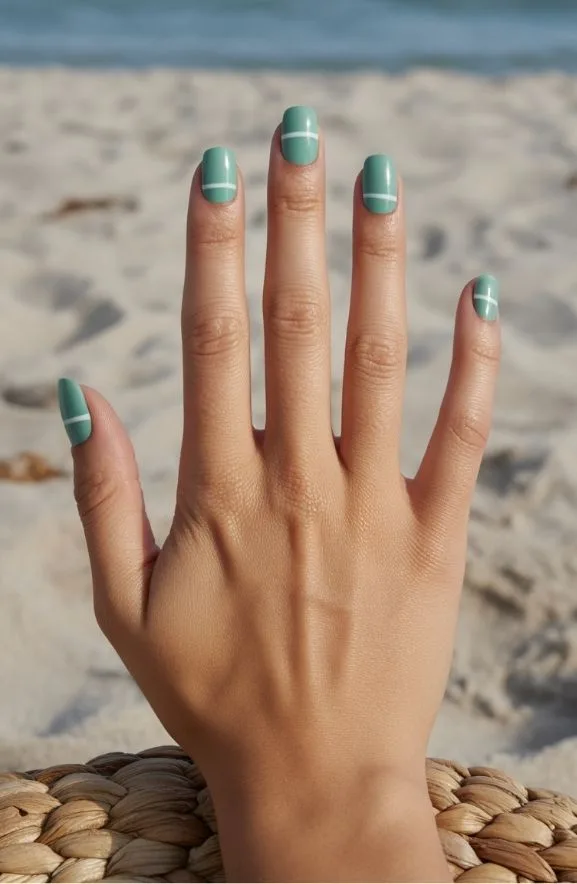
When you’re ready to embrace understated elegance, seafoam minimalist stripes offer the perfect balance of calm color and graphic interest. This design keeps your nails fresh without overwhelming them.
Start with a seafoam base coat like OPI’s “My Gondola or Yours.” Once dry, use a thin striping brush to paint delicate vertical lines in white or cream. The contrast creates visual depth while maintaining sophistication.
- Thin, evenly-spaced lines in crisp white
- Glossy top coat for dimension and shine
- Single accent nail with metallic stripes
According to nail artist Marcus Chen, “Minimalist designs require precision—each line matters.” Space your stripes about two millimeters apart for balance. This design shifts effortlessly from beach days to casual office settings.
Sunset Ombre in Orange and Purple

If you’re craving more color after mastering minimalist lines, sunset ombre delivers the vibrant energy you’re looking for. This gradient technique blends warm oranges into deep purples, creating a dynamic visual effect across your nails. Start with a peachy-orange base using Sally Hansen’s Color Therapy line. Layer deeper purple tones toward the tips using a makeup sponge for seamless blending. The key is working quickly before polish dries. Apply a glossy top coat to enhance the ombre’s depth and dimension. As nail artist Jin Soon notes, “The beauty of sunset ombre lies in its color harmony—warm and cool tones dancing together.” This design captures summer’s golden hour while feeling sophisticated. Perfect your technique with practice, and you’ll master this trending look effortlessly.
Blush Pink and White Stripes
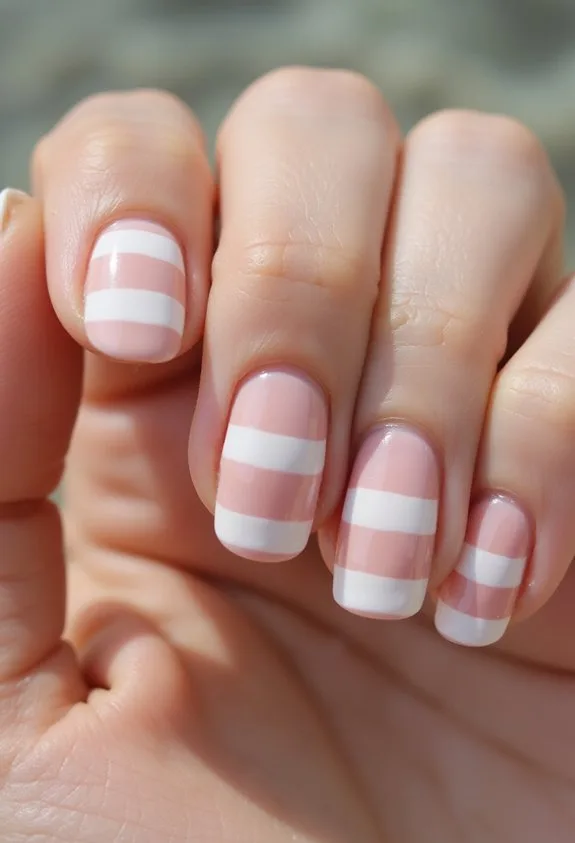
Stripes bring a fresh, preppy energy to your summer nails—and they’re easier to execute than you’d think. You’ll create visual interest by alternating thin blush pink and crisp white lines across each nail. The combination feels sophisticated yet playful for warm-weather occasions.
Here’s how to nail this look:
- Apply a white base coat as your foundation layer for maximum opacity and longevity
- Use a thin striping brush or nail art pen to draw alternating pink and white lines with precision
- Seal everything with a glossy top coat for dimension and protection
Keep your stripes evenly spaced for polished results. The contrast between soft pink and bright white creates dimensional depth. This design works beautifully on both short and long nails. You’ll appreciate how this timeless pattern feels both beachy and elevated—perfect for summer styling.
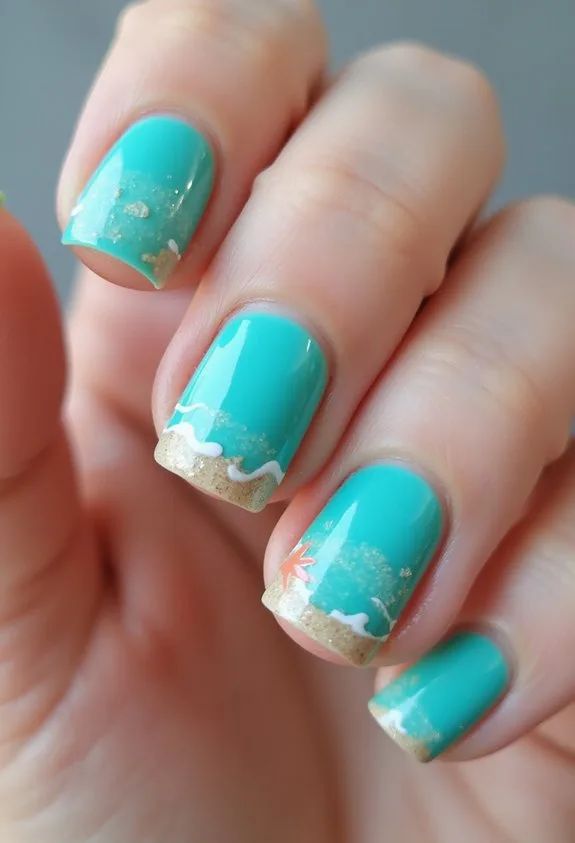
Turquoise With Sand Dollar Details

For a design that captures the essence of coastal beauty, turquoise paired with delicate sand dollar details delivers beachy sophistication. Start with two coats of a creamy turquoise base, like OPI’s “Suzi Says Feng Shui.” Once dry, you’ll use a thin detail brush to paint tiny sand dollar impressions across your nails. Create the classic circular pattern with five-point details using off-white or pale gold polish. Layer a glossy topcoat to enhance dimension and protect your artwork.
According to nail artist Jamie Hernandez, “Sand dollars add authentic coastal character without overwhelming the base color.” Consider adding subtle shimmer to your turquoise base for extra depth. You can also accent your ring finger with a solid sand dollar silhouette for visual interest. This design works beautifully on both short and long nails, making it versatile for any summer occasion.
Aquamarine With Shimmer Finish

Bring out the luminous depths of summer by layering aquamarine with strategic shimmer accents. You’ll create dimension that catches light beautifully, mimicking ocean water’s natural glow. This technique works best on longer nails where shimmer can travel across the nail bed.
- Apply a creamy aquamarine base coat like OPI’s “Toying with Emotions” for smooth coverage
- Layer translucent shimmer polish across the tips and center, leaving darker aquamarine at the edges
- Seal everything with glossy top coat to amplify that luminous effect
Celebrity nail artist Jin Soon states, “Shimmer finishes elevate simple colors into statement-making designs.” You’re fundamentally creating an ombré effect that looks professionally done yet achievable at home. The result? Nails that command attention without overwhelming your summer aesthetic.
White Base With Watercolor Seashell
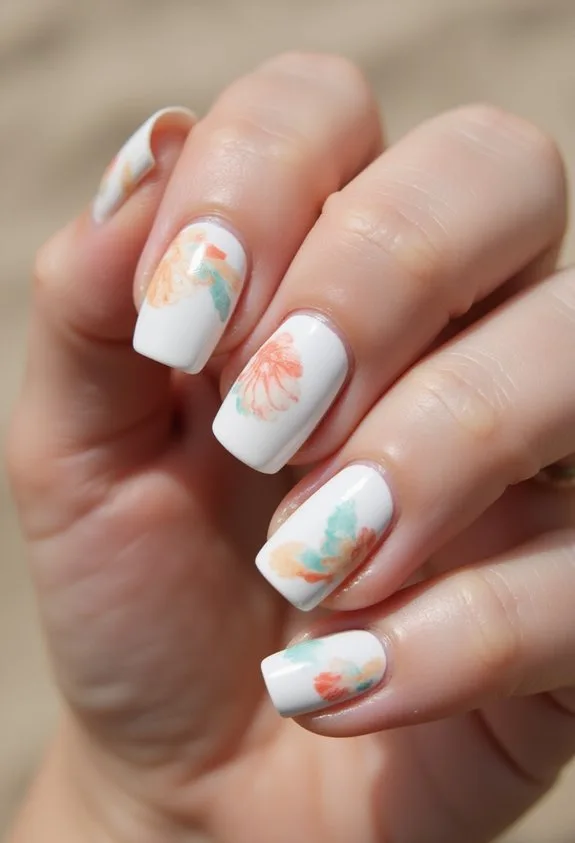
While shimmer finishes celebrate light and reflection, you can embrace a more artistic approach with hand-painted details. Start with a clean white base coat—OPI’s “Alpine Snow” works beautifully. Let it dry completely.
Next, you’ll paint watercolor seashells using diluted acrylics and a fine-tipped brush. Mix peachy, coral, and soft pink pigments with water for translucency. Sketch shell outlines lightly first. Build colors gradually, layering translucent washes for depth and dimension.
Add delicate details like ridges and subtle shading. A professional nail artist recommends: “Watercolor techniques thrive on patience and light layering rather than heavy application.”
Finish with a glossy top coat to seal your artwork. The result? Sophisticated nail art that captures coastal beauty without overwhelming your summer aesthetic. This design pairs perfectly with sundresses and beach trips.
Mermaid Scales in Blue and Silver

Transform your nails into an underwater fantasy by layering iridescent scales that catch the light. This mermaid-inspired design combines dreamy blues with shimmering silver for maximum visual impact.
Start with a deep blue base coat. Once dry, apply silver scale decals or hand-paint overlapping patterns using a thin detail brush. Layer translucent blue gel polish over sections to create dimension and depth.
Here’s what you’ll need:
- Navy or cobalt blue base polish for rich color foundation
- Holographic silver foil or gel for reflective scale details
- Matte top coat to seal and enhance the textured finish
“The key is building layers gradually,” says celebrity nail artist Maria Chen. “Each scale should catch light differently, creating movement across your nails.”
This design stays fresh throughout summer and pairs beautifully with beachy outfits and ocean-themed accessories.
Ocean Wave Design
If you’re craving movement and dimension on your nails, an ocean wave design delivers stunning visual flow that rivals the mermaid scales aesthetic. You’ll layer translucent blues and teals to create depth. Start with a pale seafoam base coat—try OPI’s “Ocean of Possibilities”—then brush on wavy strokes using a thin liner brush.
Build dimension by adding white shimmer accents along wave peaks. A nail artist tip: let each layer dry slightly before applying the next stroke for crisp definition. You can enhance the effect with a glossy topcoat that catches light beautifully.
The result? Nails that capture the ocean’s natural rhythm and movement. This design works beautifully on medium to long nail lengths, where curves truly shine.
Teal Glitter Ombre

Building on the fluid elegance of ocean waves, a teal glitter ombre takes that watery aesthetic and amplifies it with sparkle. You’re layering depth and shimmer in one cohesive design.
Start with a pale seafoam base on your nail beds. Gradually deepen the color toward your tips using a medium teal shade. Here’s your application strategy:
- Apply two coats of seafoam polish as your foundation
- Blend medium teal into the ombre zone using a damp sponge
- Layer fine glitter particles across tips, concentrating density near free edges
“Ombre techniques require patience and precision,” says nail artist Miranda Chen. Use a quality gel-polish system for longevity. The gradient creates dimension without overwhelming your fingertips. Your nails’ll catch light beautifully throughout summer days and evening events alike.
Sandy Beige With Ocean Blue Tips
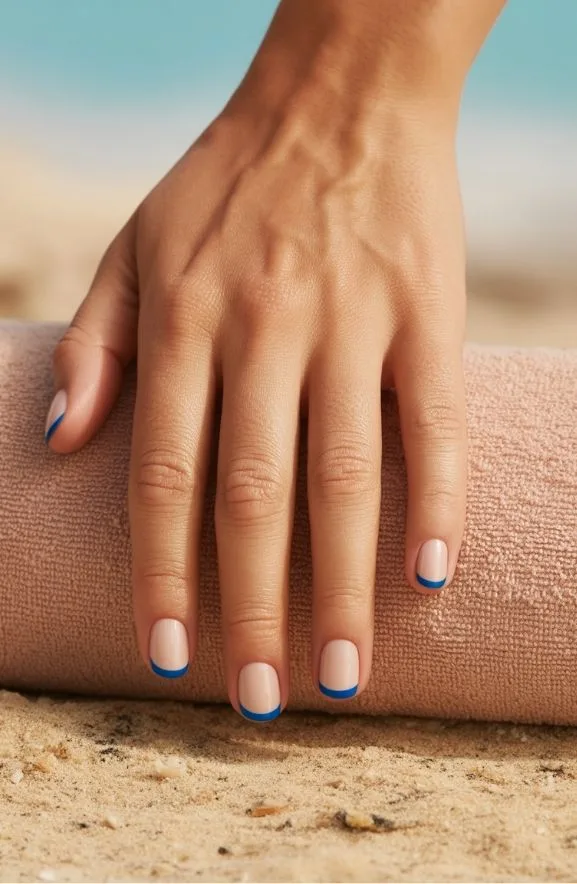
As summer moves from beach days to sunset dinners, a sandy beige base paired with ocean blue tips creates understated elegance. You’ll start with a warm neutral foundation that mimics sun-kissed sand. Apply two coats of a creamy beige polish like OPI’s “Worth a Pretty Penne” for smooth coverage.
Next, you’ll create the ocean blue ombre tips using a gradient technique. Blend a rich ocean blue shade—try Essie’s “Bikini So Teeny”—onto a makeup sponge and dab it onto your nail tips. The soft progression between beige and blue requires patience.
Seal everything with a glossy top coat for dimension and longevity. This design captures coastal vibes without screaming beach theme. You’re achieving sophisticated summer style that works for casual brunches and evening outings alike.
Bright Turquoise Gloss Finish
For a bolder statement than sandy neutrals, bright turquoise demands center stage. You’ll love how this vibrant shade captures summer’s energy and reflects light beautifully. A high-gloss topcoat amplifies the color’s intensity, creating a polished, professional look.
Apply two coats of turquoise base for full coverage. The glossy finish requires precision application and quality products like Essie’s “Aruba Blue” or OPI’s “Fiji Blue.” These deliver rich pigment without streaking.
Consider these styling options:
- Pair turquoise with white or silver accents for contrast
- Use matte topcoat on one accent nail for dimension
- Layer glitter within the gloss for subtle sparkle
Professional nail technicians recommend sealing edges carefully to prevent chipping. “Gloss finishes elevate any summer palette,” explains renowned colorist Maria Chen. This approach keeps your nails vacation-ready for weeks.
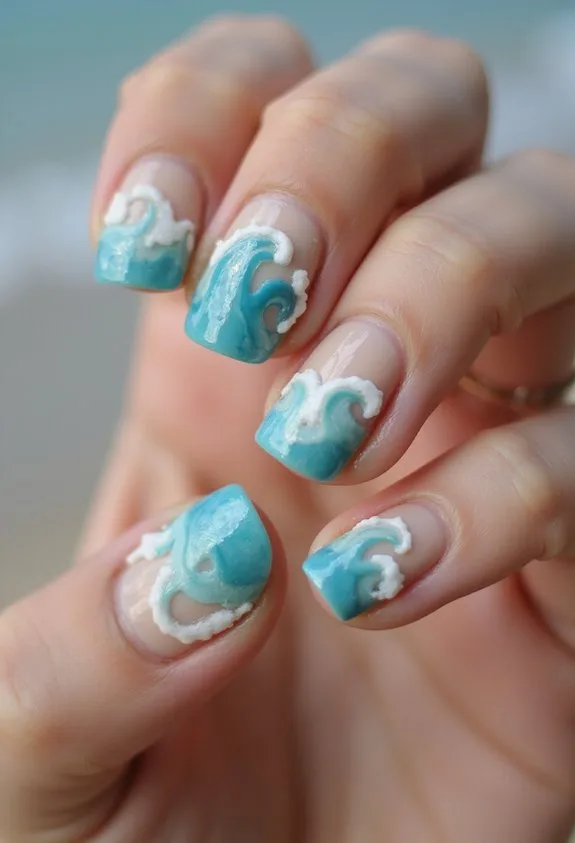
Ocean Waves With White Foam
If you’re craving an ocean-inspired nail design, this wave technique captures summer’s coastal vibes with stunning dimension. You’ll layer a deep teal or navy base coat, then use a thin brush to paint white diagonal strokes mimicking wave crests. The key is creating movement through curved, flowing lines across each nail. Apply a glossy top coat to enhance the water-like effect and amplify dimension.
For execution, try OPI’s “Samoan Sand” as your foam detail. Build layers gradually—don’t overload polish on your brush. You can add subtle shimmer to white sections for extra depth. Practice on a practice wheel first. The contrast between dark water and bright foam creates that coveted beachy aesthetic. This design works beautifully on medium or longer nails, where you’ll have adequate space for realistic wave proportions.
Palm Tree Silhouettes
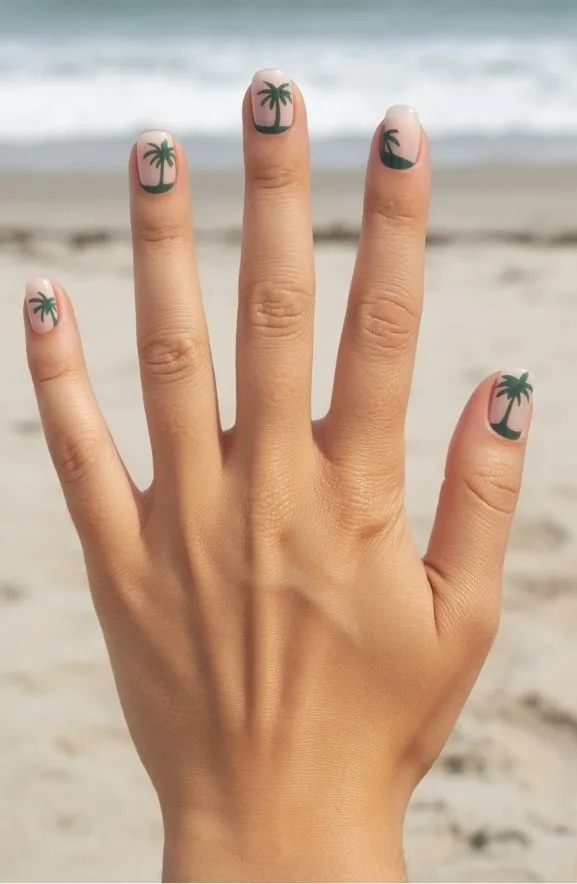
Several tropical nail designs capture summer’s essence, but palm tree silhouettes deliver instant vacation vibes with minimal complexity. You’ll create striking contrast by applying dark silhouettes against bright backgrounds. This design works beautifully on short or long nails alike.
Start with a creamy base coat like OPI’s “Bubble Bath.” Layer your palm tree shapes using a thin detail brush or stamping plate. Consider these positioning options:
- Single centered tree on each nail for minimalist appeal
- Multiple trees graduating in size across your nail set
- Silhouettes framing a sunset gradient background
Build dimension by adding metallic accents along tree trunks. A matte top coat softens the overall look while protecting your artwork. Professional nail technician Maria Chen notes that “silhouettes eliminate fussy details while maximizing visual impact.” You’re achieving salon-quality results through strategic simplicity.
Pineapple Print Nails
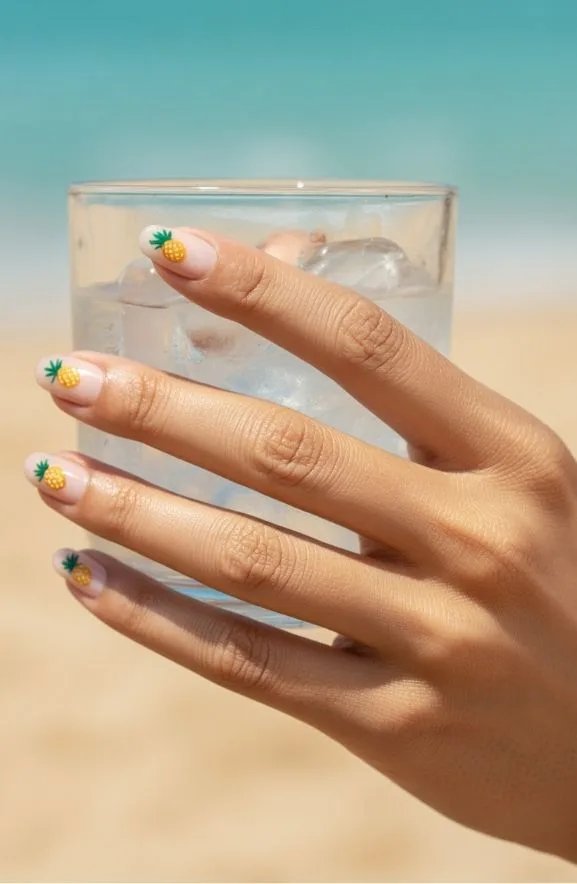
Pineapple print nails bring playful tropical energy to your summer manicure with bold geometric patterns and vibrant yellows. You’ll layer a creamy yellow base coat first. Then, using a thin nail art brush, sketch the diamond-shaped texture that defines pineapple skin. Add deeper golden accents for dimension and shading.
Consider using OPI’s “Bee My Honey” as your foundation color. A nail technician notes, “Geometric fruit designs require steady hand control and proper brush sizing for precision.”
You can enhance the design with glossy top coats or matte finishes for contrast. Some prefer adding tiny green leaves at the nail tip. This style works beautifully on medium-length nails. Pineapple prints photograph well and photograph well and suit both casual and dressy summer occasions perfectly.
Tropical Flamingo and Leaves
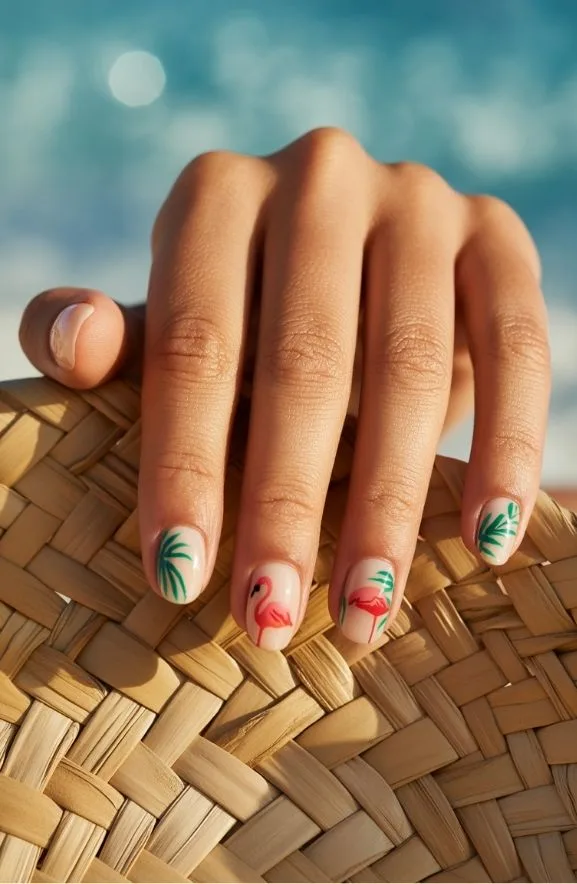
Bring vibrant wildlife imagery to your nails with tropical flamingo designs that combine pink elegance and lush foliage. You’ll create a vacation-ready manicure that captures summer’s carefree spirit.
Start with these essential elements:
- Base a soft peachy-pink or cream foundation using OPI’s “Bubble Bath” or similar neutral shade
- Hand-paint delicate flamingo silhouettes using thin brushes and hot pink gel polish for dimensional detail
- Add leafy accents with sage green and tropical foliage patterns surrounding your flamingo focal point
Layer your design strategically across accent nails for visual balance. Apply glossy top coat to enhance the polish’s vibrancy and create that beachy shine. Flamingo designs work beautifully on medium or coffin-shaped nails, giving you space for intricate details. This style combines artistry with approachability—we can’t get enough of the tropical confidence it delivers.
Tropical Monstera Leaves

While flamingo designs celebrate wildlife, monstera leaf patterns pivot focus to botanical elegance—a timeless tropical staple that’s equally Instagram-worthy. You’ll paint oversized leaf silhouettes using deep greens and jade tones. Layer translucent layers with matte and glossy top coats for dimensional depth. Start with a cream base. Outline each leaf carefully using a thin brush. Add veining details with darker green or black polish.
Pro tip: “Monstera nails work best on longer nail beds,” says celebrity nail artist Marcus Chen. You’re creating movement through strategic color blocking and negative space techniques. Consider adding metallic gold accents along the leaf edges. Use gel formulas like Gelish or Orly for lasting wear through summer activities. This design shifts seamlessly from beach days to evening plans, proving botanical inspiration never goes out of style.
Lime Green With White Daisy

For a summery pop that’s impossible to ignore, lime green with white daisy accents delivers maximum impact on shorter nail beds. You’ll create visual interest through contrasting colors that catch light beautifully. Start with two coats of a cream lime green base—try Essie’s “Mojito Madness” for optimal opacity and coverage. Once dry, hand-paint delicate white daisies using a fine detail brush or dotting tool.
- Apply matte top coat to the lime base for a velvety finish
- Add glossy clear coat over daisies for dimensional contrast and depth
- Use gold micro-glitter on petal centers for subtle sparkle
“This combination works particularly well because the brightness energizes shorter nails,” says celebrity manicurist James Boehmer. The high contrast guarantees your design remains visible and impactful throughout your summer season. You’ve created nail art that’s both wearable and eye-catching.
Sage Green With Botanical Accents

Sage green nails offer a sophisticated alternative to brighter summer hues, combining earthy elegance with modern refinement. You’ll achieve this aesthetic by applying a creamy sage base coat, then layering delicate botanical line work using thin brushes or striping tools. Consider adding pressed flower designs or hand-painted leaf motifs across your nail beds for dimensional interest.
We can’t get enough of this nature-inspired approach. Layer translucent greens with matte finishes to create depth without overwhelming your design. Apply a glossy top coat selectively—perhaps only on botanical accents—for textural contrast.
Nail artist Elena Rodriguez explains, “Sage green works beautifully because it complements all skin tones while maintaining understated sophistication.” Pair this manicure with minimal jewelry to let your nails command attention. Use gel formulas for longevity throughout summer activities.
Bright Fuchsia With Palm Print

If you’re ready to swap understated elegance for bold summer energy, bright fuchsia with palm print delivers maximum impact. This combination screams tropical vacation vibes.
Start with a fuchsia base coat like OPI’s “Spare Me a French Quarter.” Layer palm fronds in deep green or black across the nail beds using a thin detail brush. The contrast creates dimension and visual interest.
- Paint alternating nails solid fuchsia, leaving some with palm print overlays
- Add white accent lines between fronds for a graphic, modern feel
- Seal everything with glossy topcoat to enhance color saturation
Celebrity colorist Jin Soon advises: “Tropical prints work best on longer nails where the design has room to breathe.” Pair this design with gold jewelry. You’ll capture that effortless beachy-glam aesthetic.
Tropical Sunset With Palm Silhouette

As the sun dips below the horizon, you can capture that golden-hour magic right on your fingertips. Start with a warm peachy-orange base coat on your nail beds. Layer a deeper coral-red toward the tips, creating a natural gradient effect. Add silhouetted palm trees using black gel polish and a thin detail brush. Position the fronds asymmetrically for visual interest and authenticity.
According to nail artist Marcus Chen, “Sunset gradients work best when you blend three complementary warm tones.” Try OPI’s “Coral-ado” paired with Sally Hansen’s “Deep Sea” for dimensional depth. The contrast between vibrant sunset hues and stark black silhouettes creates striking visual balance.
Top with glossy sealant for enhanced luminosity. You’ll achieve that coveted beachy-chic aesthetic that screams summer sophistication.
Watermelon Slice Nails

While sunset gradients celebrate the sky’s warm palette, watermelon designs bring that invigorating, juicy summer feeling straight to your nails. You’ll love how this playful design captures the season’s essence.
Create your watermelon look with these essential steps:
- Paint a white base coat, then apply vibrant red polish to your nail beds, leaving a thin white crescent at the tips
- Add a curved green stripe along the white tip line using a thin brush or nail art pen for authentic rind definition
- Dot tiny black seeds across the red section with a dotting tool, spacing them naturally for realistic dimension
The result? Fresh, dimensional nails that scream summer. Use OPI’s “Big Apple Red” for that perfect watermelon hue. This design works beautifully on short or long nails, making it accessible for everyone seeking that fruity, beachy vibe.
Lemon Yellow With Black Stripes

Bright lemon yellow nails with bold black stripes deliver that perfect citrus-inspired look for summer. You’ll start with a vibrant yellow base—try OPI’s “Don’t Stop Me Now” or Essie’s “Sunny Side Up.” Apply two coats for opacity. Once dry, you’ll use a thin striping brush or nail art pen to paint precise black lines. Horizontal stripes create a classic candy-stripe effect. Vertical stripes offer a modern, elongating appearance. According to nail artist Marcus Chen, “Geometric patterns like stripes showcase precision and elevate simple color combinations.” Seal everything with a glossy top coat for dimension and protection. The result? A design that’s simultaneously playful and polished. This design works beautifully on short or long nails, making it accessible for everyone seeking bold summer style.
Peach Glitter and Nude Blend

For a softer take on summer glamour, try pairing peachy tones with nude bases and glitter accents. This combination gives you elegance without overwhelming your fingertips. You’re blending warmth with sophistication in one cohesive look.
Start with a creamy nude base polish across all nails. Apply a peachy shimmer over your accent nails for dimension. Layer fine glitter on top while the polish remains wet.
- Use a nude that matches your skin tone for seamless elongation
- Choose peachy shades with warm undertones for flattering contrast
- Select rose gold or champagne glitter for refined sparkle
The result? Nails that feel both polished and relaxed. This design works perfectly for beach days or professional settings. You’ll find the soft palette shifts beautifully with any summer wardrobe, creating understated elegance that lasts through your entire season.
Creamsicle Orange and Peach Swirl

If you’re craving a nail design that captures summer’s sweetest nostalgia, the creamsicle orange and peach swirl delivers exactly that vibe. You’ll layer a creamy vanilla base with soft peach and vibrant orange tones. The swirl technique creates a dreamy marbled effect across your nail surface.
Start with two coats of OPI’s “Sweet as a Peach” as your foundation. Apply “Creamsicle Dream” in thin brushstrokes, then feather orange accents while the polish remains wet. Use a detail brush to blend the colors seamlessly.
This design works beautifully on short and long nails. The soft color gradient photographs amazingly in natural sunlight. You can seal everything with a glossy top coat for dimension. The result? Nails that practically taste like summer.
Mint Green With Citrus Accent

While mint green typically reads as cool and calming, pairing it with citrus accents creates unexpected visual excitement. You’ll achieve an invigorating aesthetic that feels both sophisticated and playful for summer.
Start with a mint base using OPI’s “Green-ery” or Sally Hansen’s mint cream formula. These polish choices provide excellent opacity and a smooth finish. Layer citrus details strategically:
- Paint thin lemon-yellow stripes on your ring and pinky fingers using a detail brush
- Add tiny orange dots scattered across your middle nail for dimension
- Create a gradient where mint fades to peachy-orange on your accent nail
“This combination works because warm and cool tones create visual contrast,” explains celebrity nail artist Jin Soon. Apply a glossy top coat to enhance the summery vibe. You’ve now created nails that feel energetic yet refined.
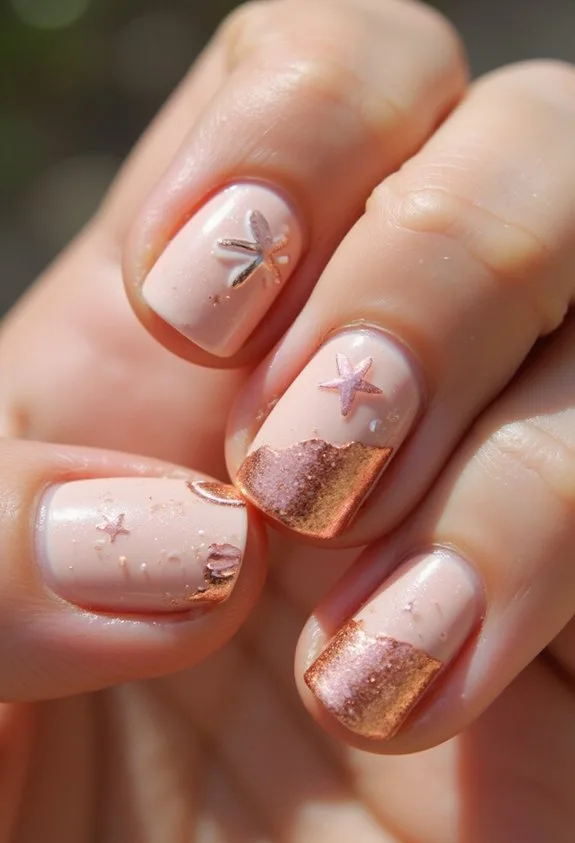
Shell and Starfish Accents

As you move from tropical brights to oceanic themes, shell and starfish accents bring coastal sophistication to your summer manicure. Paint your base in soft cream or pale blue. Add hand-painted starfish details using fine-tipped brushes and coral or gold polish. Shell accents work beautifully with textured finishes. Apply iridescent powders to create dimension and catch light realistically. Use stamping plates designed for beach motifs to save time and guarantee precision. Layer translucent glitter over accent nails for subtle shimmer without overwhelming the design.
According to nail artist Maria Chen, “Shell patterns reflect light differently depending on application angle, creating naturally dimensional effects.” Consider 3D gel embellishments for genuine texture. Seal everything with glossy top coat. Your nails’ll capture that effortless beach-ready aesthetic we can’t get enough of this season.

Navy blue and white stripes bring timeless nautical elegance to your summer nails.
This classic design works perfectly for beach season. You’ll create crisp horizontal lines using a thin striping brush or nail tape. Apply a white base coat first, then layer navy stripes at consistent intervals.
Consider these styling options:
- Alternating thick and thin stripes for visual interest and dimension
- Adding a glossy top coat that catches light like ocean water
- Pairing stripes with subtle gold accents on accent nails
According to nail technician Sarah Chen, “Nautical stripes transcend trends because they’re rooted in timeless aesthetics.” Use Sally Hansen’s Insta-Dry collection for quick-drying precision. The stripe pattern flatters all nail shapes and lengths. You’ll achieve salon-quality results at home with steady hands and patience.
Coral Reef Color Blocking
If you’re ready to move beyond classic patterns, coral reef color blocking transforms your nails into an underwater masterpiece. You’ll apply contrasting shades in distinct sections, creating bold geometric divisions that mimic ocean landscapes.
Start with a coral base using OPI’s “Living On the Bula-ouija Board.” Layer contrasting blocks of turquoise, seafoam, and cream across your nail. Use thin striping brushes for clean edges between color zones.
“Color blocking creates dimension without intricate artwork,” says nail artist Marina Chen. The technique works on short and long nails alike.
Apply a glossy topcoat to enhance vibrancy. The result? Nails that capture summer’s energy instantly.
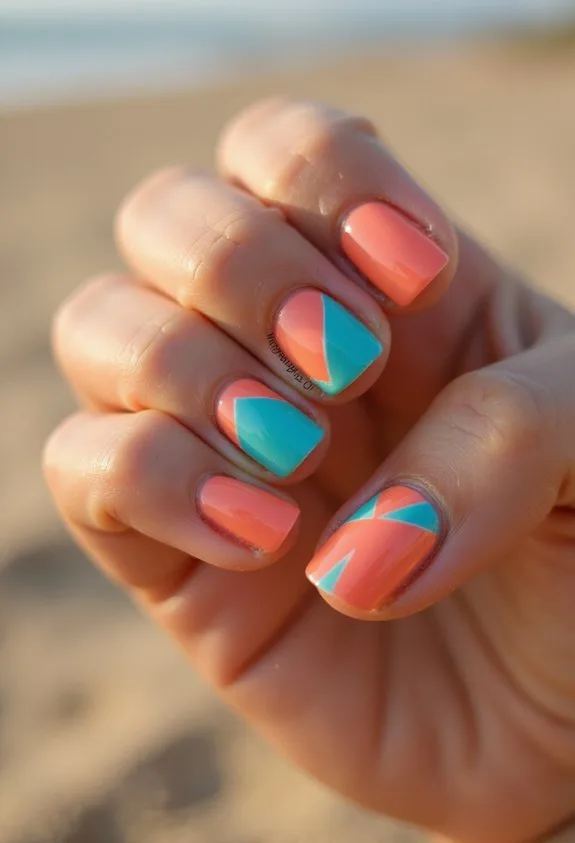
Coral and White Geometric Design

When you’re craving clean lines and timeless appeal, coral and white geometric designs deliver sophisticated summer style without overwhelming complexity. You’ll create visual interest through strategic pattern placement that flatters every nail shape.
Start with a crisp white base coat. Apply coral polish to accent nails for balance. Use a thin brush or nail art pen for precise lines.
Try these geometric approaches:
- Diagonal stripes alternating coral and white across all nails for dynamic movement
- Triangle cutouts on the nail’s lower corner, creating negative space with white showing through
- Chevron patterns down the center in coral, framing white sides for architectural appeal
Professional nail artist Maria Chen notes, “Geometric designs work best with 2-3 color applications maximum.” Layer a glossy top coat to enhance dimension. Your nails’ll look editorial-ready and effortlessly polished.
Sunshine Yellow Metallic Tips
Bright metallic yellows bring instant summer radiance to your fingertips, capturing that golden-hour glow with effortless elegance. You’ll apply a creamy yellow base coat first, then layer a chrome or metallic topcoat for dimensional shine. The combination creates depth that catches light beautifully.
Consider brands like Essie’s “Good as Gold” or Sally Hansen Chrome effects for professional results. You can keep the design minimal on natural nails or extend tips for extra drama. Pair metallic yellows with white accent nails for contrast.
A nail artist suggests this approach: “Metallics work best with clean lines and intentional placement.” You’ll want to seal everything with a quality glossy topcoat. The result? Nails that radiate summer confidence and beach-ready glamour.
Peachy With Rose Gold Shimmer
While metallics bring bold drama, peachy tones with rose gold shimmer offer a softer yet equally sophisticated alternative for summer nails. You’ll create a luminous effect that flatters all skin tones beautifully. This combination delivers warmth without overwhelming your overall aesthetic.
Layer sheer peach base coats with rose gold shimmer particles to achieve dimensional depth. The result? Nails that catch light subtly rather than scream for attention. You’re building a manicure with understated elegance.
Consider these styling approaches:
- Apply two coats of peachy nude base, then dust rose gold shimmer across the nail tips
- Create gradient effects by concentrating shimmer intensity toward cuticles
- Add thin rose gold accent lines using striping brushes for geometric interest
Essie’s “Apricot Silk” pairs perfectly with OPI’s rose gold topcoat. The combination offers wearability for professional settings while maintaining that coveted summer glow you’re after.
Golden Hour Warm Metallics

The magic hour—that golden moment just before sunset—inspires a nail trend that’s pure warmth and radiance. You’ll layer champagne, bronze, and copper tones to capture that luminous glow on your fingertips.
Start with a warm nude base. Apply a shimmering gold topcoat in sweeping strokes. Add metallic accents using a thin brush for dimension. Consider brands like Essie or OPI for reliable warm-toned metallics that won’t chip quickly.
Mix finishes strategically. Matte bronze pairs beautifully with glossy champagne highlights. Create depth by concentrating shimmer on your nail centers.
As colorist Erica Johnson notes, “Golden hour nails celebrate natural light reflection—you’re basically wearing sunset.” The key’s balancing warmth without overwhelming your summer aesthetic. These metallics work wonderfully with sun-kissed skin, making your hands look effortlessly polished and seasonally relevant.
Lavender Pastel With Floral Accents
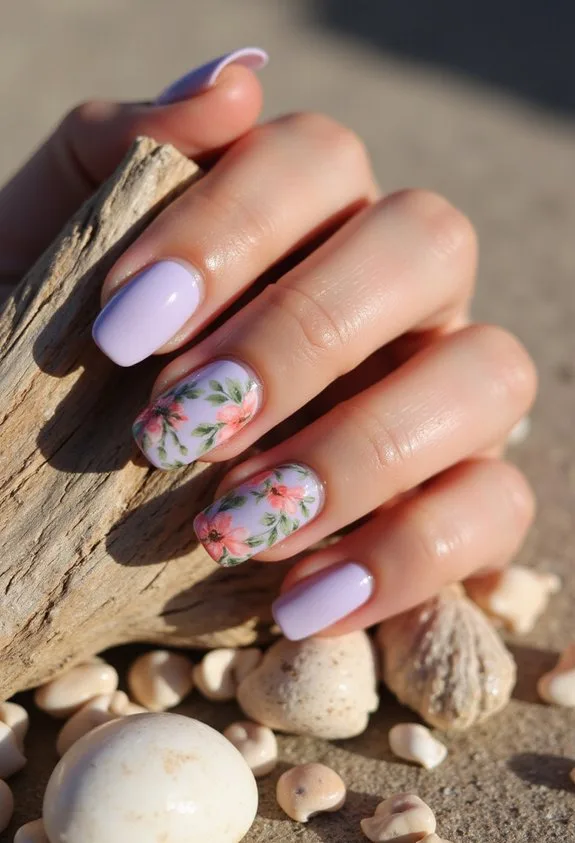
If you’re ready to swap metallics for softer vibes, lavender pastels offer the perfect bridge between bold and delicate. This shade works beautifully as your base, creating a sophisticated canvas for floral artistry.
Layer your lavender with these dimensional touches:
- Hand-painted tiny wildflowers using a thin detail brush and contrasting pinks or whites
- Delicate greenery stems that wrap around your nail edges for organic movement
- Glitter accents concentrated near the cuticle for subtle sparkle without overwhelming softness
Apply two coats of your lavender base—we recommend OPI’s “Do You Have This Color in Stock-holm”—for even coverage. A gel topcoat seals everything while maintaining that creamy finish. The floral elements shouldn’t overshadow your base; they’re supporting players here. This combination delivers understated elegance perfect for summer’s relaxed sophistication.
Pastel Rainbow Gradient Summer

Blending soft hues across your nails creates an effortless, dreamy aesthetic that’s perfect for warm-weather adventures. You’ll layer pastel pink, lavender, mint, and peach in a gradient that shifts seamlessly from nail to nail. Use a makeup sponge to dab and blend colors for that soft, watercolor effect. Start with a white base coat like OPI Base Coat to brighten your pastels. Apply each shade gradually, overlapping colors at the edges. Seal everything with a glossy top coat for dimension and protection. Celebrity nail artist Jin Soon notes, “Gradient nails work because they’re forgiving and universally flattering.” Add delicate gold striping or tiny pearl accents for sophistication. This technique requires patience but delivers stunning results that’ll have everyone asking about your manicure.
Powder Blue With White Cloud Details

Capture that serene sky-inspired look by starting with a soft powder blue base that’ll instantly refresh your summer aesthetic. This dreamy shade creates the perfect canvas for cloud details.
Apply two thin coats of a quality powder blue polish like OPI’s “Blue My Mind” for ideal coverage and vibrancy. Let each layer dry completely before proceeding to cloud application.
- Use a thin detail brush with white gel or acrylic paint to sketch wispy cloud formations across your nails
- Layer semi-transparent white on your brush strokes, feathering edges for authentic cloud texture and dimension
- Seal everything with a glossy top coat that enhances the sky-like appearance and protects your design
The result? Nails that capture summer’s peaceful, breezy energy. This design works beautifully on short or long nail beds, offering versatility for any lifestyle.
Crystal Clear Gloss With Micro-Glitter

You’ll want to build up this luminous nail look with a transparent base that lets your nail beds show through while catching light from every angle. Apply two coats of a quality clear gel polish like Gelish or OPI’s clear formula. The key is opacity without color—pure shine. Next, sprinkle micro-glitter particles while the base coat remains tacky. These tiny sparkles scatter light beautifully across your nails. Top everything with a glossy seal coat for that glass-like finish. According to nail artist Maria Chen, “Micro-glitter creates dimensional depth without overwhelming the natural nail.” The result? Subtle glamour that’s perfect for summer. Your nails’ll catch sunlight and compliments equally. This design works year-round but feels especially beachy during warmer months.
High-Shine Gel With Iridescent Finish

If micro-glitter feels too subtle for your taste, iridescent gel polish takes shimmer to the next level. You’ll love how this finish catches light from every angle, creating a mesmerizing rainbow effect on your nails.
High-shine gel formulas require proper application for maximum impact. Here’s what you need:
- A quality base coat that prevents staining and guarantees adhesion to your nail surface
- Two thin layers of iridescent gel, curing between each application under UV light
- A glossy top coat that amplifies the reflective shimmer and extends wear time
The result? Nails that shimmer like oil on water. According to nail technician Maria Chen, “Iridescent gels work best in natural sunlight, where their true dimensional quality emerges.” You’re creating dimensional nail art that looks professionally done at home, transforming your summer aesthetic instantly.
Beach-Inspired Nude With Sparkle

When summer calls for understated elegance, beach-inspired nude with sparkle delivers the perfect balance. You’ll start with a creamy beige or warm taupe base that complements all skin tones beautifully. Apply two coats for full coverage without looking heavy.
Next, you’ll layer fine iridescent glitter or shimmer across the nail surface. Focus the sparkle concentration on the tips for a gradient effect. This creates dimension while keeping the look sophisticated and wearable.
Celebrity nail artist Jin Soon recommends using “a light hand with glitter placement—less is more for daytime wear.” Try CND Shellac in “Clearly Pink” topped with OPI’s “Bubble Bath” shimmer topcoat for professional results. You can experiment with accent nails too. Paint just your ring finger with extra sparkle for subtle interest.
This combination works everywhere: beach vacations, weekend brunches, casual office settings.
Frequently Asked Questions
How Long Do Summer Nail Designs Typically Last Before Chipping?
You’ll typically enjoy your summer nail designs for two to three weeks before chipping becomes noticeable. However, you can extend their longevity by applying a protective top coat weekly and avoiding prolonged water exposure. You’re investing in proper maintenance for lasting results.
What Nail Polish Brands Work Best for Creating Beachy Nail Art?
You’ll find that brands like OPI, Essie, and Sally Hansen work best for beachy nail art. They’re durable, offer vibrant colors, and apply smoothly. You should also try gel polish for longer-lasting designs that won’t chip easily.
Can I Apply These Designs Myself or Do I Need a Professional?
You can absolutely apply beachy nail designs yourself! Start with simpler patterns like stripes or dots. As you gain confidence, you’ll tackle more complex designs. However, intricate artwork might benefit from a professional’s expertise and steady hand.
How Do I Remove Glitter and Foil Nail Designs Without Damaging Nails?
You’ll soak your nails in acetone for 10-15 minutes to soften the polish. Then you’ll gently push off the glitter and foil with a wooden stick. You won’t scrape harshly, which’ll protect your nail beds from damage.
What Base Coat and Top Coat Should I Use for Summer Designs?
You’ll want to use a sticky base coat that grips your nail polish and a glossy top coat with UV protection. Choose formulas specifically designed for summer to prevent chipping in heat and water. They’ll keep your beachy designs vibrant longer.
Conclusion
You’ve got endless summer nail possibilities at your fingertips. Whether you’re drawn to soft pastels or bold coral-and-gold combinations, these designs deliver. Mix minimalist seafoam stripes with glitter accents for sophisticated versatility. Apply gel base coats before any design to guarantee longevity through beach days. You can’t go wrong choosing styles that match your personal aesthetic and lifestyle needs.